Project planning process done right: 10 essential steps
10 min read
A project plan isn’t about predicting every hour of the journey. You don’t plan a road trip by deciding exactly where you’ll stop at 2 PM three weeks from now. You pick a destination, sketch the route, and then adjust as you go because the context keeps changing. Projects work the same way. A good project planning process keeps the team moving in the right direction without pretending that nothing will go south.
We've put together a simple flow of ten project planning steps that keep projects humming along without overcomplicating them. We’ll cover what to include in your project management plan, how it fits into the project lifecycle, and how to keep it execution-focused. And as a bonus, if you’re already managing work in Jira, you’ll probably be curious to know how to iron out the planning workflow there.
TL;DR:
- Strategic project planning is important because it turns a vague initiative into a clear project plan with defined project objectives, project scope, timelines, resources, risks, and success criteria.
- A solid project plan connects five essentials: what you’re trying to achieve, what’s in and out of the project scope, how work is sequenced on your project schedule, how resources are managed throughout the project lifecycle, and what success looks like for this project.
- You don’t need a heavy stack to get started. A clear communication plan and the right project planning tools, like templates, checklists, and dedicated software, are often enough to achieve project success and keep project progress visible.
What is a project plan?
A project plan is the document where all key decisions about a project are captured and turned into a clear, actionable plan for the team. It brings together what you’re trying to achieve, what work needs to happen, who is doing it, when it happens, and how you’ll know things are on track.
If you think in project management terms, your project plan sits above individual issues. It connects the dots between project goals, project scope, timelines, resources, risks, and communication within your entire project.
It’s also your baseline for project monitoring and change. In other words, the project plan serves as a reference point for the whole project management lifecycle, helping you see whether you are moving toward your project aims or drifting away from them. Done right, it becomes a single control panel that gives you everything you need to answer the basic questions from key stakeholders at any point: “What are we doing?”, “When will we be done?”, and “Are we still on track?” As soon as reality kicks in and something shifts — scope, dates, project budget, or team members — you compare it to the plan instead of arguing from memory.
That’s why plans don’t have to be perfect; they just have to be clear and honest enough to serve as a reliable reference point throughout the project management life cycle. Think of it as your project blueprint – a single document (or structured set of documents) that guides decision‑making and keeps everyone aligned on priorities.
Key components of a project plan
Most project management frameworks mention different subsidiary plans, but in practice, almost all effective project plans cover the same 5 core components. A successful project plan doesn't have to be exhaustive: you can go as lightweight or as detailed as you need, but these five building blocks are the minimum that make a plan usable in real life.
1. Goals: why the project exists
In terms of project planning, goals manifest as a short, clear description of why the project exists and what you’re trying to change or improve. Get clear on your core project goals and high‑level outcomes so the team understands what a successful project would look like and why it matters.
2. Scope: what is and isn’t included
Scope defines what the project will deliver and, just as importantly, what it will not deliver. This is where you turn goals into concrete boundaries: which customers, markets, features, teams, or processes are in the scope of the project and which are out.
3. Schedule: when things happen
A realistic project schedule shows how work unfolds over time. Be it a simple list or a full timeline, this part of the plan answers what happens when and forms the basis of your detailed project schedule.
4. Resources and ownership: who does what
Every plan needs a view of who is doing the work, how much of their capacity you can rely on, and how you’re allocating resources and budget to support them. This component ties people, money, and systems together so you’re not secretly depending on overcommitment or “free” overtime.
5. Risks and success criteria: what to watch and how to judge
Risks and assumptions tell you what to keep an eye on as the project progresses. They highlight potential risks and where you may need to develop contingency plans or apply specific risk management strategies. Success criteria tell you when you can honestly call the project successful and what to highlight in your final project report and future projects.
For an executive audience, you can keep these components high‑level and visual. For the people actually doing the work, the same components get broken down into more detail, like tasks, estimates, dependencies, and owners, often directly in your project management software.
Project planning phase in the project lifecycle
Effective project management treats planning as a distinct stage rather than optional pre-work. Most methodologies describe a standard project life cycle with five phases: initiation, planning, project execution, monitoring and controlling, and closure. Planning comes second, but it underpins everything that follows.
- Planning vs. Initiation. Initiation gives you the “why”: the business case, high‑level project objectives, and initial constraints. Planning turns that intent into a concrete instruction set, supplemented with a project plan, a defined project scope, timelines, resources, and control mechanisms.
- Planning vs. Execution. Successful project execution depends on the clarity that only a proper planning phase can provide. During project implementation, the team executes what was defined during planning. If you skip this stage and jump straight into doing, your team ends up improvising the planning process mid‑flight. This usually shows up as poor project performance, rework, and burned‑out people.
- Planning vs. Monitoring and Controlling. You can’t control what you haven’t formalized. Without a baseline project schedule, milestones, and defined success criteria, it’s impossible to tell whether the project progresses smoothly or is quietly sliding off track.
- Planning vs. Closure. Planning defines the criteria and baseline for judging success, so closure can be a structured review instead of a vague "We're done.” With a clear plan, you can compare results to scope, schedule, and budget, capture lessons learned, and create a final report that truly informs future projects.
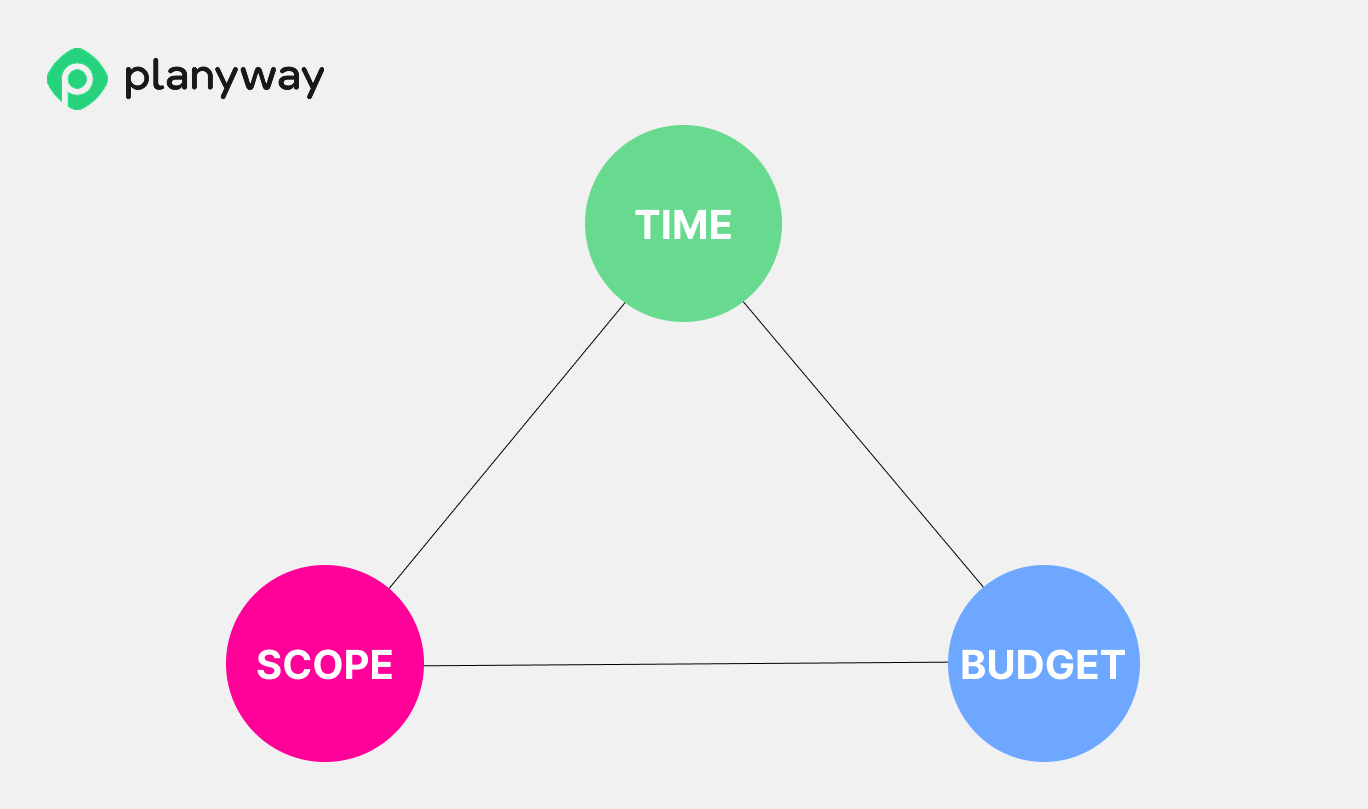
Skipping or rushing the planning phase is how projects fall into the “start from the end” trap. The team jumps into the work without shared goals, then spends weeks renegotiating expectations, adjusting project deliverables, and explaining project failure risks to stakeholders. With planning in place, the team has a baseline they can adjust by moving the project budget, timeline, or scope of the project (the project management triangle) in a controlled way instead of firefighting.
Put simply, the planning phase is your insurance policy. It doesn’t guarantee that everything will go perfectly, but it does guarantee you’ll know which levers to pull when reality diverges from the project plan.
How to plan out your project in 10 steps
Before you start filling in templates or drawing timelines, it helps to know what you’re trying to get out of your project planning ritual. At each step, you’re not just producing another document but answering a set of practical questions: what exactly we’re doing, how we’ll know it’s done, who’s involved, when the work happens, how much it will cost, what might go wrong, and how to keep everyone aligned.
You don’t have to move through these steps in a perfectly straight line. In real life, most project managers loop back a couple of times as they discover new constraints or risks. Use these project planning steps as a structured way to turn a vague idea of the project into a detailed project plan.
Pro tip: In case you need a head start, use our spreadsheet library with 23 project planning templates that cover different aspects of planning and delivery, and can be easily customized to fit your project.
1. Define project goals and objectives
A strong project goal shifts the focus from what you plan to build to the value you want to create for the product, the team, or the user. Start with a clear understanding of the problem you are trying to solve and the improvement you want to make.
If a goal is the point B you want to reach, an objective is the specific, measurable step that gets you there. For example, a goal might be to improve the checkout process, while an objective might be to increase completed purchases by 15% and reduce cart abandonment.
Questions to help you define clear goals and objectives:
- What value will this project create?
- What will change if the project succeeds?
- How will we know we have achieved the intended outcome?
- Are these objectives achievable within the time and resources available to us?
- Do these objectives align with the company’s overall direction?
2. Define the project scope (what is and isn’t included)
The next step is to define the project scope by drawing clear boundaries around the work that needs to be done to achieve the stated goals and objectives. Be firm about what belongs in the project, and just as firm about what does not. Start broad, then narrow the scope as you validate assumptions, review early results, and see what truly moves the project forward.
A few practical tips:
- Keep both an in-scope list and an out-of-scope list.
- Use a single channel for change requests so scope does not grow informally — the main driver of scope creep in otherwise well-run projects.
- Review the scope against the WBS to make sure every piece of work has a clear reason to exist.
- Revisit the scope after early discovery or testing, and remove anything that does not clearly move the project forward.
3. Establish success criteria and quality expectations
Before you can close a project successfully, you need to decide what success actually means. Success criteria are typically tied to delivery time, product quality, business impact, and financial results — but how many you need and which ones matter will depend on your situation.
The key at this stage is to make success visible and measurable before the work starts. A useful way to do this is to separate project success from deliverable quality. Project success tells you whether the project achieved its intended outcome. Quality expectations tell you whether the main outputs are good enough to be accepted, used, and maintained.
To make this step more practical, define acceptance criteria for the main deliverables and spell out what "good enough" actually means. If different stakeholders care about different things, capture those differences early, so the team does not discover them at the end.
4. Identify stakeholders and the project team
Another thing to sort out before the project kicks off is people — who they are and how they can shape the project. Start by mapping all project stakeholders: sponsors, impacted groups, and your core project team. For each person, note what they care about and how involved they need to be. Rather than assuming, ask directly: "What would make this project a success for you?" — and write the answers down. For each core deliverable, one person should own it and be accountable for it.
To wrap this up, put together a stakeholder map and make it visible — both for final sign-off and as a reference throughout the project. This makes it easier to manage expectations and avoid "invisible" decision-makers showing up mid-project.
5. Create the Work Breakdown Structure (WBS)
The most common mistake at this step is jumping straight into tasks. The WBS holds together better when you begin with the main outputs of the project, then decompose them into components and finally into tasks.
There's no universal rule about how deep the WBS should go. A good sign that you've reached the right level is being able to attach a time, cost, and owner to a task with reasonable confidence.
Once the structure starts to take shape, it's a good moment to check whether anything important has slipped through — things like reviews and approvals, testing cycles, or stakeholder updates. These take real time and belong in the WBS.
The WBS will change as the project moves forward, so make sure those changes get captured down the road.
6. Estimate costs and determine the project budget
Once the working skeleton of the project is in place, it's time to put numbers to it. Before translating work into costs, estimate how much time each major work package will take. Effort drives cost, and cost is what you translate into a budget, not the other way around.
Try to get those estimates from the people actually doing the work. Any practicing professional's estimate of their own task is always more accurate than figures drawn from experience or market benchmarks. And don't overlook non-labour costs like software licenses, third-party services, equipment, travel, training, and others.
After bringing everything together into a project budget, make sure to build in a contingency reserve of 10-20%. If the numbers don't fit, the more clear-headed move is to adjust the plan itself, rather than squeezing the estimates until they look acceptable.
7. Develop the project schedule and milestones
Use the WBS to build a realistic timeline. Decide the order of work, identify dependencies, and highlight key milestones, then put the work on a calendar or timeline.
If you manage work in Jira, Planyway turns your existing work-item structure into a cross-project timeline. Instead of building schedules manually, you can visualise epics, stories, and milestones across all projects in a single Gantt-style view, keep dependencies visible, and adjust plans by simply dragging work items — with everything syncing back to Jira in real time.
8. Plan risk management and mitigation
The most reliable source of risks is history. Start by sourcing the most probable patterns from post-mortems, retrospectives, and documents from past projects.
Another great tool is a pre-mortem. Before the project starts, ask the team to imagine it's already over — and it failed. Then work backwards: what caused it? This approach bypasses the optimism that shapes most planning conversations and brings the uncomfortable risks into the open.
One more useful source is the experience of more established industries. Aviation, construction, and others have spent decades cataloguing what goes wrong. Scanning a generic risk checklist for software or product projects takes 20 minutes and reliably surfaces two or three things the team hasn't considered.
Finally, every assumption the project rests on is a potential risk in disguise. Going through the project scope and flagging every "we assume" or "the client will" — then asking what happens if that turns out to be wrong — is one of the more practical ways to build a risk list that reflects reality.
Together, these inputs help you build risk management strategies that are grounded in real patterns rather than generic assumptions.
9. Assign resources and define roles
Match the plan to real people. Assign owners to key deliverables and work packages, check workloads, and adjust the schedule or team where capacity doesn’t line up with the ambition. Make it clear who is responsible, who supports, and who just needs to stay informed.
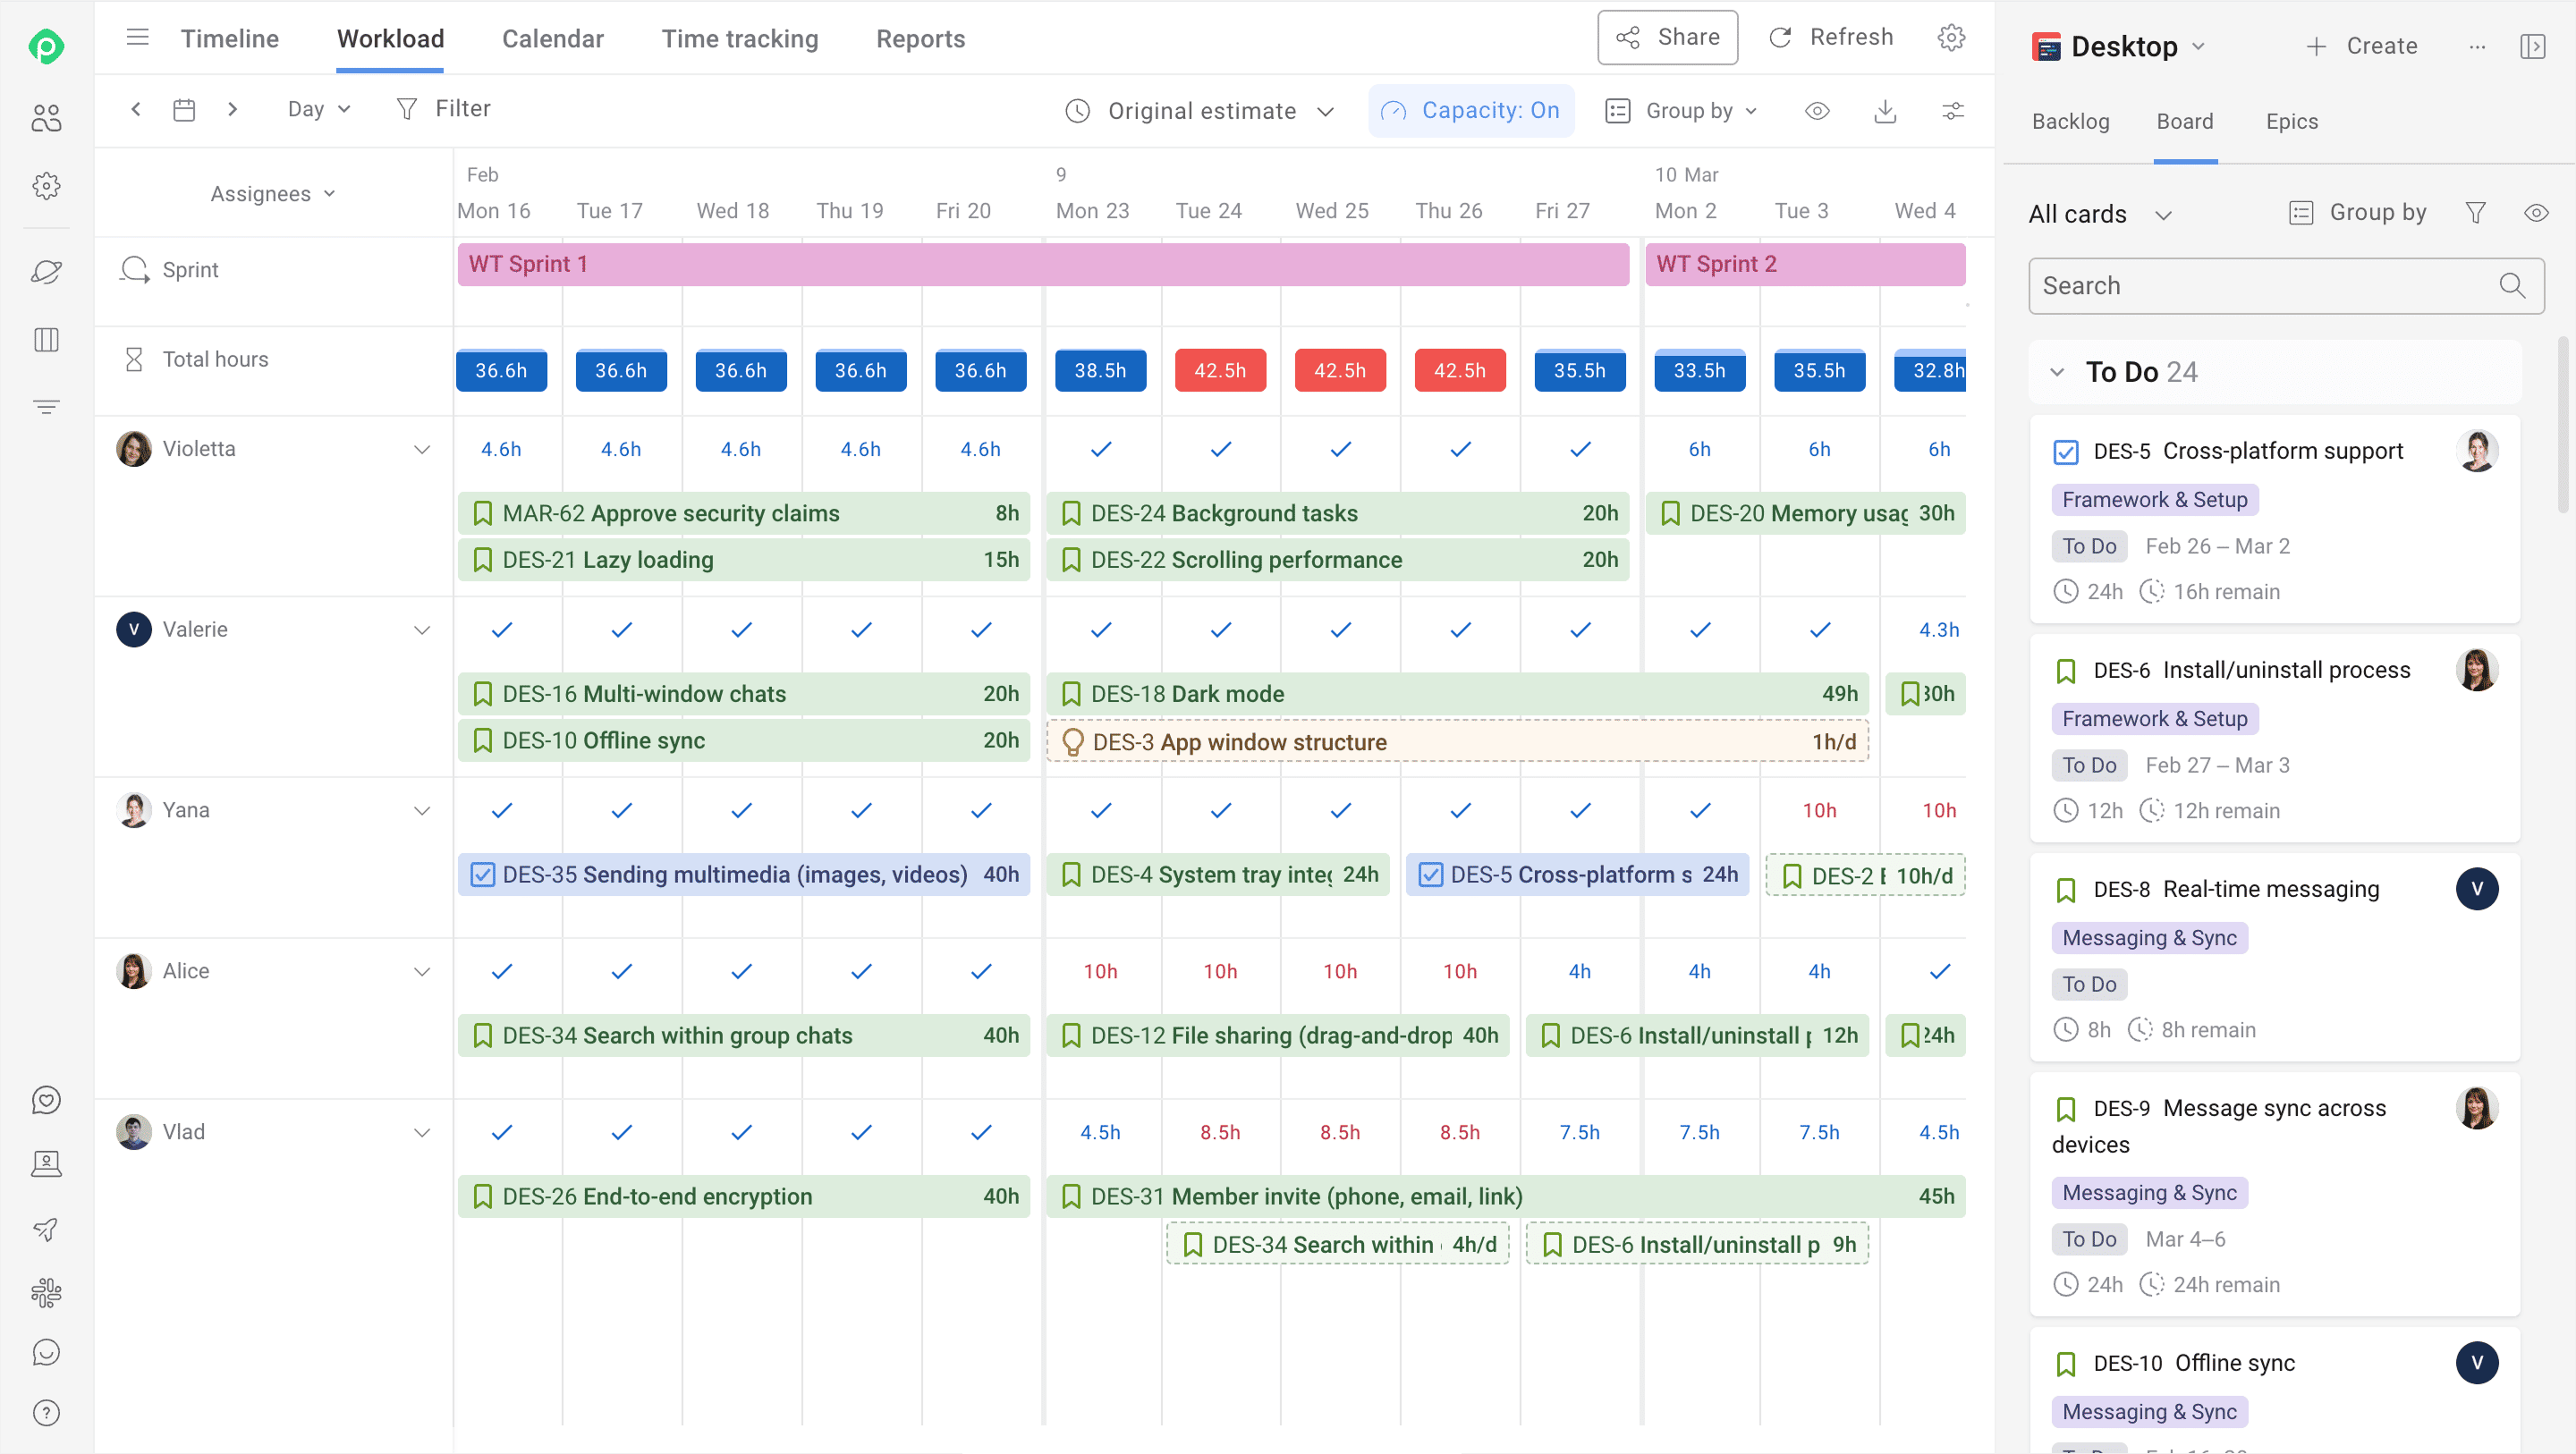
Again, if Jira’s your system of record, you can use Planyway to plan workload at the team and individual levels across all projects in one view, spot overloads early, and reassign work via drag-and-drop.
10. Plan communication and project monitoring
As a final step, decide how you'll keep everyone aligned and how you'll track progress. Define who needs which updates, how often, and through which channels. Choose a small set of indicators or views — boards, dashboards, reports — that you'll check regularly to see whether the plan still matches reality and where adjustments are needed. As with every step in this list, write it down and make sure the rules you set are actually followed. Otherwise, all the planning work that came before it won't amount to much.
At this point, you have a detailed project plan: project scope, project objectives, project schedule, project budget, risk management plan, resource allocation, and communication plan.
Tools, techniques, and artifacts you will actually need for effective project planning
If you’ve been close to real-world project management for a while, you already know that there’s no single “correct” methodology, stack, or project planning tools set. And the choice of the setup always depends on what you’re trying to achieve. Different planning activities require different approaches, and most teams end up combining lightweight techniques with systems that keep plans connected to day-to-day work.
Scope definition techniques
For scope, teams usually rely on a small set of lightweight artifacts:
- a project charter to capture context and goals,
- a requirements document to describe the core needs,
- and a scope statement that spells out what the project will and will not deliver.
Together, these documents set the boundaries within which it makes sense to talk about schedules and resources.
Work breakdown and sequencing
Once the “what” is clear, large goals are broken down into smaller pieces. Work Breakdown Structures, lists of milestones, and simple dependency mapping help turn a big, abstract initiative into manageable chunks of work with a clear execution order. Without this structure, any schedule quickly turns into noise.
Timeline and capacity planning
After the work is broken down, attention shifts to “when” and “with which capacity”. Roadmaps, timelines, and workload views are used to estimate delivery windows and to check whether the team actually has enough bandwidth to support the chosen plan. This is where a project stops being a nice slide and starts matching reality.
Risk and decision tracking
Risks and key decisions need a home. A simple risk register, a decision log, and a list of assumptions are usually enough to host this information. Together, those artifacts reduce the number of unpleasant surprises and make it easier to understand, later on, why certain choices were made when the project plan was created.
Project management systems
All of these artifacts rarely live in a single application. Strategy and context might sit in Confluence, Notion, or Google Docs, while day‑to‑day work is tracked in Jira, Asana, or another project management system.
The important part is having one place where everything comes together and where tasks, assignees, timelines, and project progress are always up-to-date. For example, for some teams, the stack ends up being a combination of Jira + Planyway + Confluence, which all work within the same ecosystem. In this case, Jira acts as the system of record, Planyway handles planning and visualization, and Confluence captures context and documentation.
However, the exact combination matters less than the fact that it forms a clear and feasible system of record for the project.
Best practices for project planning, based on our hard-earned experience
Templates and frameworks are useful, but most of what makes a plan work comes from practice — and from paying attention to where real projects tend to break. We’ve curated 4 best practices that really move the needle — in our humble opinion, of course.
Start from the real context, not from a template
Most projects don’t start from zero. There are expectations already set by customers or leadership, half‑agreed timelines, existing systems, and habits the team won’t change overnight. So, before you touch any template, it’s worth understanding:
- what has already been promised to stakeholders;
- which dates, budgets, or rules are genuinely fixed;
- which other projects or teams do you depend on — and which depend on you?
Planning with this context in mind makes the plan more honest and minimizes painful rework later.
Keep the plan lean and close to execution
When people hear “project management plan”, many picture a large document that looks impressive at kick‑off and then gathers dust. In reality, the useful part of the plan mostly lives where execution lives: in your boards, timelines, and task lists. Supporting documents only help if they make that layer clearer.
A simple way to keep things lean is to decide what belongs where:
• The execution layer sits in your work management system (for example, Jira), where tasks, owners, dates, and status change every day.
• The context layer is kept in a small set of pages — a short project overview, goals, scope, requirements, and the reasoning behind key choices.
• The control layer collects the moving parts that affect direction: risks, issues, and change decisions.
Once each of these has a clear home, the plan stops pretending to be a single all‑purpose file and becomes a set of connected artifacts that actually support day‑to‑day work. Keeping the plan close to where work actually happens is one of the most reliable levers for successful project delivery.
Respect dependencies and constraints before polishing the schedule
A very common failure pattern looks like this: someone builds a beautiful, detailed timeline and only afterwards discovers a fixed go‑live date, a long vendor lead time, or a dependency on another team that changes everything. The schedule was technically correct but built in a vacuum.
To avoid that, teams usually map constraints and dependencies before getting attached to specific dates:
• where your project is on the critical path for other initiatives;
• which external teams, suppliers, or events you rely on;
• which dates are true hard deadlines, and which are internal targets.
A schedule that reflects those constraints may look less elegant on paper, but it has a much better chance of surviving contact with reality.
Treat the plan as a living baseline
Another trap is thinking of the plan as something you either rewrite from scratch or never touch again. In practice, the plan starts drifting from reality as soon as people begin doing the work, and that's okay.
It’s usually more effective to treat the plan as a baseline you keep adjusting in small steps: move a milestone when needed, add or downgrade a risk, tweak one person’s workload, and record a decision that changes scope. Regular, lightweight updates keep the plan close to what is actually happening and make it a useful reference point instead of a snapshot from the past.
As a side effect, those small updates build a simple history of the project. Later, when you look back, it’s much easier to see which assumptions didn’t hold, where new constraints appeared, and what you’d like to handle differently on the next project.
How Planyway can help you plan and manage your projects in Jira
If you use Jira as your source-of-truth project management software, you know it’s a pain to plan anything there because the system doesn’t provide a convenient high-level view for structuring plans, dependencies, and resources.
As a visual cross-project planning interface within Jira, Planyway fills that gap. Planyway allows you to plan work at any level: from strategic initiatives to epics and tasks. The app bundles portfolio management, roadmapping, resource management, and time tracking into a single, flexible interface, which works in sync with Jira data.
With Planyway, you can:
- See all your projects, epics, stories, and milestones on a unified, cross-project timeline. You can use this as your Gantt-like view to manage complex dependencies and releases, or switch to a strategic roadmap to communicate progress to stakeholders.
- Get a portfolio-level view of all initiatives by turning epics into a structured portfolio table, grouped by project, team, or time period.
- Plan capacity at the individual and team levels and rebalance work with a simple drag-and-drop based on current workload.
- View all tasks, milestones, and deadlines across projects in one unified calendar, so teams always stay aligned on “what’s due when”.
- Track delivery performance with built-in time reporting — log time in Jira, compare estimates vs actuals, and monitor delivery health without extra tools.
Perfection is never the point of project planning, but direction is
Perfection is never the point of project planning. No plan will pan out exactly as written: timelines shift, scope changes, and things that seemed certain at the start turn out to be unrealistic assumptions. What a good plan actually gives you is a shared baseline — a common understanding of what the team is building, why, and in what order.
That baseline forms a clear picture that is much easier to adjust along the way without losing sight of the original goals. And that's what good planning is really about: giving the team the clarity, calm, and coordination they need to reach the finish line on time and to treat project completion not as a scramble, but as a structured handoff.
FAQ
In classic project management, planning is one of the five phases in the project lifecycle: initiation, planning phase, project execution, monitoring and controlling, and closure. Within the planning process itself, you can think of five mini‑stages: define project objectives and project scope, design the project schedule, plan resource management and project budget, design risk management and controls, and agree on a management plan and communication.
The first stage in planning is always understanding why the project exists and what goals and objectives you’re trying to achieve. Only then does it make sense to define project scope and start building a work breakdown structure and project schedule; otherwise, you risk optimising a project planning process that doesn’t solve the right problem.
A solid project plan starts with clarity on goals and scope — what the project is trying to achieve and what falls outside its boundaries. From there, the work gets structured: success criteria are defined, stakeholders are mapped, and the full scope of work is broken down into clear, manageable pieces. Once the structure is in place, the budget is estimated and approved, and risks are identified and planned for. A realistic schedule then ties all the pieces together, forming the tactical layer of the project. The plan closes with resource allocation and a communication setup that keeps everyone aligned as the work unfolds.
Your choice of a project planning tool stack depends on where your work already lives and how complex your project planning process is. For small, simple projects, spreadsheets and basic task tools might suffice. For larger or ongoing work, teams usually adopt dedicated project planning tools or project management software. If you’re already in Jira and need a clear visual project plan with the project’s timeline, dependencies, and capacity, adding a planning layer like Planyway helps you keep project plans and their implementation aligned.