How to add multiple assignees in Jira? 6 methods
4 min read
Most probably, you’re now staring at a Jira ticket that clearly calls for multiple people’s input, but the platform stubbornly lets you assign only one name to the “Assignee” field. Yep, that’s one of the most frustrating limitations Jira has, and it’s a common question lifted by community discussions.
So how do you break free from the single-assignee bottleneck without abandoning Jira altogether? In this post, we’ll explore practical workarounds that let you effectively manage multiple assignees in Jira, keeping everyone accountable without breaking your workflow.
Can you allocate tasks to multiple assignees in Jira?
By default, Jira doesn’t allow assigning multiple users to a single work item. Each issue can have only one official assignee, which helps keep accountability clear and prevents the “everyone owns it, so no one owns it” problem. However, there are several workarounds you can follow in Jira natively or expand to third-party solutions like Planyway.
6 proven ways to manage multiple assignees in Jira
Below, we’ve listed all possible ways to overcome Jira limitations with their pros and cons to help you navigate among available options.
Option 1: Break down a main task into subtasks (the classic)
Using subtasks for collaborative assignments is probably the most popular tip you’ll come across, and for a good reason. It’s the most natural way to stay within Jira’s logic and style while still involving several people in the same task.
How it works
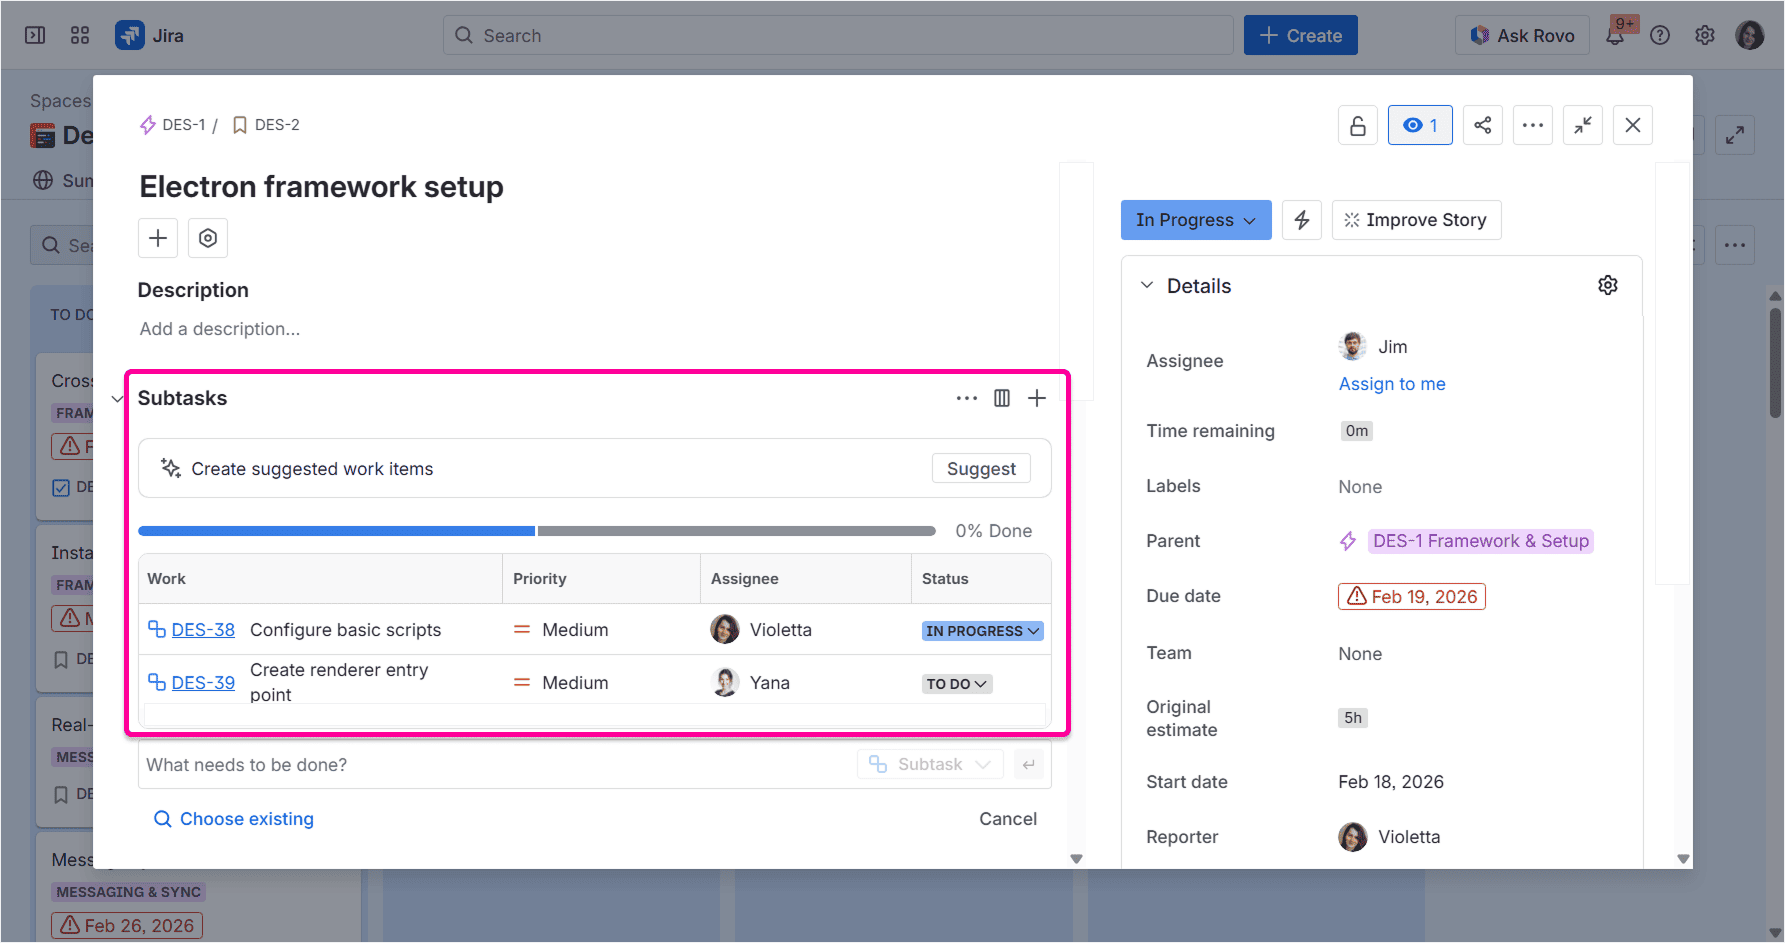
To use this workaround, you need to keep the main work item as the parent one with a primary assignee and create separate subtasks for each person involved. Each subtask gets its own assignee, status, and deadline to make ownership clear.
In this case, everyone knows their turf, while the parent work item still acts as a single source for tracking the overall progress.
Limitations of this method
Band-aiding with subtasks works only when multiple people truly own different parts of the work. For example, with larger multi-step tasks, like cross-functional work, same feature delivery, content production, design implementation, or QA, that quick fix should suffice.
However, subtasks are extremely hard to track visually as they always live inside the parent item. Therefore, things may become harder to scan and maintain even for such projects.
Option 2: Use Planyway for smooth multi-assign planning in Jira
[Planyway](https://marketplace.atlassian.com/apps/1221297/advanced-roadmaps-resource-capacity-planning-time-tracking?hosting=cloud&tab=overview) is a Jira plugin for project planning, resource management, and time tracking. Besides all its mighty views and features, it also allows you to split a single Jira issue across multiple team members without creating a mess of duplicate items or endless subtasks.
With Planyway, you can split tasks into parts and distribute them across different teammates right on the timeline. Each person gets their own piece with a clear deadline and responsibility. Also, since Planyway is essentially a resource management tool, those work item parts can get their own estimates and participate in the workload calculation.
Try Planyway and manage multi-assignee work visually inside Jira
Splitting into assignable parts on a timeline is especially useful when one task needs several people working on it at different stages or in parallel, or when it's important to track the whole workflow visually. For example, a developer might work on implementation from Monday to Wednesday, QA could be scheduled for Thursday, and a project manager can review the final result on Friday. The Jira issue stays the same, but the actual work is distributed across the team much more clearly, right on the timeline.
How to enable multi-assign with Planyway
This is what you’ll need to do to set up multi-assign with Planyway:
1. Open Planyway inside Jira.
2. Choose the Jira spaces you want to plan.
3. Open the timeline grouped by users or the workload view.
4. Find the issue that requires several people’s input.
5. Right-click the issue and choose to multi-assign it or split.
6. Choose another responsible person, adjust the duration and deadline.
7. If you wish to manage the workload, set the estimate for the part. It will automatically be included into the workload calculation.
Limitations of this method
There aren’t many real limitations here. The only thing you need to do is install the Planyway plugin, which usually takes just a few minutes.
And that small setup step gives you more than just multi-assign planning. You also get access to resource capacity management, roadmaps, and time tracking — all synced with your Jira data.
So, if your main problem is that Jira doesn’t let you assign multiple people to one issue, Planyway gives you a cleaner workaround without forcing your team to overload the board view with sub tasks or create duplicate issues.
Option 3: Add collaborators as watchers for lightweight collaboration
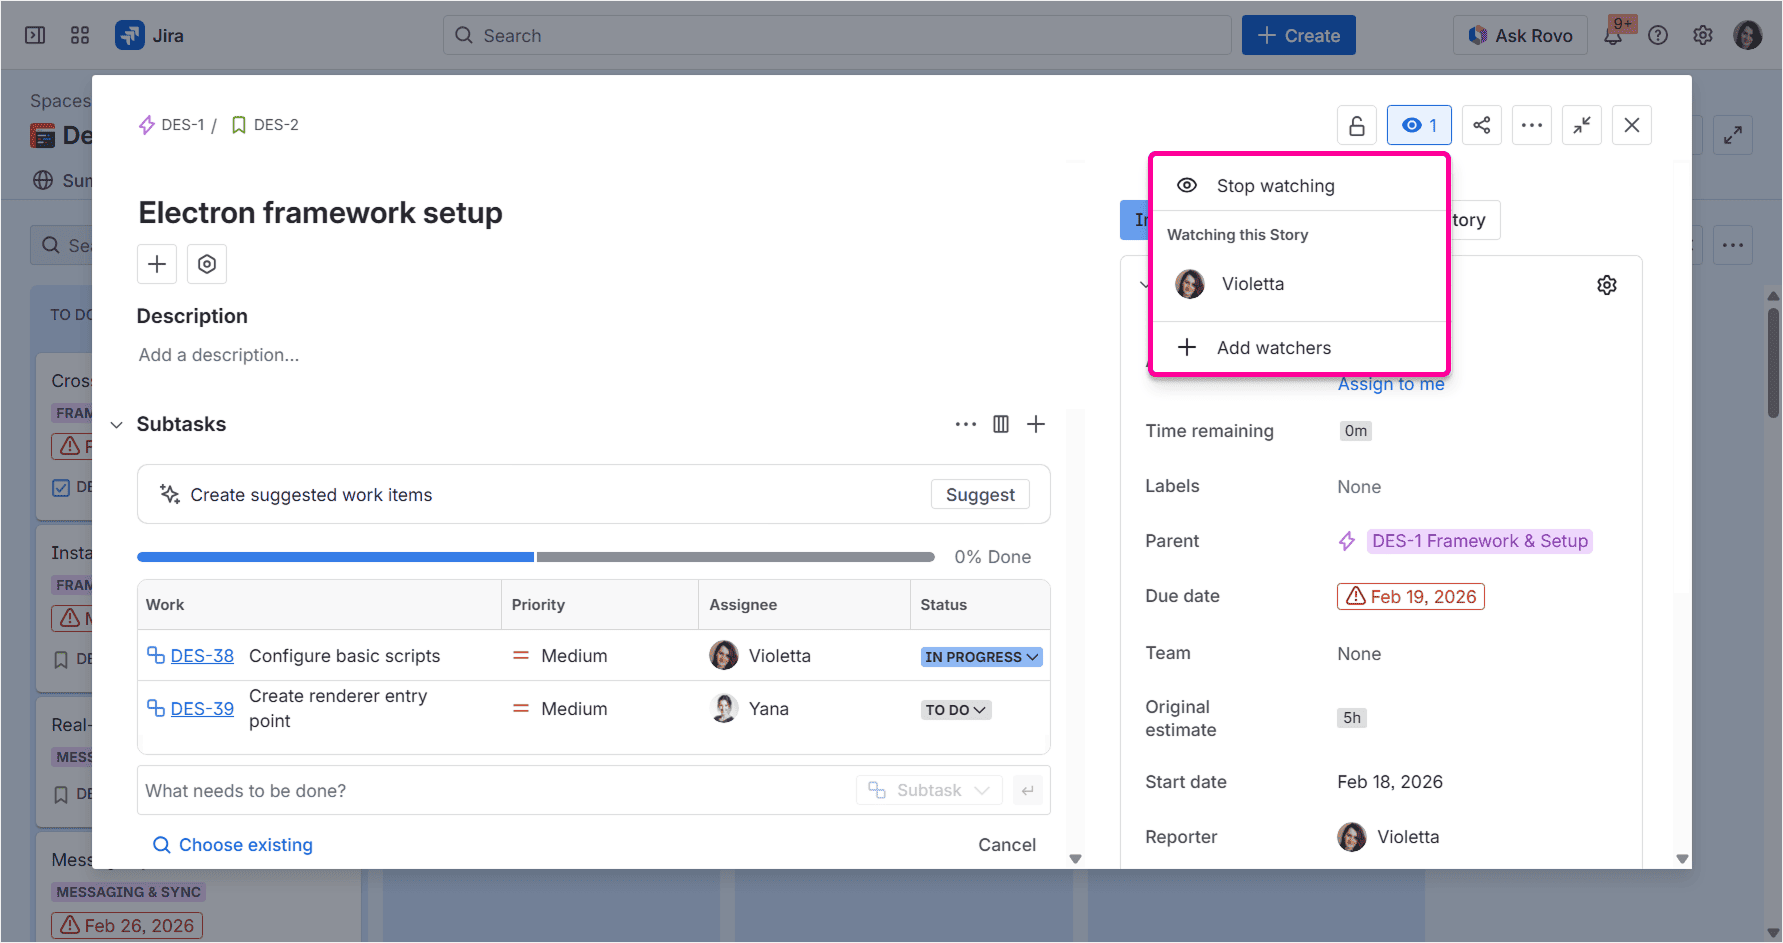
A Watcher is a separate Jira role that automatically updates people on a work item. Watchers are not actually assigned to the issue. They simply stay in the loop. This makes watchers a good option when several people need visibility into the same work item, but only one person is responsible for moving it forward.
The Reporter and Assignee usually become watchers by default, while other teammates who need visibility must be added manually.
As an alternative, you can also tag collaborators with @mentions in the comments or use comments to delegate smaller actions. This works well for quick, one-off pings, but comments are harder to manage because they can easily get buried in the issue history.
How it works
There are three ways to add watchers to a Jira issue:
1. Add watchers manually
Open a work item and find the Watchers field in the details panel. Click next to it and select the person you need to add.
2. Add watchers via automation rules
If you often need to add the same people as watchers, automation can reduce manual work.
For instance, you can create a rule that automatically adds a QA leader as a watcher when a work item moves to “Ready for QA”.
3. Add watchers via API or scripts
For larger-scale operations, you can add watchers through the Jira API or custom scripts. It’s definitely not the easiest option for everyday use, but still inevitable for technical teams that need to update many work items at once or connect Jira with internal systems.
Limitations of this method
Watchers can improve visibility, but they don’t solve the core multiple-assignee problem. A watcher doesn’t have ownership of the issue, doesn’t appear as an assignee, and won’t be reflected in workload or capacity planning. So while this method keeps people informed, it doesn’t clearly show who is responsible for which part of the work.
There’s also a notification risk. When too many people are set as watchers, task updates can quickly become just noise they tend to ignore. Another limitation is that you can see who follows the issue, but not what each person should do, when they should do it, or how much effort is expected from them.
Option 4: Track additional assignees via custom fields
Instead of trying to change the default **Assignee** field, you keep one official owner and add everyone else to a custom field. This gives your team a visible additional field to record who else is involved without changing Jira’s core single-assignee logic.
How it works
To set this up, a Jira admin needs to create custom fields, usually using the User Picker or Multi-user Picker field type.
A typical setup looks like this:
1. Open Jira settings.
2. Open Issues.
3. Select Custom fields.
4. Click Create a new field with a name like Additional assignees or Contributors.
5. Choose a multi-user field type.
6. Add the field to the relevant issue screens.
Once added, this field can be used in issue views, filters, dashboards, and reports.
Limitations of this method
People listed in a custom field won’t automatically get the same ownership logic as the main assignee. Depending on your Jira setup, they may not receive the same notifications, appear in the same workload reports, or be treated as responsible users in boards and sprint planning.
There’s also a maintenance problem. If the field isn’t updated regularly, it can quickly become outdated. Someone may be listed as a contributor even after their part is done, or not appear at all, even though they’re actively working on the issue.
Another downside is that this approach often requires admin setup. For small teams, that may be fine. But in larger Jira environments, adding custom fields can come with unnecessary approvals, screen configuration, permissions, and coordination with Jira admins.
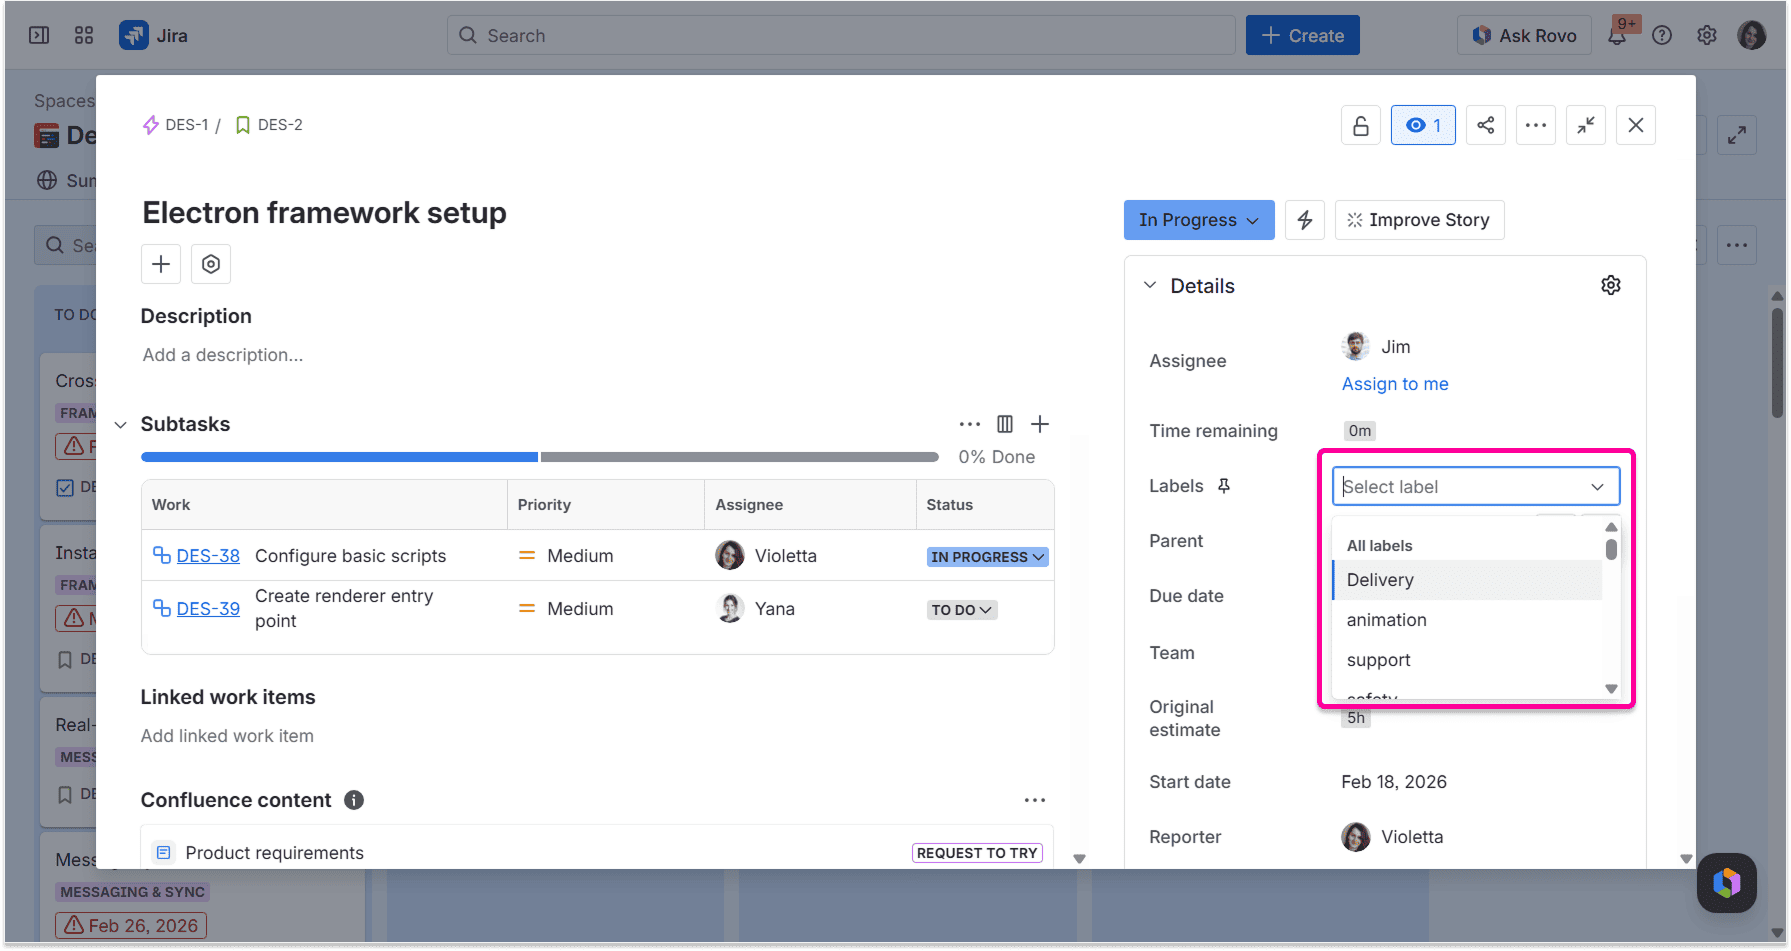
Option 5: Use labels or components for team-level ownership
Another way to deal with shared responsibility in Jira is to assign ownership to a team, department, or workstream rather than to an individual. This can be done with Labels or Components.
This method works well when the issue doesn’t need several named assignees, but it does need to be clearly connected to the right team. From there, the team can decide who takes the work or how to split it internally.
How it works
You can either use labels or components to set up this flow.
Labels are flexible tags that can be added to Jira issues. They don’t require a complex setup, so team members can add them directly to issues and then use filters or dashboards to find relevant work.
Components are more structured. They are usually configured at the space level and represent parts of a product, system, or team area. For example, Jira projects may have components like Mobile app, API, Billing, UX, or Support.
Components are especially useful when you want to route work to specific teams or areas. In some Jira setups, each component can also have a component lead or default assignee, which makes issue ownership more predictable.
A typical component-driven workflow could look like this:
1. Create components for teams, product areas, or workstreams.
2. Add the relevant component to each issue.
3. Use board filters or swimlanes to group work by component.
4. Let the responsible team review the queue and decide who takes each issue.
5. Keep one official assignee for execution, while the component shows the broader ownership area.
This way, Jira still has one assignee, but the issue is easier to find and manage at the team level.
Limitations of this method
Labels and components are useful for organizing work, but they don’t create real multi-assignee logic. More specifically, they don't explain who is responsible for each part of the issue. You still need a separate process to decide who does what.
Labels can also get messy over time. Since they are easy to create, teams may end up with duplicates.
Components are more controlled, but they usually require admin or space-level configuration. They also work better for stable teams or product areas, not for temporary collaboration between several people.
Option 6: Keep issues unassigned and use components as shared queues
Another approach is to leave the Assignee field empty and treat Jira issues as items in a shared team queue. Instead of assigning work upfront, you use components, labels, or board filters to send issues to the right team, and then team members pull work when they’re ready.
This approach is especially common in Kanban, support, maintenance, and operations workflows where work arrives continuously and priorities may change throughout the day.
How it works
A typical flow looks like this:
1. Create components or labels for teams or work areas.
2. Configure board filters so each team can see only the issues relevant to them.
3. Leave the Assignee field empty when the issue is created or during triage.
4. Let team members pick issues from the queue when they have capacity.
5. Once someone starts working on an issue, they assign tasks to themselves.
6. The assignee then becomes responsible for moving the issue forward.
This method works well when the team has a strong habit of checking the queue regularly. It also fits teams that use WIP limits, because people can pull new work only when they finish something else.
Limitations of this method
The biggest limitation is that unassigned issues can easily be ignored. If no one is directly responsible for an issue, it needs a clear queue owner, triage process, or team agreement. Otherwise, work may sit untouched because everyone assumes someone else will take over.
This method also gives less visibility into future workload. Since issues are not assigned in advance, it’s harder to anticipate who will be busy next week or whether someone is about to be overloaded.
The bottom line
Jira’s single-assignee logic can feel limiting, but it exists for a reason. When two or three people “own” the same issue, ownership often becomes blurry. Everyone is involved, but no one is clearly responsible for making sure the work actually gets to the finish point.
That’s why the best setup is usually a mix of both: keeping one main assignee as the person accountable for the issue, and using the right workaround to show everyone else involved.
If you need to plan one Jira issue across several people, see who is working on what, and understand how the task fits into your team’s capacity, a planning layer like Planyway gives you a much cleaner option. It allows you to keep Jira as the single source of truth while making collaboration visible on a timeline, workload view, or calendar.
FAQ
In Jira, multiple assignees are not available by default. Jira’s native Assignee field supports only one person per issue. This means one user is officially responsible for moving the task forward.
However, you can work around this limitation by using subtasks, watchers, custom fields, labels, components, shared queues, or third-party add ons like Planyway to plan work across several teammates.
There are several ways to support multiple assignees in a Jira issue both team managed and company managed projects. You can create subtasks and assign each one to a different teammate or dd collaborators as watchers so they receive issue updates without becoming the main assignee. For quick, one-off requests, you can use @mentions in comments to bring teammates into the conversation.
If you need a more structured setup, you can create a custom multi-user custom field. You can also use labels or components to show team-level ownership. For visual planning, a tool like Planyway can help split one Jira issue across multiple team members visually.
Yes. Planyway gives you the ability to plan a Jira issue to more than one assignee without creating duplicate tickets or overloading your board with subtasks.
You can keep the original Jira issue as the main source of truth, while assigning parts of the work to more than one person on a timeline or workload view. This helps you see which participants are involved, when they’re working on the Jira task, and how it affects team capacity in project management.