How to get your resources right with Jira capacity planning (+ practical workarounds)
10 min read
"Do we have enough hands to deliver on what we’ve promised?” is arguably the most terrifying yet important question every team mulls over after committing to stakeholders for a Q3 release. Been there, done that.
If you're already running Jira, the obvious move would be looking for the answer there. After all, that's where your sprints are planned, work is tracked, and team capacity (at least, in theory) is visible. And to be fair, on premium tiers, Jira capacity planning gives you a lot to work with.
But that’s only half the story. Here are our five cents on the subject — the official way to do Jira capacity planning and some shortcuts that actually work in the trenches.
TL;DR
- Capacity planning in Jira is only available in Jira Premium via Jira Plans, but even there, it’s limited to team-level planning and doesn’t track individual capacity.
- Common Jira capacity planning limitations include the inability to track individual workloads, account for vacations or other time off, and do dynamic task reallocation.
- Capacity planning in Jira can be significantly extended with an additional capacity planner. These solutions provide more detailed, visual views of team availability across projects and help align plans with real resource capacity — all without requiring an upgrade to Jira Premium.
What is capacity planning in Jira?
Capacity planning helps figure out how much work your team can realistically handle and gives you a clear view of the resources you have. This helps your team deliver without slipping deadlines and satisfy future demands without burning out.
Capacity goes hand in hand with the team’s velocity. While velocity refers to the historical delivery rate of the team, capacity is what the team estimates they can deliver for the upcoming period at a sustainable pace, assuming they maintain their historical velocity.
Why it pays to do capacity planning
Capacity planning as a concept is sometimes frowned upon, mainly because it’s viewed as a top-down "accountability" tool. However, a more positive perspective on capacity planning is to think of it as a team-owned forecasting/reassurance tool that provides relative estimates (either in hours or story points) and helps the team agree on how to reach that number.
The benefits of team capacity planning are manifold, including:
- Assessing your team’s overall capacity
- Prioritizing and scheduling work items to meet deadlines
- Preventing capacity glut and thus reducing the odds of missed sprint goals
- Giving everyone on the team a clear understanding of what’s expected
- Empowering a sense of responsibility in each team member
The headline is, capacity planning in tools like Jira is much more than just managing resources. It serves a more important goal, which is building a predictable delivery model. When teams see their workload and remaining capacity visualized, it’s easier to set realistic deadlines and avoid potential bottlenecks.
How to do capacity planning in Jira? The official way
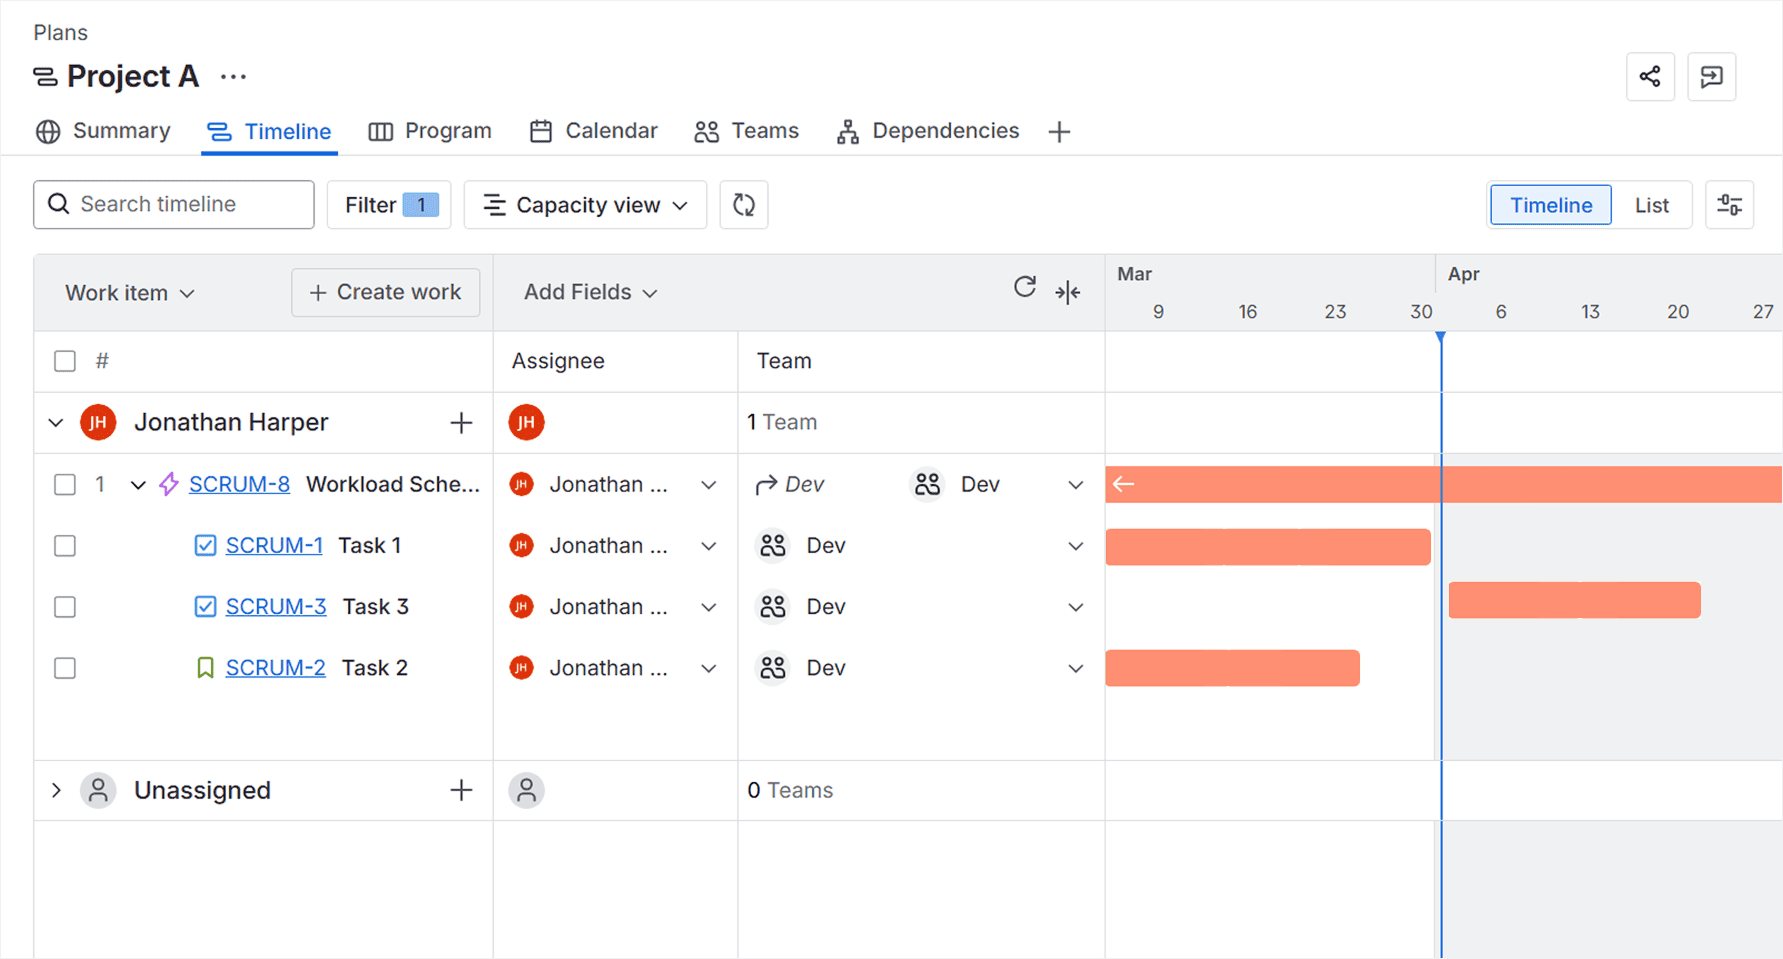
The first thing to be said is that effective capacity planning in Jira is only available on Jira Premium with its Jira Plans (formerly known as Advanced Roadmaps). Jira Plans lets you plan your team capacity as well as sprint capacity (for Scrum boards) to make sure you have enough resources to achieve project goals. But keep in mind that Jira Plans strictly focuses on a high-level planning layer and doesn’t dive into detailed, individual-based capacity management.
If you decide to upgrade, here are a few tips and tricks you can use to optimize capacity planning:
- Scenario planning. Create different versions of your plan to see how changes in scope or resources might affect your timeline. This helps you prepare for potential shifts without disrupting the entire project.
- Dependency mapping. Visualize dependencies between various work items. This will highlight bottlenecks, allowing you to catch risks early.
- Team-level capacity management. Assign tasks to teams and visualize their current workloads directly on your timeline, so you never commit to more work than your teams can handle.
- Cross-team visibility. Get a clear overview of how multiple teams' workloads are aligned across projects.
Where you can hit a bump with Jira capacity management
Here’s the thing: if you only need to manage team capacity, you can do with the native Jira Plans. However, if your goal is to track user capacity, while also keeping tabs on real-time workloads, redistributing tasks, or balancing across multiple teams dynamically, Jira Plans might not live up to your expectations, even in its premium form. As we’ve mentioned earlier, it’s not like it’s a dedicated capacity planning tool anyway.
Bump #1: Individual capacity planning is not available
Jira Plans is based on team-level planning, not individual-level capacity. This means you can’t easily track how much work a specific team member can handle, especially when dealing with varying skill sets, part-time schedules, vacations, or time off.
Bump #2: Visual load balancing isn’t strong
While Jira Plans offers a basic visualization of the team’s workload, it’s not as dynamic or intuitive when it comes to balancing tasks. You won’t find heatmaps or more advanced visual cues that clearly indicate whether you have resource overload or if tasks are evenly distributed across the team.
Bump #3: Kanban / non‑sprint teams often struggle
If your team members use Kanban boards or work outside of traditional sprints, Jira Plans doesn’t offer a great fit for capacity project planning. This is because Jira Plans is primarily designed around sprint-based planning and relies on timeboxed iterations, velocity, and capacity assumptions per sprint.
As a result, there’s no natural structure for allocating capacity over flexible periods, which makes it harder to visualize and manage resources when you're not working within fixed sprint cycles.
Bump #4: Dynamic task reallocation is manual
If you need to reassign tasks quickly based on workload shifts or resource changes, Jira Plans won’t make it at a click. There’s no automatic task redistribution, so you will need to adjust and reassign work back in Jira issues, which can slow things down and lead to human error.
Bump #5: Cross-team capacity visibility exists, but it’s high-level
Jira Plans allows you to see resource allocation across teams, but it’s a high-level view. If you need a detailed, granular breakdown of how resources are distributed across different projects or teams, Jira falls short, unless you add dedicated capacity planner plugins on top of it.
How to work around native Jira capacity planning limitations with Planyway
If upgrading your Jira plan for a relatively high-level capacity layer doesn’t feel worth it (or simply doesn’t solve your day-to-day challenges), there’s another route: using a dedicated capacity and resource planning tool on top of Jira. Yes, we’re talking about our very own product, Planyway, which we’ve created to fill in the gaps we kept running into with the native Jira capacity planning process.
Planyway integrates seamlessly with Jira to give the level of detail and flexibility that Jira’s native capacity planning tools lack — without requiring you to upgrade your team to premium tiers.
Here’s what Planyway, as a capacity planner, brings to the table:
- Individual and team capacity tracking. Unlike Jira Plans, Planyway allows you to track capacity both at the team and at the individual level. You can view who is overloaded or underloaded, identify teams that are running out of bandwidth, and rebalance workload in real-time based on their resource availability.
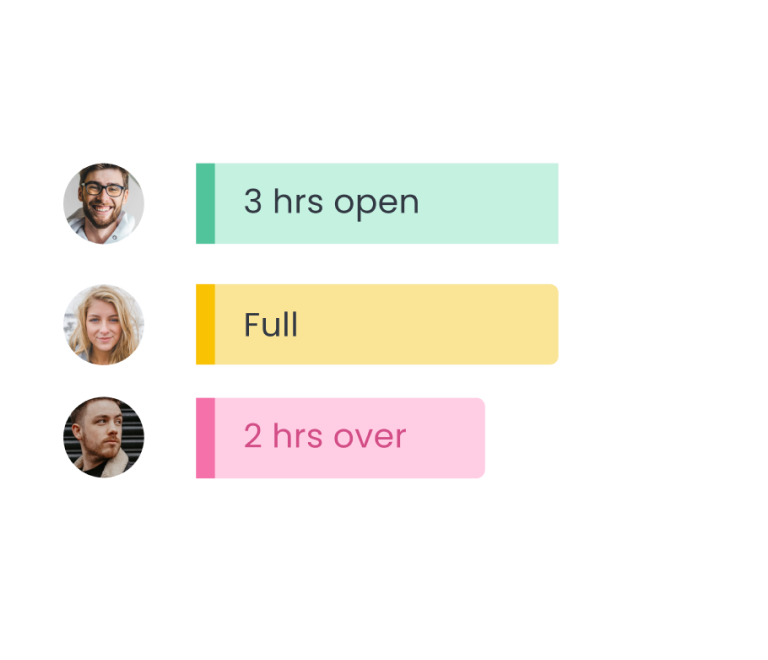
- Visual workload balancing. Planyway offers clear, color-coded workload indicators, helping you visualize which team members are at risk of being overburdened and which have the capacity for more work allocation.
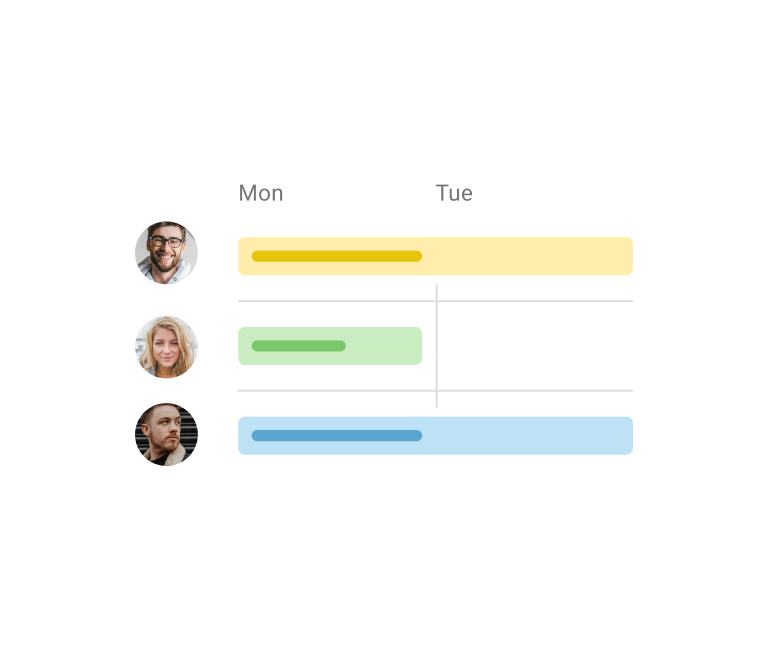
- Multi-assign. Planyway lets you split a single work item into separate parts, assign them to different team members, set individual estimates to make them participate in the workload calculation, and track completion independently.
- Dynamic task reallocation. With Planyway, you can easily allocate resources based on changing priorities or workload shifts simply by dragging cards.
- Cross-project capacity management. Unlike Jira Plans, which provides a high-level view, Planyway lets you see remaining capacity and spot available resources across multiple projects and teams.
- Kanban & non-sprint support. Planyway works for agile teams using Kanban boards or non-sprint work process, giving you the flexibility to manage capacity outside of strict sprint cycles.
Above all, Planyway brings three tools together in one place — project roadmapping, resource management, and time tracking — under a single setup. All of it lets you build your plans based on actual team availability and adapt changes on the way using real-time effort data .
Case study: how Gradient team optimized sprint capacity planning with Planyway
The Gradient team was struggling with a manual, disjointed sprint planning process in Jira that lacked visibility into workloads and deadlines. They were using basic Jira project management, but their workflow relied heavily on spreadsheets and disconnected tools to track resource utilization and sprint timelines. As a result, they often faced confusion around resource allocation and couldn't easily understand project progress to make informed decisions.
To tackle this, Gradient added Planyway's capacity planner to visualize the workload and see available hours during the sprint. The granular approach to the team's bandwidth helped them set deadlines more realistically, and reduce the time they spend on manual tracking, allowing them to reallocate that effort to all the tasks that actually require attention.
Keep your resources predictable with Jira and Planyway
Jira resource capacity planning is often handled through Jira Plans, but for many project managers, it still comes with limitations and additional headaches. As a project manager, even with Jira Plans, you still have to somehow manage individual resource allocation, manually keep estimates to date, and make sure project tasks reflect what's actually happening across the team.
If built-in team capacity planning features in Jira Plans do not pull their weight for you, or you're on a standard Jira plan and are not planning to upgrade, you can resort to specialized capacity planning plugins.
Capacity planning plugins are installed on top of your existing Jira space, extending the platform's native capabilities. Planyway is one of those plugins. It extends Jira capacity planning with a visual timeline that makes it easier to track resource capacity, reassign project tasks, and rebalance workloads — all for one price, all directly within your Jira project management space.
FAQ
Capacity planning in Jira is only available through its Premium project management feature, Jira Plans. You can manage the team's workload and sprint capacity, and track progress. However, if you’re a project manager looking for a more granular resource capacity management, especially at the individual level, you will need an additional tool — a capacity planner — like Planyway.
Atlassian Marketplace offers several resource capacity planning tools that seamlessly integrate with Jira, such as Planyway, which provides a visual timeline for tracking resource capacity, and BigPicture, which offers advanced planning features for Gantt charts and cross-project management. Tempo Capacity Planner and Activity Timeline are also popular for time tracking and resource planning among project managers.
With Jira Plans (Premium), you can only manage tasks on the team level. For individual Jira resource capacity planning, you can explore tools like Planyway that will help you track individual workloads, account for team availability, and redistribute project tasks easily for project success.