10 best Jira roadmap plugins to try in 2026
15 min read
Jira is fantastic at tracking tasks and sprints, but when it comes to roadmapping, the out-of-the-box experience is far less satisfying. The built-in Timeline won’t let you link epics across different Jira projects or see a team member's individual workload. In fact, there are plenty of things it can’t do. Even though it politely pretends those aren’t the things anyone would ever need.
That’s why teams turn to Jira roadmap plugins, which are dedicated add-ons that supplement native Jira roadmapping capabilities without upgrading to Premium. In this blog post, we’ve rounded up 10 of the best Jira roadmap tools and broken down each, so you can find the right fit for your team.
How we evaluated these plugins
To keep this comparison practical and unbiased, we have evaluated each plugin using the following criteria:
- User ratings and reviews. We focused on roadmap plugins that have high ratings across a large number of reviews on Atlassian Marketplace, Capterra, G2, and other go-to review platforms.
- Update frequency and vendor activity. We have selected plugins that are continuously enhanced with new features, which also means they work seamlessly with the latest Jira versions.
- Multi‑project roadmapping. Can the plugin consolidate epics, initiatives, or tasks from multiple Jira projects into a single timeline? This is arguably one of the main reasons teams look for Jira roadmap plugins.
- Two‑way sync with Jira. Changes made on the roadmap (dates, statuses, assignments, hierarchy) must write back to Jira in real time.
- Resource and capacity planning. Does the plugin allow users to plan based on actual availability?
- Support for Jira hierarchies. Does it respect Jira’s native issue types (Epic → Story → Subtask) and allow custom hierarchies?
- Sharing without Jira licenses. Does the plugin allow for sharing an interactive version of the roadmap with stakeholders and executives who don’t have a Jira login?
- Export and reporting. Can users generate reports on workload, timeline, and progress for leadership review?
- Pricing. Ideally, the plugin should offer a free trial to let users test-drive the features**.**
Using these seven points, we’ve analyzed the most popular options on the Atlassian market and have curated only those ten that have made the grade. Keep in mind that our methodology doesn’t imply that all tools excel in every criterion mentioned above. Rather, each plugin takes a different angle on roadmapping, and we’ll highlight those as we go through the comparison.
All plugins in this comparison run on Jira Cloud or Jira Data Center. Server editions are not included since Atlassian ended Server support on February 15, 2024, and most Marketplace partners stopped releasing updates for Server-based plugins shortly after.
Best roadmap tools for Jira: initial comparison
We've summed up the main differentiators and distinctive features of the ten Jira roadmapping plugins below.
| **Tool** | **Core strength** | **Roadmap view** | **Capacity planning** | **External sharing (no Jira license)** | **Hosting** | **Starting price** |
|---|---|---|---|---|---|---|
| Easy Agile Roadmaps | Theme-grouped roadmap | Theme swimlanes + Jira issue timeline | No | Yes: PNG export of filtered views | Cloud + DC | Free ≤10 users; from $1.75/user/mo |
| Planyway | Execution + capacity + time in one tool | Timeline + calendar; groups by user, epic, team, project | Yes: workload heat maps, holidays | Yes: PDF, CSV, XLSX export | Cloud + DC | Free ≤10 users; from $3/user/mo |
| Swanly | Cross-project release coordination | Issue + Release timelines | No | Limited: shareable URLs (Jira users) | Cloud only | Free ≤10 users; tier-based above |
| ProductGo | User story mapping + roadmap + AI | 2D story map (vertical Goals→Steps→Stories + horizontal Swimlanes) | No | Yes: Confluence embeds | Cloud + DC | Free Standard ≤10 users; $10/mo flat Advanced |
| Released | Customer-facing roadmaps + AI release notes | Audience-tailored public roadmaps | No | Yes (best in class): public/password/invite portals | Cloud only | Free Standard ≤10 users; $15/mo flat Advanced |
| Aha! Roadmaps | Strategy-first product management | Strategy hierarchy + two-way Jira sync | No | Yes: presentation views | SaaS standalone (not a Jira plugin) | From $59/user/mo (Premium tier) |
| Structure + Gantt (Tempo) | Gantt across Structure custom hierarchies | Custom hierarchies + Gantt with Configuration Slices | Yes: Resource Leveling | Yes: shareable URLs, dashboard gadgets | Cloud + DC | No free tier; from ~$20/mo for both apps combined |
| BigPicture | Enterprise PPM with SAFe support | Boxes + Gantt + Objectives modules | Yes: Resources module | Yes: shareable URL links across modules | Cloud + DC | Free ≤10 users; tier-based above |
| ActivityTimeline | Resource-first capacity scheduling | Individual + team timelines | Yes (best in class): skill-based teams | Limited: dashboard sharing within Jira only | Cloud + DC | $10/mo flat for ≤10 users; from $2.50/user/mo above |
| WBS Gantt-Chart (Ricksoft) | MS Project-like Gantt inside Jira | WBS + Gantt with 4 dependency types | Yes: workload limits and overallocation alerts | Yes: export to MS Project files | Cloud + DC | Free ≤10 users; from $1.32/user/mo |
Prices and ratings shift on the Marketplace regularly. Before committing, open each plugin's pricing tab.
Related reading: “Creating roadmaps in Jira: from basic timeline to Jira”
1. Easy Agile Roadmaps: Basic PPM-lite tool
Cut out for small, predictable projects with a lean team, Easy Agile Roadmaps for Jira transforms raw Jira data into visual timelines — drag-and-drop, theme-based, and stakeholder-friendly. Theme Swimlanes is one of the plugin's pillars: the feature lets users group work into themes and display them as swimlanes.
Easy Agile Roadmaps offers:
- Multi-project roadmap — Easy Agile pulls multiple Jira projects and boards into one cross-team view.
- Drag-and-drop scheduling — tasks move on the timeline with a single drag.
- Date and version markers — users can pin key dates like major milestones and launches on the roadmap timeline.
- Theme swimlanes or hierarchical views — the plugin allows you to switch between them.
- Work-vs-parent alignment — the roadmap surfaces child issues whose dates fall outside the parent.
- Filters and date ranges — the toolbar can filter work by team, label, fix version, or JQL; the roadmap timeline zooms from sprint to year.
- Real-time Jira sync and PNG export.
Easy Agile makes the most sense when teams need a basic roadmap visible to stakeholders, without the overhead of a full PPM stack.
Pros
- Users can filter and switch between hierarchical and theme swimlane views.
- Filtered views export to PNG straight from Jira, making it easy to share stakeholder-ready snapshots.
Trade-offs
- Easy Agile Roadmaps may be restrictive at enterprise scale, since full-fledged resource capacity, cross-portfolio analysis, and other PPM controls aren't part of the tool.
Pricing
Free for up to 10 users. Paid plans start from $1.75/user/month. Free trial available.
Hosting options
Cloud and Data Center.
2. Planyway: Execution-to-capacity roadmapping
Unlike many Jira roadmap plugins that focus on a single capability, Planyway integrates all four core aspects of project delivery into a single interface. It combines roadmapping, resource planning, time tracking, and portfolio management, so teams can plan and execute work in one place instead of flitting between tools. It's especially useful when the same person owns the roadmap and gets pinged at standup about who's free next sprint.
Planyway's key features for roadmapping:
- Portfolio roadmap across multiple Jira projects. Planyway groups tasks from boards or JQL filters by user, epic, team, or project.
- Live project roadmap scheduling with drag and drop functionality. A single drag updates end dates or assignees; changes sync back to Jira instantly.
- Workload and capacity planning per team and per member. Each person or team gets a timeline row with a workload heat map, custom working hours, and country-based holidays.
- Key milestones, releases, and dependencies on the roadmap timeline. Sprints overlay the timeline, Fix Versions track release progress, and task dependencies show as arrows on work items.
- Sharing without a Jira license. Filtered views export to PDF format, CSV, or Excel for external stakeholders, ready for roadmap presentations to leadership without rebuilding slides.
- Native Jira integration. Jira data syncs both ways in real time, and fields are edited in-line on the Planyway board.
Planyway is aimed at product, delivery, and engineering managers who need to track progress on roadmap, capacity, and time in one tool. It is trusted by 1+ million teams, including Adobe, Kaspersky, and Booking, and is available on the Jira Standard tier.
Pros
- One subscription folds roadmap, individual capacity planning, and time tracking together — no need to run three separate add-ons.
- Cross-project roadmapping doesn't require the Premium tier and runs on Jira Standard.
- Intuitive interface doesn't require training: most users schedule their first task within the first hour.
- Customer support is a consistent strength, and the team draws on user feedback to shape new features and prioritise updates.
Trade-offs
- Doesn’t include Program Increments, ARTs, or similar SAFe-specific structures as native features.
- Has no built-in scenario planning for drafting alternative versions of a plan and committing to one.
Pricing
Pricing: Free for up to 10 users. Paid plans start from $3/user/month. Free trial available.
Hosting options
Cloud and Data Center.
3. Swanly: Release-first portfolio roadmapping
The key differentiator of Swanly is that it plans work around releases. The tool lets you create a single release that features multiple Jira projects and syncs versions across them.
Alongside cross-project releases, Swanly pitches in with the following features:
- Roadmap with Issue and Release views — the plugin has a unified roadmap that can switch between Issue view (Epics, Stories, any Jira issue type) and Release view (Fix Versions, major milestones, progress tracking).
- Templates and Stages — repeatable phases attach to issues or releases with their own dates, status, and color.
- Cross-project release reports — each release opens a detailed report to track progress: time tracking, story-point breakdowns, and on-track/behind indicators.
Swanly is made for those whose main headache is lining up several teams on one release date. It's also part of the Appfire ecosystem, which means it plays well with OKR for Jira (for tying releases to strategic goals) and Foxly (for backlog priority visualization).
Pros
- Beyond roadmapping, the plugin lets users plan and track releases (Jira Fix Versions) across projects in a visual timeline, with detailed per-release reports.
- Templates make repeated release types (hotfixes, MVPs, major launches) consistent across agile teams.
Trade-offs
- It’s Cloud only and has no Server or Data Center version.
- Documented integrations cover Jira and the Appfire stack (OKR for Jira, Foxly), but don't extend to Slack, Teams, or third-party PM platforms.
Pricing
Free for up to 10 users. Paid plans start from $1.93/user/month. Free trial available.
Hosting options
Cloud
4. ProductGo: User-centric discovery and strategic roadmapping
ProductGo brings strategic planning into Jira through user story mapping. It transforms a flat backlog into a user journey and then attaches Jira issues to each step of it.
ProductGo offers:
- Story map with two dimensions — a vertical user-journey hierarchy (Goals → Steps → Stories) and horizontal swimlanes that group work by release or sprint.
- Portfolio Board — a multi-project version of the story map, with customisable levels for teams running large or branching initiatives.
- Roadmap with milestones and dependencies — tasks anchor to Jira dates, helping teams track project goals across releases.
- Advanced Personas — detailed user profiles attach to story maps, helping teams prioritize tasks by who they actually serve.
- AI Generator (Cloud only) — generates Goals from a product brief, breaks them into Steps, and proposes Stories.
- Confluence embed — story maps and roadmaps embedded into Confluence pages alongside project documentation.
ProductGo is best suited for product owners and agile teams who already use story mapping for discovery and want the roadmap to flow from the same place.
Pros
- ProductGo makes story mapping the central planning place, which is quite unique.
- Cloud, Server, and Data Center editions are all actively maintained.
Trade-offs
- The roadmap module on its own is thinner than specialised alternatives, since the whole tool revolves around story mapping.
- Reviewers on Marketplace and G2 note that the interface looks older than newer Jira-native plugins.
Pricing
Free for teams of up to 10 users. Paid plans start from $1.75/user/month for Standard, $2.00/user/month for Advanced. Free 30-day trial.
Hosting options
Cloud and Data Center.
5. Aha! Roadmaps for Jira: Strategy‑first product roadmapping
Aha! Roadmaps for Jira works differently from typical Jira plugins. It's a separate tool for strategic planning. Teams use it to plan goals, initiatives, and releases, and then tie that strategy to features and Jira work. A two-way integration gives product and engineering real-time visibility into each other's progress.
Beyond Jira connection, Aha! Roadmaps brings:
- Strategy hierarchy above the roadmap — Goals, Initiatives, Releases, Features, and Requirements that are fully customizable.
- Two-way Jira sync with default record mappings.
- Backlog import via JQL — existing Jira backlog imports into Aha! using custom JQL filters, without altering Jira, and can be rerun or undone.
- Roadmap views in multiple formats — Aha! includes Now-Next-Later, Strategy, Portfolio, Custom, and Gantt formats, plus presentation-ready slides.
- Premium includes additional tools for ideas, brainstorming, and documentation beyond roadmapping.
Product teams that already use Aha! for strategy and want Jira to handle execution often end up choosing Aha! Roadmaps.
Pros
- Deeper strategic alignment than other plugins due to five record types (Goals, Initiatives, Releases, Features, and Requirements).
Trade-offs
- As reported by users, field mappings between Aha! and Jira can break when Jira admins update field configurations or user permissions, requiring manual repair.
- For smaller teams without a clear separation between editors and viewers, the platform might be on the pricier side.
- Aha! is reported to have a steep learning curve.
Pricing
Sold via Aha! Software (not the Atlassian Marketplace) with three annual tiers: Premium ($59/user/mo), Enterprise ($99), and Enterprise+ ($149). Only active editors are paid, while viewers are free. Managed via Aha.io with a 30-day free trial.
Hosting options
Aha! Roadmaps is a SaaS platform hosted by Aha! Software (not a Marketplace plugin, with a Jira connector for Jira Cloud and Jira Data Center.
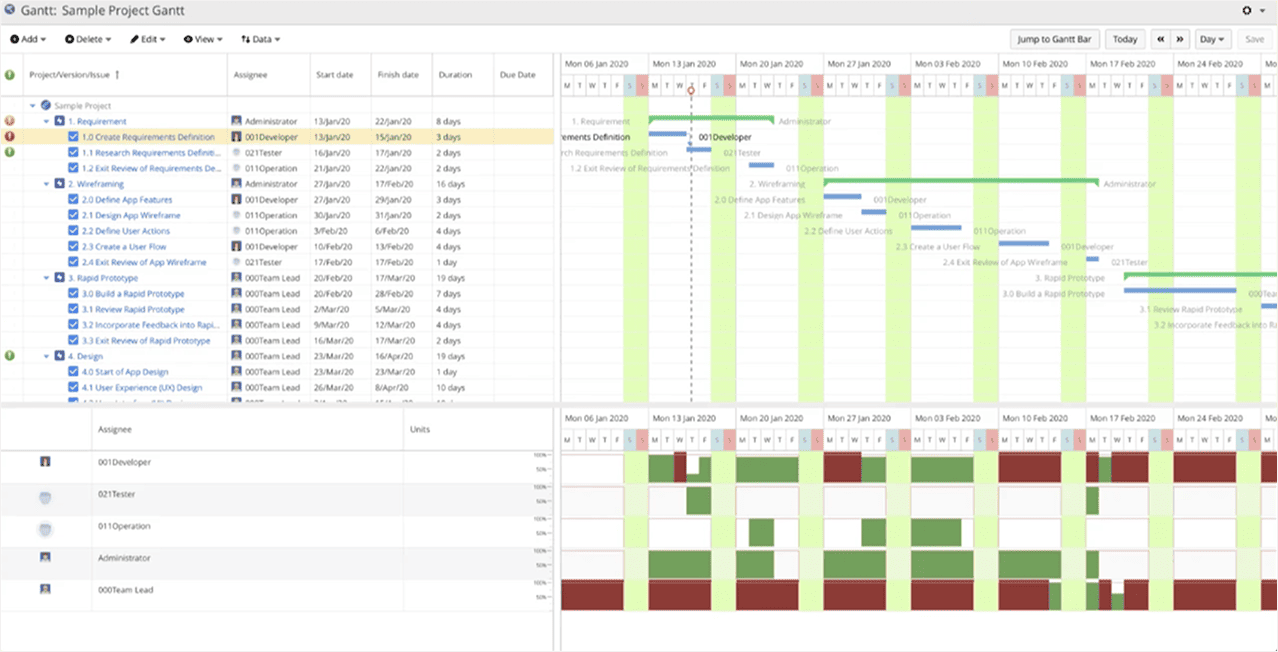
6. Gantt Charts for Structure PPM by Tempo: Hierarchy-driven Gantt planning
Gantt Charts for Structure PPM is an add-on for Tempo's Structure PPM — the two have to be installed together to work. Structure PPM gives teams a spreadsheet-like view of issues from multiple Jira projects, organised into custom hierarchies. Gantt Charts brings time-based planning to those hierarchies.
Here's what the powerful duo of Structure + Gantt brings to your table:
- Spreadsheet-like portfolio view (Structure) — issues from multiple Jira projects are organised into custom hierarchies by project, epic, assignee, release, or custom field, with totals, formulas, and Excel-style calculations on each level.
- Configuration Slices — JQL rules apply distinct scheduling logic, time-tracking methods, or visual settings to various subsets of issues inside the Gantt chart.
- Task scheduling and resource leveling — auto/manual/sprint scheduling with dependencies, plus workload balancing across teams to allocate resources.
- Baselines — teams can save snapshots of the Gantt at any point and compare them with the current plan.
- Tempo ecosystem integration — direct connections to Tempo Timesheets, Capacity Planner, Custom Charts, and BI connectors (BigQuery, Power BI, Tableau).
Gantt Charts are built for PMOs and engineering organisations whose project goals span multiple programmes and don't fit Jira's epic-story tree.
Pros
- Direct integrations with Tempo Timesheets, Capacity Planner, and Custom Charts cover time tracking, resource allocation, and reporting through a single vendor.
- Hybrid project methodologies work in the same Jira instance: agile teams run sprints inside Structure, while PMs use Gantt Charts for long-range planning and stakeholder reviews on the same data.
Trade-offs
- Gantt Charts requires a Structure PPM license, since the two products can't be bought separately.
- The spreadsheet-formula model and configuration depth fit large PMOs running dozens of projects. For smaller teams, both products might be heavier than the actual planning problem requires.
- Both products have a steep learning curve. However, Tempo offers paid training sessions on request.
Pricing
Both Structure PPM and Gantt Charts require paid licenses from the first user. Combined cost runs from approximately $20/month for a single user (both apps), scaling up at enterprise tiers. Free 30-day trial for each app.
Hosting options
Cloud and Data Center.
7. BigPicture: Enterprise-grade PPM and roadmapping suite
Compared to other roadmapping plugins, BigPicture by Appfire is on the heavyweight side of the spectrum. While it offers powerful roadmap views, its core focus is complex project coordination: dependency management, resource planning, and portfolio-level visibility across multiple teams and projects.
Roadmapping-wise, BigPicture is built around modules:
- Boxes — custom hierarchical containers (portfolio, program, project, phase, iteration, ART, or any custom type) form a flexible structure with any number of levels, aggregating data upward through the hierarchy.
- Gantt module — timeline planning across the full Boxes hierarchy at any granularity, including milestones, dependencies, critical path, and what-if scenarios.
- Objectives module (formerly known as Roadmap) — SAFe-aligned planning of Sprints, Program Increments, and ARTs, with goals set at the sprint, PI, team, or company level.
- Resources module — workload and capacity tracking across teams, with overallocation indicators and the ability to schedule unscheduled tasks via drag-and-drop.
- Risks and Reports — color-coded risk matrices and configurable reports across any granularity, useful for enterprise PPM environments.
BigPicture suits the kind of complexity that PMOs and large organisations face: SAFe, LeSS, or hybrid methodology rollouts, and portfolio-level coordination across hundreds of users.
Pros
- One of the very few Marketplace tools with dedicated SAFe support, including PI Planning, Program Increments, and ARTs as native concepts.
- Handles Agile, Classic, and hybrid methodologies in the same instance.
- BigGantt is available as a separate, lighter standalone product if you need only the Gantt module without the full PPM stack.
Trade-offs
- The feature-heavy interface and steep learning curve can make the app an overkill for smaller teams.
- The full enterprise PPM feature set requires two licenses: BigPicture for the core, plus BigPicture Enterprise (a paid extension) for unlimited templates and scenarios, the financial module, baseline versioning, and Tempo integration.
- BigPicture doesn't offer a public API for custom integrations, which limits how external systems can connect to its data.
Pricing
Free for up to 10 users. Paid plans start from $5.21/user/month for BigPicture; BigPicture Enterprise is sold as a separate add-on for the full PPM feature set. Free 30-day trial.
Hosting options
Cloud and Data Center.
8. ActivityTimeline: Capacity-first scheduling for Jira
ActivityTimeline by Reliex is more of a capacity and scheduling tool with timeline views, not a classic roadmap builder. The planning calendar maps Jira tasks across individual and team timelines, with workload indicators marking how busy each person is on any given day.
In terms of roadmapping, ActivityTimeline offers:
- Drag-and-drop scheduling — tasks move across dates on individual and team timelines, and Shift+drag splits a single task between multiple assignees.
- Multi-project timeline views — one timeline shows tasks across projects and helps managers allocate resources between individuals, functional (skill-based) teams, and entire portfolios.
- Workload Indicators — coloured bars on each timeline show planned hours per team member per workday; availability mode flips the same view to show remaining capacity instead.
- Real-time overload detection — available hours per person are reduced by holidays, leave, and recurring work, with real-time updates flagging overloads and capacity gaps.
ActivityTimeline would feel right at home with delivery and engineering managers whose project goals depend on team capacity day to day more than on long-range roadmap structure.
Pros
- ActivityTimeline integrates two-way with Jira Plans, BigPicture, and Structure across multiple projects, enabling teams to combine resource allocation with the strategic plan from any of those tools and track progress over time.
- Functional teams group users by skill rather than by project (frontend, QA, data engineering).
- ActivityTimeline holds Atlassian's Cloud Fortified designation.
- Customer support stands out for its consistency.
Trade-offs
- ActivityTimeline doesn't build high-level roadmaps organised by product themes or strategic goals.
- Release planning is limited: no Fix Version–based release timeline, only milestone views on team/individual timelines, with cross-project coordination requiring external tools.
- The tool helps with daily capacity planning, but still needs upfront configuration of teams, skills, holidays, and custom fields, and can feel unfamiliar to product managers used to epics and themes.
Pricing
$10 flat fee for teams up to 10 users (no free tier). Paid plans start from $2.50/user/month for 11-100 users. Free 30-day trial.
Hosting options
Cloud and Data Center.
9. WBS Gantt-Chart for Jira by Ricksoft: Gantt-centric enterprise project management
If you've been looking for an add-on that transforms Jira into a solid alternative to Microsoft Project — with WBS, Gantt charts, critical path, and baselines embedded directly into your Jira environment — WBS Gantt-Chart for Jira by Ricksoft is the most direct answer on the Marketplace.
WBS Gantt-Chart offers:
- Four dependency types (FS, SS, FF, SF) with drag-and-drop linking directly on the Gantt timeline.
- Critical path (highlighted in red) and baselines to track schedule shifts vs. the original plan.
- Two-way Microsoft Project file exchange with one-click import and export to .mpp files.
- Auto-populated Gantt from JQL or saved filters to prioritize tasks based on dependencies and deadlines.
- Issue templates for repeatable project structures with milestone deadlines and delay alerts.
WBS Gantt-Chart would check most of the boxes for project managers coming from Microsoft Project, especially in organisations running waterfall projects with clear project goals alongside agile work.
Pros
- The classic project-management toolkit (baselines, critical path, dependencies, milestones, progress lines) makes WBS Gantt-Chart a credible alternative to standalone PM tools.
- Two-way file exchange with Microsoft Project, plus a familiar and user-friendly interface, makes migration straightforward for teams moving off Microsoft Project.
- The plugin handles projects with up to 10,000 issues at full speed, holding up at the kind of scale that breaks lighter Gantt tools on the Marketplace.
Trade-offs
- Waterfall and traditional project management form the core of WBS Gantt-Chart, so agile teams might find the formality and heavy toolkit unnecessary for their day-to-day work.
- New users typically need weeks of dedicated study before becoming productive in the tool.
- The interface looks visibly older than newer Gantt plugins, with a visual style closer to early-2010s desktop apps than to modern Cloud-first design.
Pricing
Free for up to 10 users. Paid plans start from $1.32/user/month. Pricing scales down significantly at larger tiers, dropping to $0.59 per user/month at 1,000 users. Free 30-day trial.
Hosting options
Cloud and Data Center.
10. Released: Feedback portal + public roadmaps + AI release notes
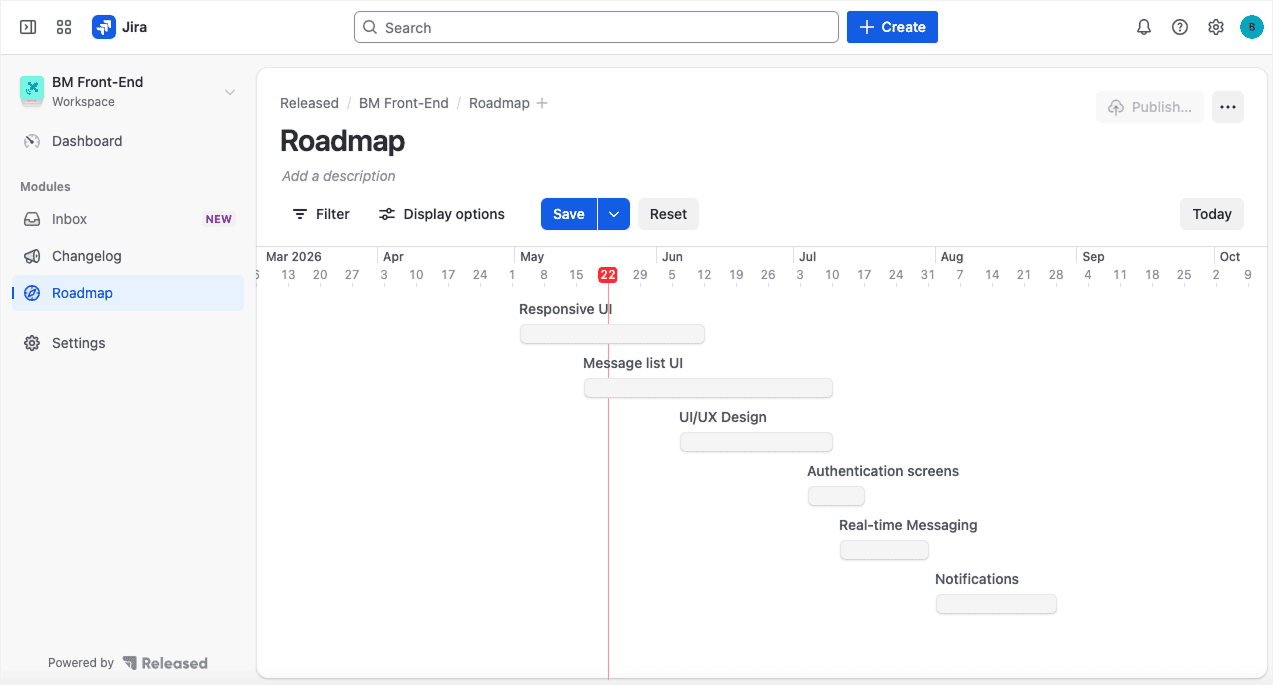
Released fills the gap Jira leaves around external communication. The plugin connects feedback, roadmaps, and release notes into one workflow to keep stakeholders informed and on the same page about what's shipping.
Inside Jira, Released covers the full comms lifecycle with:
- Feedback portal with custom branding (pop-up, full page, or custom URL) feeding a single inbox linked to Jira or Jira Product Discovery (JPD).
- Audience-tailored public roadmaps that pull data across Jira projects and JPD with milestones and controlled access (public, private, invite-only).
- AI-generated release notes with tone-of-voice customisation for different audiences.
- Personal wishlists with feature demands from users.
- One-click multi-channel publishing to a website, Confluence, Slack, or any custom embed location.
Released fits anyone responsible for the bigger picture of external communication: product marketing, customer success, and PMs who publish externally. It replaces standalone roadmap tools at a ****lower cost, while keeping the workflow inside Jira.
Pros
- External stakeholders view shared roadmaps without a Jira license. The displays update automatically as the team's delivery work evolves in Jira.
- Reviewers cite a 10× speedup on release-note writing with the AI module compared to writing from scratch.
- Teams plan early-stage work in Jira Product Discovery, then add the feedback portal and customer-facing roadmap to the same Jira data without third-party sync.
Trade-offs
- Released doesn't include internal resource management, capacity planning, or portfolio analytics for agile projects.
- Released runs on Jira Cloud only, and the vendor confirms there's no Server or Data Center version planned.
Pricing
The free plan covers teams of up to 10 users. Paid Starter plan costs from $0.90/user/month with all core features and custom branding. Growth plan (on request) adds advanced features like priority support, a dedicated account manager, and detailed analytics.
Hosting options
Cloud only.
The right Jira tool for roadmapping should match your mental model
The “best” roadmapping tool doesn't boil down to features. Нow the tool matches your team's mental model of planning and delivery matters much more. Two plugins with the same feature list can play out very differently, depending on how each team plans.
For example, capacity-led teams think in daily workload, while release-focused teams hang their roadmaps on Fix Versions and quarterly ship targets. So, before making the call, look at how your team plans now. The perfect match for you is the roadmapping tool that already fits your team's approach.
FAQ
Alternatives to Jira Advanced Roadmaps (now called Jira Plans) include Marketplace plugins such as Planyway, BigPicture, Structure + Gantt, Released, and ProductGo. The right pick depends on the gap you need to fill: cross-project roadmaps, capacity planning, customer-facing views, classical Gantt, or strategic product management.
The best roadmapping tools that integrate with Jira are Marketplace plugins such as Planyway and WBS Gantt-Chart. Planyway combines timeline and team capacity in one tool for agile and hybrid teams, while WBS Gantt-Chart turns Jira into a Microsoft Project-style workspace with classical Gantt charts and four dependency types. To pick, think of what you're optimising for.
Planyway pairs the timeline with workload heat maps and time tracking inside a single subscription. BigPicture's Resources module is part of a broader PPM suite designed for portfolio-level workload visibility. ActivityTimeline starts from capacity and adds skill-based functional teams.
The native Jira Timeline is limited to a single project, and Jira Plans requires a Jira Premium upgrade to show several projects in one view. An easier way around this is to use a Marketplace app. Planyway, BigPicture, Structure + Gantt, and ActivityTimeline all let you manage timelines across projects without moving to Jira Premium. The right choice depends on what you do with the data once it is consolidated: timeline plus capacity in one place (Planyway), portfolio hierarchy (BigPicture), custom WBS with detailed Gantt (Structure + Gantt), or resource‑first scheduling (ActivityTimeline).
If your team uses SAFe but does not need the full weight of Jira Align, BigPicture covers the main SAFe building blocks — PI Planning, Program Increments, ARTs — for noticeably less money. For non‑SAFe organisations, it usually makes more sense to look at lighter tools such as Planyway, Released, or Easy Agile Roadmaps. They handle product roadmapping without the enterprise bloat, yet can still support work across a portfolio.