How to Create Jira Timeline in 2026
Creating roadmaps in Jira: from basic timeline to Jira Plans
If you're a project manager navigating the world of Jira, you know how powerful it is for tracking tasks. But what happens when you need to zoom out and show the bigger picture? You’ve probably seen the "Timeline" view or heard about "Jira Plans" and wondered where to begin.
In this article, we'll explore everything from the simple, free tools you can use today to the advanced options for complex, multi-team projects.
What are your roadmap options in Jira?
Jira provides a few different tools to help you visualize your plan, each suited for a different purpose.
- Basic Timeline View. It's a free, built-in feature that's perfect for getting started and managing a single project.
- Jira Plans (formerly Advanced Roadmap). This is a premium feature designed for when you need to coordinate across multiple teams and projects.
- The Roadmap Gadget in Dashboards. A handy way to make your roadmap visible to everyone on a shared dashboard.
- Third-party apps from the Atlassian Marketplace, which offer unique features and workflows.
Now, let's take a closer look at each of these options.
What you get in Jira for free: the basic timeline
The Timeline View is a free, out-of-the-box feature available in Jira Software (both Cloud and Data Center). It’s straightforward, works directly with your existing Jira issues, and is ideal for small to medium-sized projects.
What is the Timeline View?
It's a visual planning interface that helps you schedule work, monitor progress, and understand the sequence of tasks within a single project. Think of it as the storyboard for your current project—while it might not be for planning a five-year portfolio, it's incredibly effective for the work you're focused on right now.
Interactive demo: how to create Jira Roadmap with the Timeline View
Let's walk through how to create one. It's easier than you think!
- Step 1. Navigate to the Timeline tab. Just click on it to get started. If you don't see it, it might be disabled in your board settings, which you can easily re-enable.
- Step 2. Epics represent the large pieces of work in your project. You can create them right on the timeline by clicking the + Create epic button. If you've already created your epics, you can simply set dates on the board or backlog view to see them on the timeline automatically.
- Step 3. You'll see bars next to your epics on the timeline. You can click and drag the ends of these bars to set their start and end dates.
- Step 4. Each epic is made up of smaller items like stories, tasks, and bugs. You can see these by clicking the small arrow next to an epic's name. This allows you to expand it and view all the associated child issues, and you can even add new ones right from this screen.
- Step 5. If required, you can link issues with dependencies for better visualization of the workflow.
- Step 6. As your team works on and completes the child issues, the progress bar on the main epic will update automatically.
- Step 7. You can easily export your timeline in the CSV or PNG formats to share with non-Jira users.
Limitations of the free Timeline view
The free timeline is a fantastic starting point, but it's helpful to know its limitations.
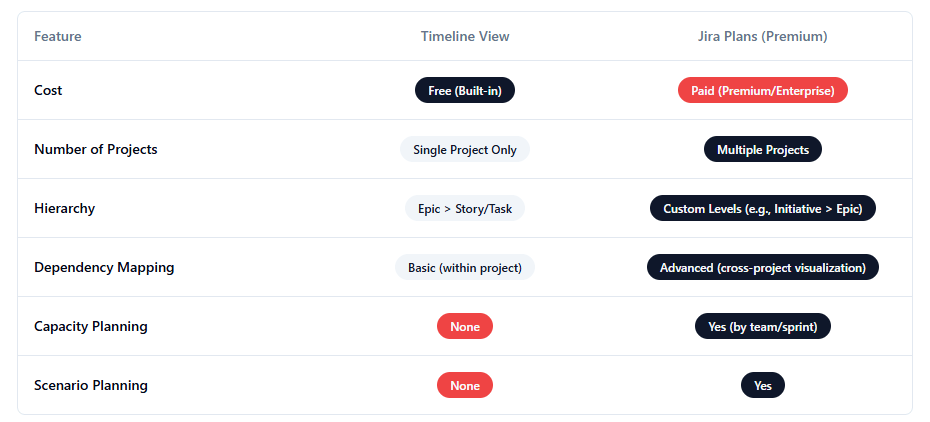
- Single-project focus: it can only display issues from the project you are currently in.
- Basic hierarchy: it shows two levels: your epics and their direct child issues (like stories and tasks). It doesn't support additional levels above epics.
- No capacity planning: it doesn't include features to see if your team's workload is balanced or if they are over-committed.
- Simple dependency views: you can link issues, but visualizing complex dependency chains isn't its primary function.
Advanced roadmapping with Jira Plans (formerly Advanced Roadmaps)
Jira Plans is Jira's premium feature for when you're coordinating multiple teams, managing complex projects, and need a truly strategic, cross-project perspective.
What are Jira Plans?
Included with Jira Software Premium and Enterprise subscriptions, Jira Plans provides a sandbox environment for planning. You can pull in issue sources from multiple projects, boards, and filters to create a single, unified roadmap. It allows you to experiment with "what-if" scenarios and understand the impact of changes before you commit them to your team's live Jira boards.
Here are some of its key capabilities:
- Custom hierarchy: create hierarchy levels above epics, such as "Initiatives," to align your projects with broader company goals.
- Cross-project dependency mapping: clearly visualize dependencies between issues across different teams and projects, helping you spot potential blockers early.
- Capacity planning: get insights into your teams' workloads to ensure you're planning realistically based on their actual availability.
- Scenario planning: create different versions of your plan to see what might happen if dates shift or resources change. It's a safe way to prepare for the unexpected.
- Data roll-ups: automatically see rolled-up progress reports across multiple projects, giving you and your leadership a clean, high-level summary.
Here is a single example that incorporates all the features:
A tech company launching a new smart hub uses a custom hierarchy to track the project as a major "Initiative." They use cross-project dependency mapping to see how a hardware delay will impact the marketing team's schedule and apply capacity planning to ensure the software team has a realistic workload. To prepare for potential chip shortages, the program manager uses scenario planning to model the impact on the timeline. Finally, executives get a quick overview of the entire initiative's cost and progress thanks to automated data roll-ups on their main dashboard.
Interactive demo: building a strategic roadmap with Jira Plans
Let's see how you can build a comprehensive strategic plan.
- Step 1. From the top navigation bar in Jira, select "Plans" and then "Create Plan." You can then choose your issue sources—this can be a combination of projects, boards, or even specific JQL filters.
- Step 2. In the plan's settings, you can define your hierarchy levels. For example, you can add an "Initiative" level to group related epics that contribute to a larger strategic theme.
- Step 3. With issues from multiple teams all in one place, you can easily create "blocks" or "is blocked by" links between them. The plan visualizes these dependencies with lines and will highlight any potential scheduling conflicts in red, giving you a clear warning.
- Step 4. Switch to the capacity view to see each team's workload for upcoming sprints. You can see at a glance if a team is over or under their capacity and adjust the plan to create a more balanced and achievable schedule.
- Step 5. Use the robust filtering and view settings to create custom roadmaps for different audiences. You can create a high-level view for executives and a more detailed dependency view for fellow project managers. Share these saved views to keep everyone on the same page.
Any workarounds? Explore the Jira Roadmap Gadget
So, you've built a great roadmap. How can you make it easily visible to everyone? Meet the Jira Roadmap Gadget.
What is the Jira Roadmap Gadget?
It's a simple and effective gadget you can add to any Jira Dashboard to display a project roadmap. Its purpose is to provide clear, high-level visibility, making it perfect for a team's central dashboard or a stakeholder report.
Interactive demo: how to add and configure the Roadmap Gadget
This is wonderfully simple to set up.
- Step 1. Navigate to "Dashboards" in Jira and choose an existing one or create a new one.
- Step 2. Click the "Add gadget" button in the top right corner. In the window that appears, search for "Jira Roadmap" and click "Add gadget".
- Step 3. The gadget will now be on your dashboard. The only thing left to do is tell it which project's roadmap to show. Select your project from the dropdown menu.
- Step 4. And just like that, the gadget displays your project’s roadmap directly on the dashboard. It's a live view that keeps your plan front and center for the whole team._
Third-party apps for Jira roadmapping
The Atlassian Marketplace is like a vast library of tools that can enhance and extend Jira's capabilities. There are thousands of apps, many of which are designed to offer specialized roadmapping and planning features.
Explore Planyway for Jira
Planyway is a popular app that provides a highly visual interface for planning, resource management, and time tracking that works right on top of your Jira data.
Here's why you might find Planyway to be a great fit for roadmapping in Jira:
- Enhanced visuals: Planyway offers a beautiful timeline that lets you manage your project from various perspectives: epics, projects, users, teams, etc.
- Effortless drag-and-drop scheduling: rescheduling tasks is as simple as dragging and dropping cards on a calendar, a feature that many teams find incredibly intuitive.
- Cross-project portfolio view: it makes it easy to combine multiple projects into a single portfolio view, which is great for managers overseeing several initiatives.
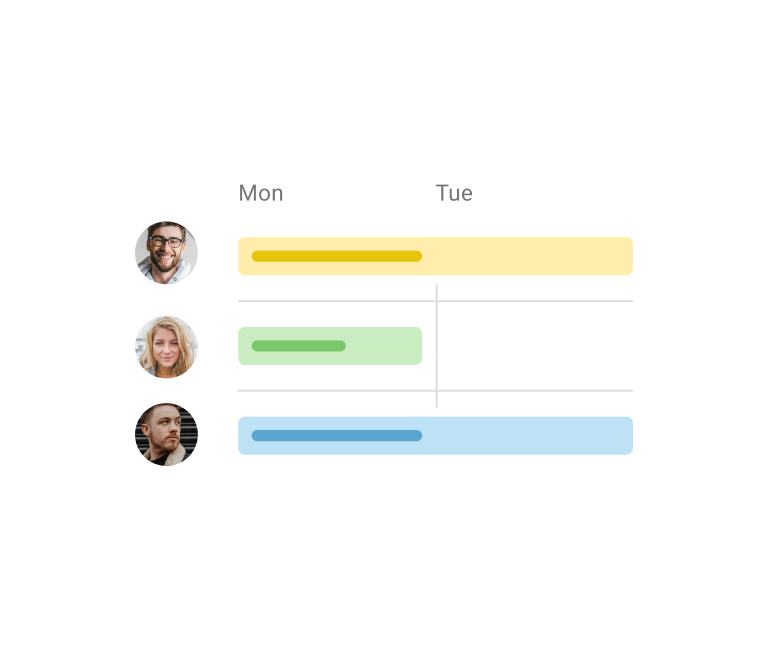
- Simplified resource management: the workload view gives you an instant understanding of who is working on what, helping you balance assignments and prevent team burnout.
- Built-in time tracking: no need to add extra plugins to do time tracking in Jira. Keep your project under control and analyze efforts seamlessly.
For teams that want the power of Jira with a more comprehensive and easy-to-use visual interface, Planyway is an excellent solution to explore.
Conclusion: choosing the right roadmap tool for your needs
You now have a clear picture of your roadmapping options in Jira, and you can choose the right tool for your specific needs.
 So, which path is right for you?
- Use the timeline view if: you're working with a single, focused team on a straightforward project. It provides a clear, simple, and free way to visualize your plan and keep everyone aligned.
- Upgrade to Jira Plans if: you are coordinating multiple teams, managing complex programs, and need to think strategically about the future. If managing dependencies and team capacity are key priorities, Jira Plans is the tool for the job.
- The Roadmap Gadget is your best friend for: communication. No matter which tool you use to build your roadmap, the gadget is the perfect way to share it and promote visibility across your organization.
- Planyway for Jira roadmap: if you want to get more flexibility over the view and gain more team management features.
You're now equipped to go beyond simple task tracking and become a strategic planner. You're ready to create your roadmap and lead your projects with clarity and confidence.


