How to create roadmaps in Jira: an ultimate guide for project and product teams

We've been building a roadmapping tool, so we've spent a good deal of time thinking about what makes a roadmap actually useful, and how to create roadmaps that help teams move toward a goal rather than just track work. In practice, most teams end up with a well-organized backlog with dependencies mapped, milestones set, and everything color-coded. It's thorough, but not quite a roadmap.
A Jira roadmap only works when it's both a direction and an execution plan — showing where you're going, how you're getting there, and what you'll need along the way. When that connection is not there, teams often lose sight of the bigger picture and fall into constant rework.
So, how can you create a Jira roadmap that's more than just a colorful Gantt chart everyone ignores after the first week? Let's see.
TL;DR
- A Jira roadmap outlines a high-level plan of direction and priorities for a product or a project over time. A good roadmap includes the reasoning behind the work and the plan for getting it done.
- Jira offers three ways to roadmap. Single-project teams usually use the free Timeline, while those who need cross-team coordination switch to Advanced Roadmaps (Jira Plans) or get third-party apps.
- A roadmap serves multiple audiences from a single source, and each needs a different level of detail to truly capture its value. Engineering teams focus more on execution, while leadership needs visibility into direction and momentum.
What is a roadmap in Jira?
A Jira roadmap is a visual representation of the team's work laid out on one roadmap timeline. It tells a story about what needs to get done, in what order, by whom, and by when.
Under this visual layer sits another one: a set of decisions already made by a team in order to pursue their goals. Every item on a roadmap made it there because someone chose it over something else. A roadmap that doesn't reflect those choices isn't a roadmap — it's more of an organized list of issues, always at risk of turning into a list of broken promises.
That's why the most useful question to ask about any roadmap is “why are we building this, and what are we not building instead?” The Jira roadmap is how you make these things visible and translate them into work your team can actually deliver.
Product roadmap vs project roadmap in Jira
Roadmaps come in many shapes, each serving its own purpose for its own audience. There are business roadmaps, technology roadmaps, process roadmaps, but in the context of Jira and product teams, two matter most: the product roadmap and the project roadmap.
A product roadmap is the strategic layer that captures goals, priorities, business objectives, and the direction the product is heading. It exists before you start filling in epics, and without it, what you build in Jira is just a backlog someone assigned dates to.
Unlike a feature list, a product roadmap revolves around problems, not solutions. Features describe what to build. Problems explain why it matters and connect the work to actual customer insights and project goals. Teams that start from problems tend to prioritize better, because the conversation stays focused on customer value rather than delivery timelines.
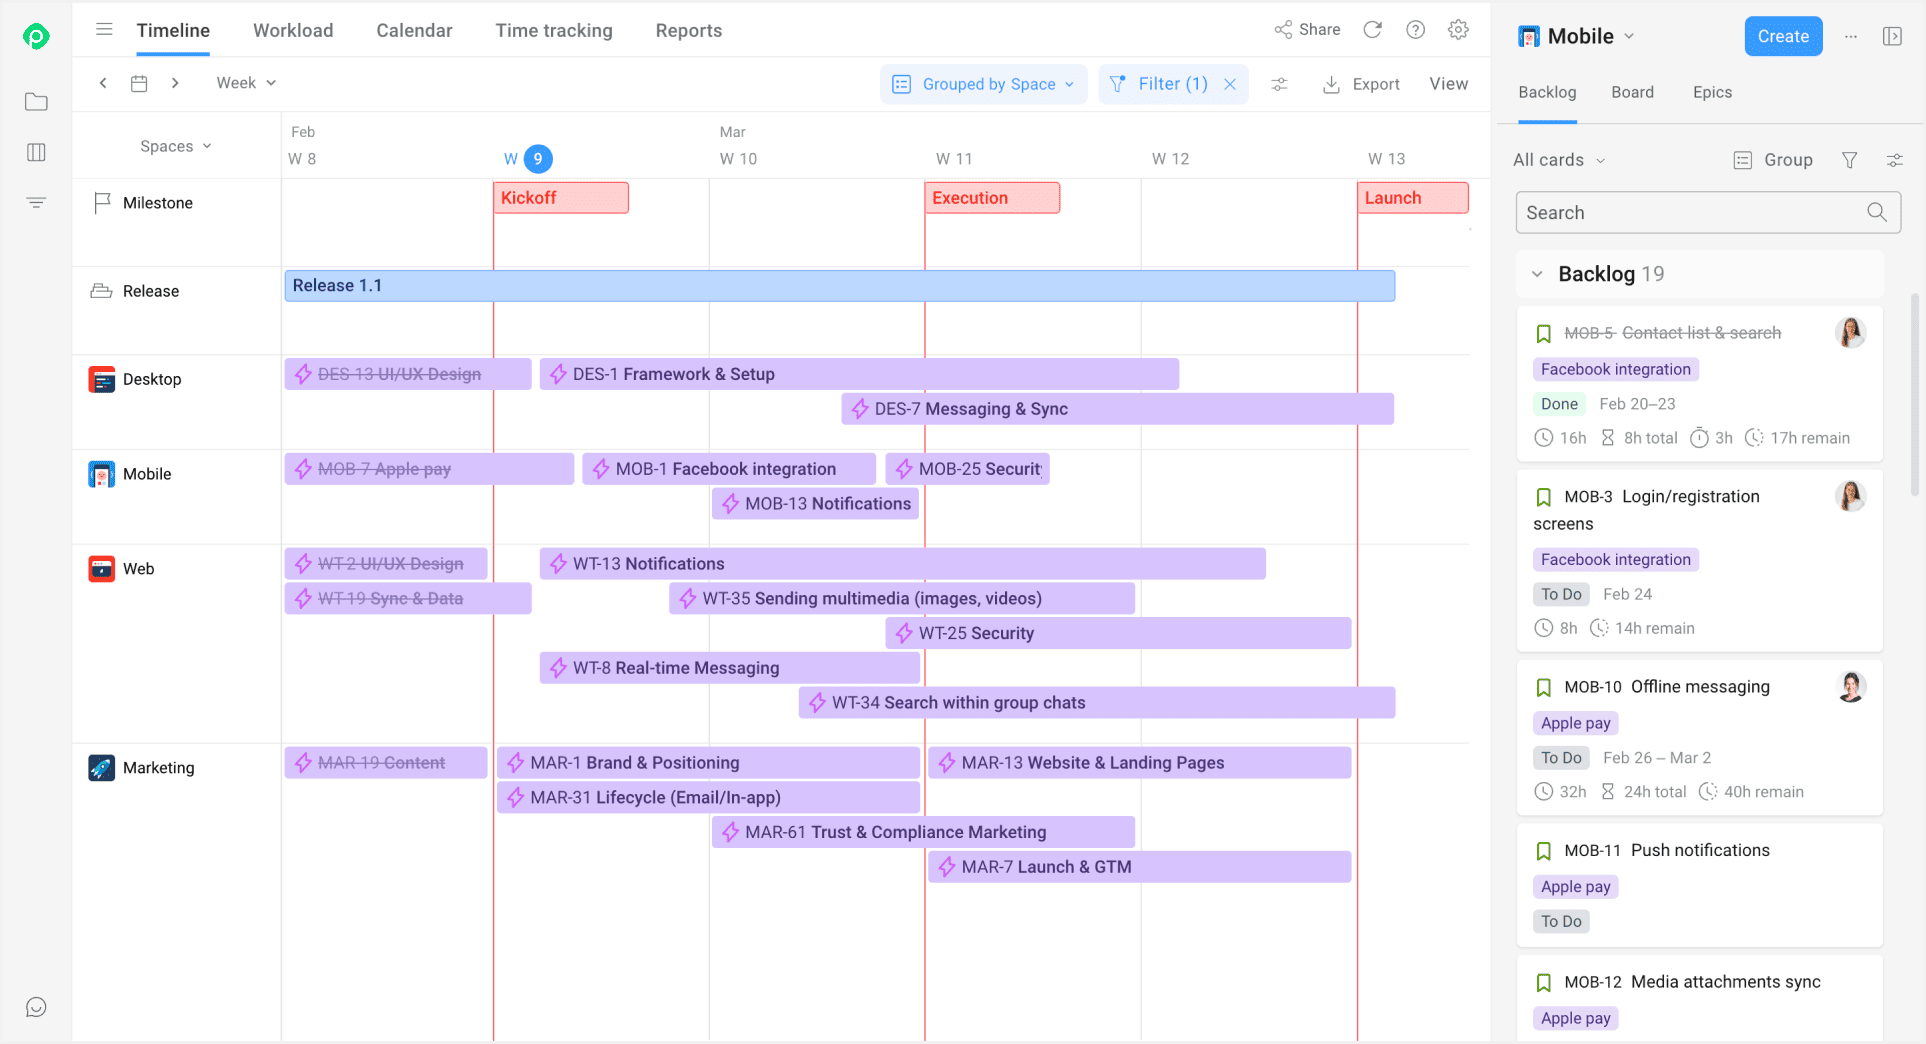
A project roadmap is where that intent becomes execution. It answers the operational questions: who does what, by when, and with what dependencies. In Jira, this execution side of things becomes very visible, as different teams, product owners, and project managers band together around the same operational view of work. Everyone stays on the same page without needing a separate tool to see the bigger picture.
These two types of roadmaps are most powerful in symbiosis, with strategy woven into every level of execution, and execution grounded enough to test strategy against reality.
Why do you need roadmaps in Jira at all?
Everything your team tracks day to day is already sitting in Jira. A roadmap drawn from that data stays current by default, saving the team time and cutting down on errors that come with moving data between systems. That's why the roadmap in Jira works especially well for teams running agile projects and doing project management across multiple products.
In practice, roadmaps translate into a few specific advantages:
- Orgs get a unified, source-of-truth timeline, enabling teams to track progress across all projects from a single view.
- Сonflicts and dependencies surface early enough, so teams can prevent them from wreaking havoc on the project.
- A shareable live view for stakeholder reviews is accessible via a link for any Jira user.
- Planning is grounded in actual workload data, reflecting what the team can ship in reality.
These are the basic benefits all roadmapping options in Jira have in common. From there, each option or tool adds its own unique strengths and key features.
What are your roadmap options in Jira?
Jira provides a few different tools to help you visualize your plan, each suited for a different purpose.
- Basic Timeline view. It's a free, built-in roadmap feature that's perfect for getting started and managing a single project. It has an intuitive interface and requires no extra setup.
- Jira Plans (formerly Advanced Roadmap). This is a premium feature designed for when you need to coordinate across multiple teams and projects.
- Third-party roadmapping apps/plugins from the Atlassian Marketplace, which offer unique roadmapping features and workflows.
Now, let's take a closer look at each of these options.
How to set up a basic roadmap in Jira? Timeline view
The simplest way to create a basic roadmap in Jira is the built-in Timeline — a project-level view of your epics, available on every subscription tier, including Free, Standard, Premium, and Enterprise, both on Jira Cloud and Data Center.
Setting it up takes a few minutes:
Step 1. Enable the Timeline view
Navigate to the Timeline tab in the left sidebar. If it's not there, just turn on this tab in the Board settings.
Step 2. Add your epics
Create epics directly on the timeline using the Create epic ****button, or use existing epics from your backlog. Epics need start and end dates to show up on the timeline, because without them, the view stays empty.
Step 3. Shape the timeline
Once dates are set, you'll see colored bars representing each epic on the timeline view. Drag the ends of the bars to move the start date or the deadline. Dragging the whole bar shifts both dates together. Progress on the epic fills in as child issues get closed. Child issues with their own dates feed the epic's bar automatically: the earliest starts it, and the latest ends.
Step 4. Break work down
Click the arrow next to any epic to expand it and see its child issues, including user stories, smaller tasks, and bugs. New child issues can be created directly from this view. Note that subtasks don't appear here, and only direct child issues of the epic are shown.
Step 5. Map dependencies
Dependencies go in through the Blocks relationship. To create one, draw a line from one epic bar to another directly on the timeline. The dependencies on the free Timeline only run within a single project. Cross-project dependencies require a Premium plan, whether on a cloud site or Data Center.
Step 6. Share your roadmap
To share the timeline with people outside Jira, export it as a PNG. Select Export in the top right corner, set the date range, and the image downloads automatically. If your stakeholders need something interactive and always up to date, the Share button lets you copy a link. Viewers will need a Jira license to open it.
Limitations of the free Timeline view in Jira
The free Jira roadmap timeline is a nice starting point for any Jira project and a solid first step into Jira roadmapping overall before moving to more advanced options. For teams that don't need to coordinate across projects, it does the job well. For the others, not so much because of its inherent limitations:
- One project at a time. Basic Timeline view only shows issues from the project you're currently in. If you try to adjust the board filter to include two different projects, the timeline simply disappears and can’t be used at all.
- Basic hierarchy. The Timeline shows epics and their direct child issues, including stories, tasks, and bugs. Adding levels above epics or below stories requires Plans (Premium).
- No capacity planning. The tool doesn't include features to see if your team's workload is balanced or if specific teams are over-committed.
- Simple dependency views. You can link issues within the same project using the Blocks relationship, but visualizing dependencies across various projects branching into complex chains calls for a higher tier.
- No scenario or what-if planning. You can't easily compare different roadmap versions or simulate changes.
- Basic filtering and customization. Key features like filter work options, grouping, and view controls are more limited than in advanced roadmap tools.
- Weak support for stakeholder communication. It's not designed as a polished, shareable planning artifact for leadership or external audiences.
Advanced Roadmaps in Jira: when basic timelines are not enough
When teams outgrow a single-project timeline, they can upgrade to Advanced Roadmaps (now officially called Jira Plans), which unlocks a planning and coordination layer in Jira. While the basic Timeline view helps you manage work within one project, Advanced Roadmaps allows you to coordinate work across multiple teams, projects, and levels of hierarchy in a unified view. For project management teams handling portfolio management across multiple products, Plans is Atlassian's native roadmap feature built for exactly this.
Jira Plans is designed as a sandbox, a separate planning layer that works with your Jira data without writing back until you commit. It enables you to plan freely without worrying about breaking something a team is actively working on. It also means the plan can drift from reality if nobody keeps it updated.
Unfortunately, you have to be on a Jira premium subscription tier (Cloud or Data Center) to step up to advanced roadmapping. If you’re on Standard or Free, you won't see these options unless you upgrade your subscription.
What are the core features of Advanced Roadmaps in Jira?
Six roadmap features separate Plans from the basic Jira roadmap Timeline. Here is what each one covers:
Cross-project visibility. Issues from multiple Jira projects come together in a single plan, showing the bigger picture. The view groups by team, sprint, release, or any custom field — whatever question you're trying to answer.
Multi-level hierarchy. A director and an engineer can open the same plan, and each can see exactly what's relevant to them: product owners at initiative-level direction, dev teams at epics and dependencies.
Capacity planning. Plans lets you set team availability and see whether your timeline is realistic given the workload. Capacity is calculated at the team level, pooling total hours or story points across the whole team per iteration.
Some teams work around this by creating one “team” per person. This works, but scales poorly and is officially a not-as-intended use case.
Dependency management at scale. Cross-project dependencies show up as visual connectors on the timeline, making it easier to map dependencies and spot sequencing problems early.
Scenario planning. Since Plans is a sandbox, alternative versions of your plan can be created without touching live Jira data. When two directions seem equally sound, the sandbox lets you stress-test both and pick the one that actually holds up.
Advanced scheduling and auto-planning. Plans can suggest timeline adjustments based on dependencies, priorities, and capacity. It's useful as a starting point when manual sequencing takes hours.
Together, these features give a project manager the bird's-eye view they need to coordinate work across teams.
How to set up advanced roadmaps in Jira, step by step
Here’s how you can add powerful roadmapping capabilities to your Jira:
Step 1. Go to Jira Plans in the top navigation and select Create plan. Name it after the product, initiative, or programme you're coordinating.
Step 2. Choose your issue sources. Plans pulls data from three types: Projects (all issues in a Jira project), Boards (issues on a specific board), or JQL filters (a custom query for precise control over what's included). You can mix sources — for instance, pull from two projects and one board. If you change your mind later, sources can be added or removed at any time from the Plan settings.
Step 3. Configure your hierarchy in Plan settings. By default, Plans uses Epic as the top level, but you can add a level above it to connect strategy to delivery on a single screen. View settings control the grouping (by team, sprint, or release), enabling teams to see exactly what's relevant for them.
Step 4. Set dates and draw dependency lines between issues across different projects. When a dependency creates a scheduling conflict, the line turns red. This view surfaces sequencing problems while there's still room to manoeuvre.
Step 5. When the planning part is done, hit Review changes to see what's diverged from the current Jira data, then Save changes to push updates back.
If plan creation isn't available, your Jira admin may have restricted it. Most licensed users have access by default, but admins can lock it down.
Third-party apps for Jira roadmapping
If you want advanced roadmapping capabilities but don't feel like doubling your Jira bill, you can install a third-party roadmapping plugin. Apart from saving money, plugins can also make the entire experience lighter than Jira's native tools, because adding a plugin means choosing a tool built around a specific gap. Instead of bankrolling a full platform and using 30% of it, you end up with a tool that plugs the exact gap.
Let's dig into what a roadmapping plugin can bring to the table, using Planyway as an example.
Planyway is a timeline and resource allocation Jira plugin, built for product teams that need more than the native tools offer. It reads from your existing projects, boards, and filters and turns that data into an interactive visual timeline.
Individual capacity instead of buckets. Where Plans stops at the team level, Planyway breaks it down by person: each person gets their own timeline row with a workload heat map. When someone's bar turns red, the issue can be moved to another person or stretched across more days.
Reality-aware availability. Planyway brings real availability into the picture by automatically applying public holiday calendars for each country and letting you mark individual days off. Sprint planning shifts from team totals to what this specific group of people can deliver next week.
Instant sync with Jira. Every change in Planyway writes back to Jira in real time, giving your team real-time visibility into what's changed.
Sharing without a Jira license. Plans exports to PNG only for unlicensed viewers. Planyway generates PDF and Excel exports for external stakeholders, plus a live interactive link for licensed users.
Time tracking in the same subscription. Plans has no time tracking. Planyway includes time logging via list view, calendar, or timer, with reports by assignee, project, epic, or client.
Bottom line, plugins like Planyway help teams create roadmaps in Jira that hold up in practice, and that feedback is what prioritization decisions run on.
Best practices for Jira roadmaps that actually make a difference
Roadmaps in Jira or anywhere else fail when teams start treating them like a finished, polished document for presentation, instead of something that’s actively updated and used to guide real work. So a clear roadmap is less about the software and more about the habits and discipline of the team using it.
Keep roadmap views audience-specific
For strategy conversations with senior stakeholders, you should never surface the full task list. It pulls attention into execution details that don’t matter at that level and quickly turns a strategic discussion into a debate about scope and tickets. Instead, bucket work into capabilities, problems being solved, and metrics being moved.
In this context, roadmaps work as a practical way to communicate priorities from a single source of data. Jira's saved filters and custom views make this possible, helping teams align around the right level of detail for each audience.
Treat roadmaps as a working document, not a deliverable
There are two ways to approach roadmaps. One is where a roadmap is prepared before a planning session, presented once, and then forgotten. The other is where the roadmap is used for actual planning. Jira gives you the infrastructure for the second approach: the data is already there, and updates flow in automatically as work moves. But deciding what matters (and what doesn't) is still on the team.
Use live views instead of static exports
Instead of exporting a roadmap as a static file and constantly re-uploading or updating it, it’s much easier to just use a live shared view that stays up to date on its own. To that end, a live link pasted into a Confluence page does the job. Stakeholders can access an up-to-date roadmap whenever they need it, and nobody has to send manual status updates across different teams.
Make it clear what the dates mean
The moment a date appears on a roadmap, some stakeholders view it as a commitment. Teams that work under that assumption tend to stop updating dates when things slip, because updating the date feels like admitting failure.
As a result, the roadmap freezes and drifts away from reality. Setting the expectation upfront, i.e., agreeing that dates are estimates, and that an updated date is more useful than a wrong one left in place, is what will help keep the roadmap alive.
Map dependencies at the start
When dependencies are put on the back burner in multi-team projects, they tend to show up at the worst possible moment. Usually, that's when one team slips and the other finds out too late to do anything about it. However, if dependencies are mapped early and checked regularly, teams have a much better chance of nipping the conflict in the bud.
Keep the roadmap updated as changes happen
Whether that's a scope change, a date that slipped, or a dependency that's just been cleared, a roadmap should reflect it by the end of the day. An outdated roadmap always costs more time than keeping it up to date would have.
A roadmap won't fix your process, but it can reveal it
If your sprint reviews consistently surface surprises, like things slipping or dependencies no one tracked, the roadmap isn't the main problem. It just indicates that something in how your team plans and communicates needs attention. And that is actually the most useful thing a roadmap can do for you: it highlights the gap between what was planned and what happened.
Jira's native tools give you the structure to build that view — from basic timeline to portfolio management across teams. Plans extends it across teams. Planyway adds the individual layer between the strategic plan and what teams can actually deliver.


FAQ
Timeline is built into every Jira plan and works within a single project. It shows epics and their child issues on a calendar, and supports basic dependency linking. Plans is a Premium roadmap feature that turns your Jira data into a product roadmap across multiple projects. It adds custom hierarchy above epics, enables scenario planning in a sandbox environment, and supports cross-project dependency mapping. The practical difference is that Timeline is for one team planning their own work, while Plans is for coordinating work across teams.
You don’t necessarily need Advanced Roadmaps to create a roadmap in Jira. You can create a functional roadmap for any single-project team using the free Timeline. You need Plans or a third-party plugin when the work spans more than one project and calls for cross-team visibility, dependencies between projects, or hierarchy above the epic level.
You can create a roadmap across multiple Jira projects with a third-party plugin like Planyway. It handles cross-project releases, agile teams coordination, and agile project management on Standard-tier Jira.