Jira Capacity Planning: Best Way to Plan Teamwork Effectively
How to Create Jira Timeline in 2026
Jira offers a variety of dashboards and tools to help visualize your project's implementation stages, including timelines, roadmaps, Gantt-like charts, and more. On Atlassian community forums, I often see confusion around these different terms and how to use them. This is understandable, as Jira provides two main built-in tools for visual planning: the timeline and Jira Advanced Roadmaps.
Moreover, Atlassian often updates the names of its features. For instance, Jira Plans was once known as Jira Advanced Roadmaps, and prior to that, it was called Portfolio for Jira!
In this article, we will break down the purpose of each of these planning tools, show how to create a default timeline within Jira, and then create a more detailed version for daily tracking and planning using a Jira plugin.
What is a Jira timeline?
First and foremost, the Timeline in Jira is the name of the tool within the project. We’ll explain how to use it a bit later. For now, let’s understand what a timeline is in project management.
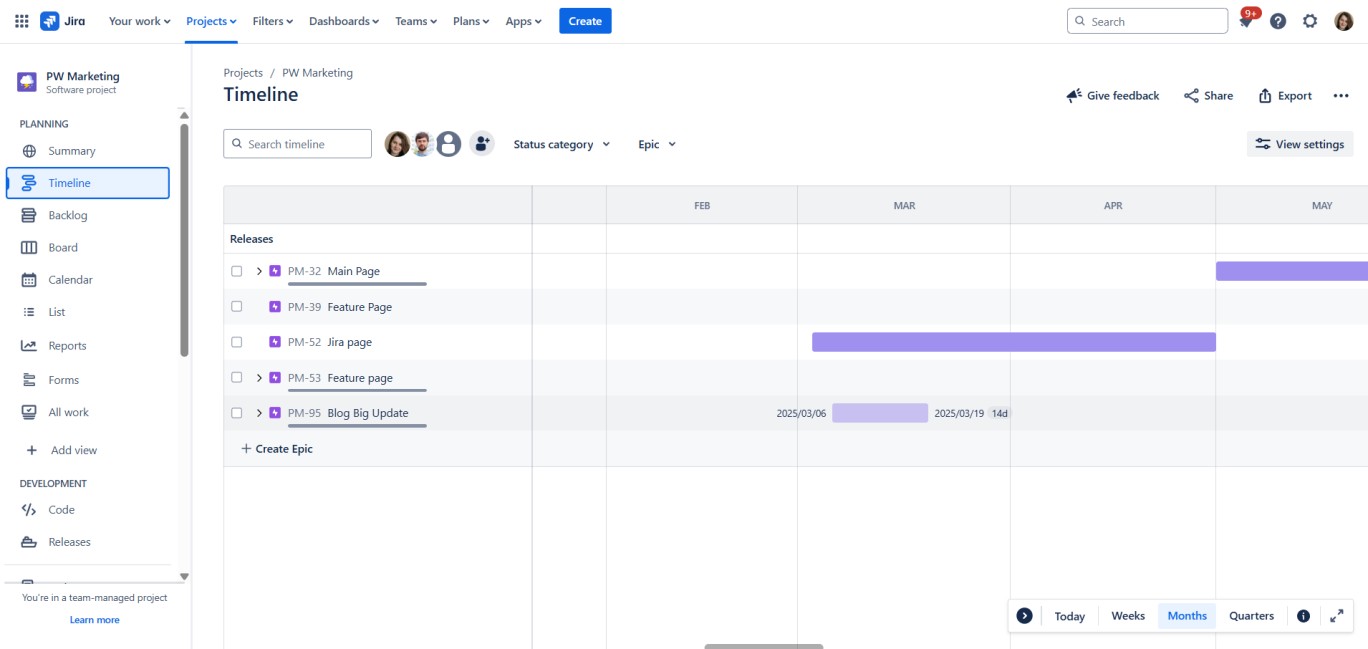
A project timeline is a visual representation of your project, showing its breakdown from the beginning to completion, covering all tasks and milestones, with deadlines assigned to each task. The timeline view helps you keep track of due dates and coordinate work to ensure the project is delivered on time.
Here are the main reasons why timeline is so helpful for project management:
- All teammates get access to the clear project overview
- Project steps become visible
- You schedule project from the start to an end
- Each task has a visible due date
- Tasks are allocated to team members
- It can be shared with external stakeholders
- Updates happen in real time
How to create a Jira Timeline
Let’s start with the built-in tools. The basic timeline is generated automatically if you have already set deadlines in tasks and epics.
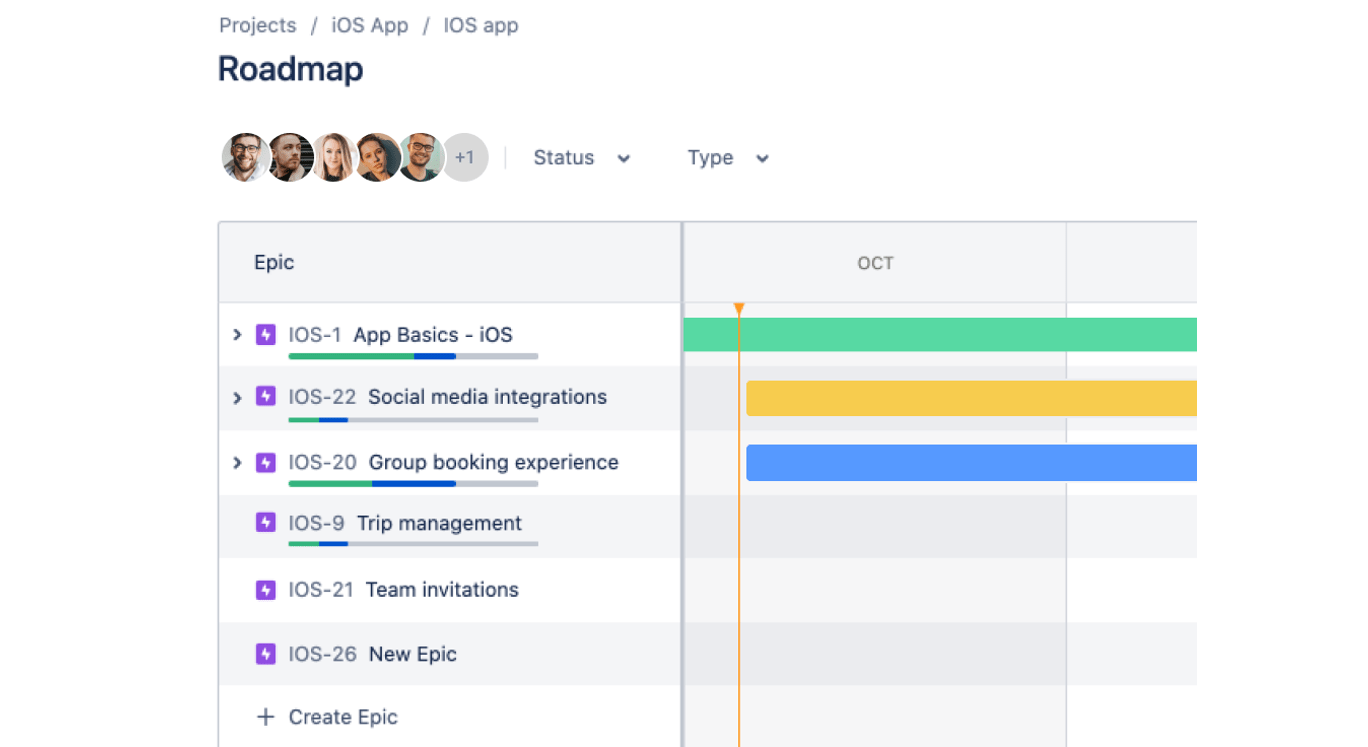
This built-in timeline is ideal for small to medium-sized teams who need a straightforward tool to organize work. Here's how it works and how it differs from the Premium subscription's Advanced Roadmaps:
Default timeline in Jira
The default Timeline allows teams to:
Visualize Epics: view epics on a timeline with clear start and due dates.
Plan Work Easily: drag and drop issues to adjust schedules, ensuring they align with deadlines.
Track Progress: monitor the progress of individual tasks and their relation to larger goals.
Dependencies: identify and manage task dependencies to avoid bottlenecks.
Premium subscription: Advanced Roadmaps
For users on the Premium plan, Jira unlocks Advanced Roadmaps, which significantly expand the functionality of the Timeline tool.
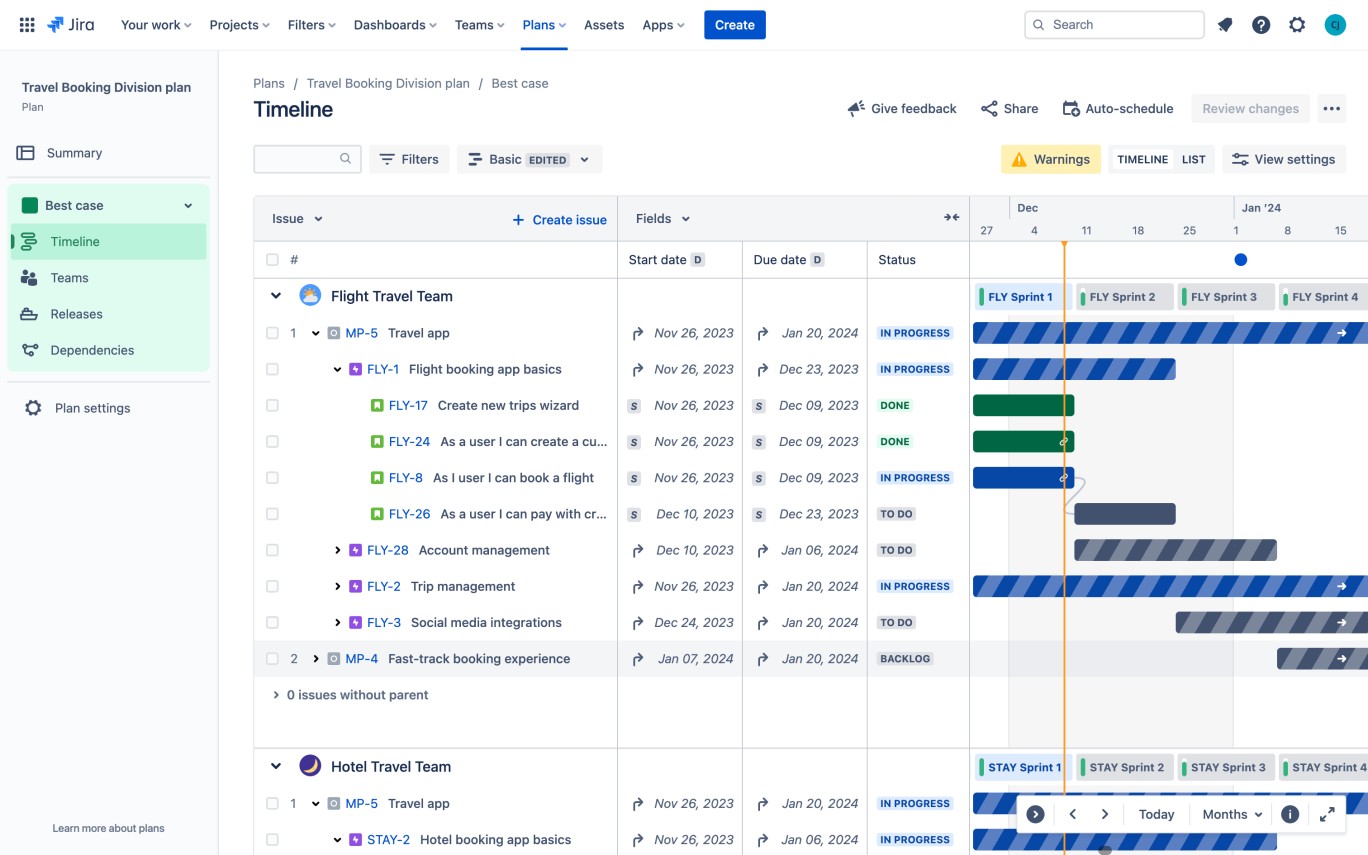 Advanced Roadmaps are designed for larger teams and organizations managing work across multiple projects. Key features include:
Multi-Project Planning: consolidate and track progress across multiple Jira projects in a unified view.
Resource Management: analyze team capacity and allocate resources effectively. Custom Hierarchies: Go beyond epics by creating custom issue hierarchies tailored to your workflow.
Scenario Planning: build “what-if” scenarios to model different approaches to scheduling and resource allocation.
Advanced Dependency Management: visualize complex dependencies across projects for better coordination.
Limitations of built-in timeline and roadmap
- Lack of milestones: project milestones in Jira are essential for roadmaps, as they help project managers explain why certain initiatives are prioritized or define critical deadlines. However, Jira’s built-in roadmaps currently do not allow the creation of milestones. -** Sharing limitations:** Jira’s built-in roadmapping feature is most effective when sharing with colleagues who also use Jira. But, these users must have a Jira license and be willing to learn how to use Jira in order to access the roadmap.
- Limited rollup calculations (number fields): rollup calculations, which summarize child issue values at the parent issue level, can only be applied to a few fields. Custom fields cannot be included in these rollup calculations.
- No rollup for secondary dates: rollup calculations cannot be applied to secondary date fields like the scheduled start date, review date, approval date, etc. This limitation means you cannot create a field to display the latest review date for all stories within an epic, limiting your ability to track the overall progress.
- Color coding restrictions: Jira has a predefined color-coding system for its issue types such as Epics, Stories, and Tasks. If you want to apply your brand’s colors or use color theory to communicate project details, you'll need to explore other solutions.
- Limited export: Jira’s built-in tools do not support full export of the timeline in formats such as Excel or PDF while retaining all visual elements. The export often only includes basic information like tasks, deadlines, and assignees. Additionally, key elements such as task dependencies, milestones, and other visual components are often lost in the export process.
- Limitations with epics across multiple projects: in addition to the Timeline not allowing you to include Epics from multiple projects in one roadmap, this feature is only available if you upgrade to Jira Premium for Advanced Roadmaps.
Streamline Jira timeline with Planyway
Planyway app is super handy for those who want to bring more visibility across projects without excessive complexity.
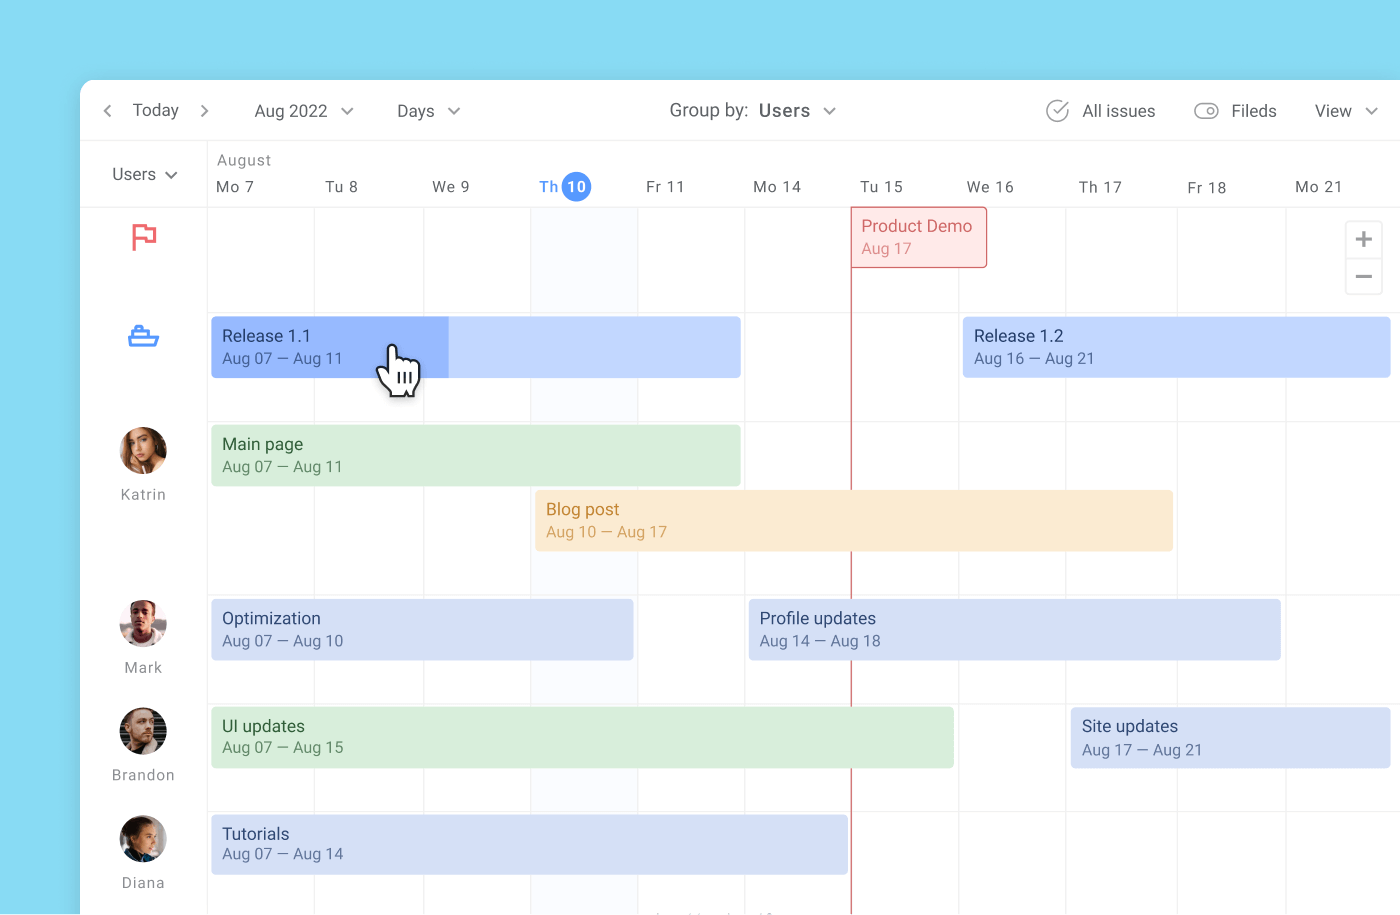
Group timeline by users, projects, and epics
Planyway allows you to visualize your workflow from different angles. Instead of just having the basic timeline view, you can also group it by team members for easier resource planning. by Jira epics, and projects to make a project portfolio.

Schedule issues with drag and drop
Simply drag issues from your [Jira board](Jira board) to the timeline and drop them on the right date to schedule.
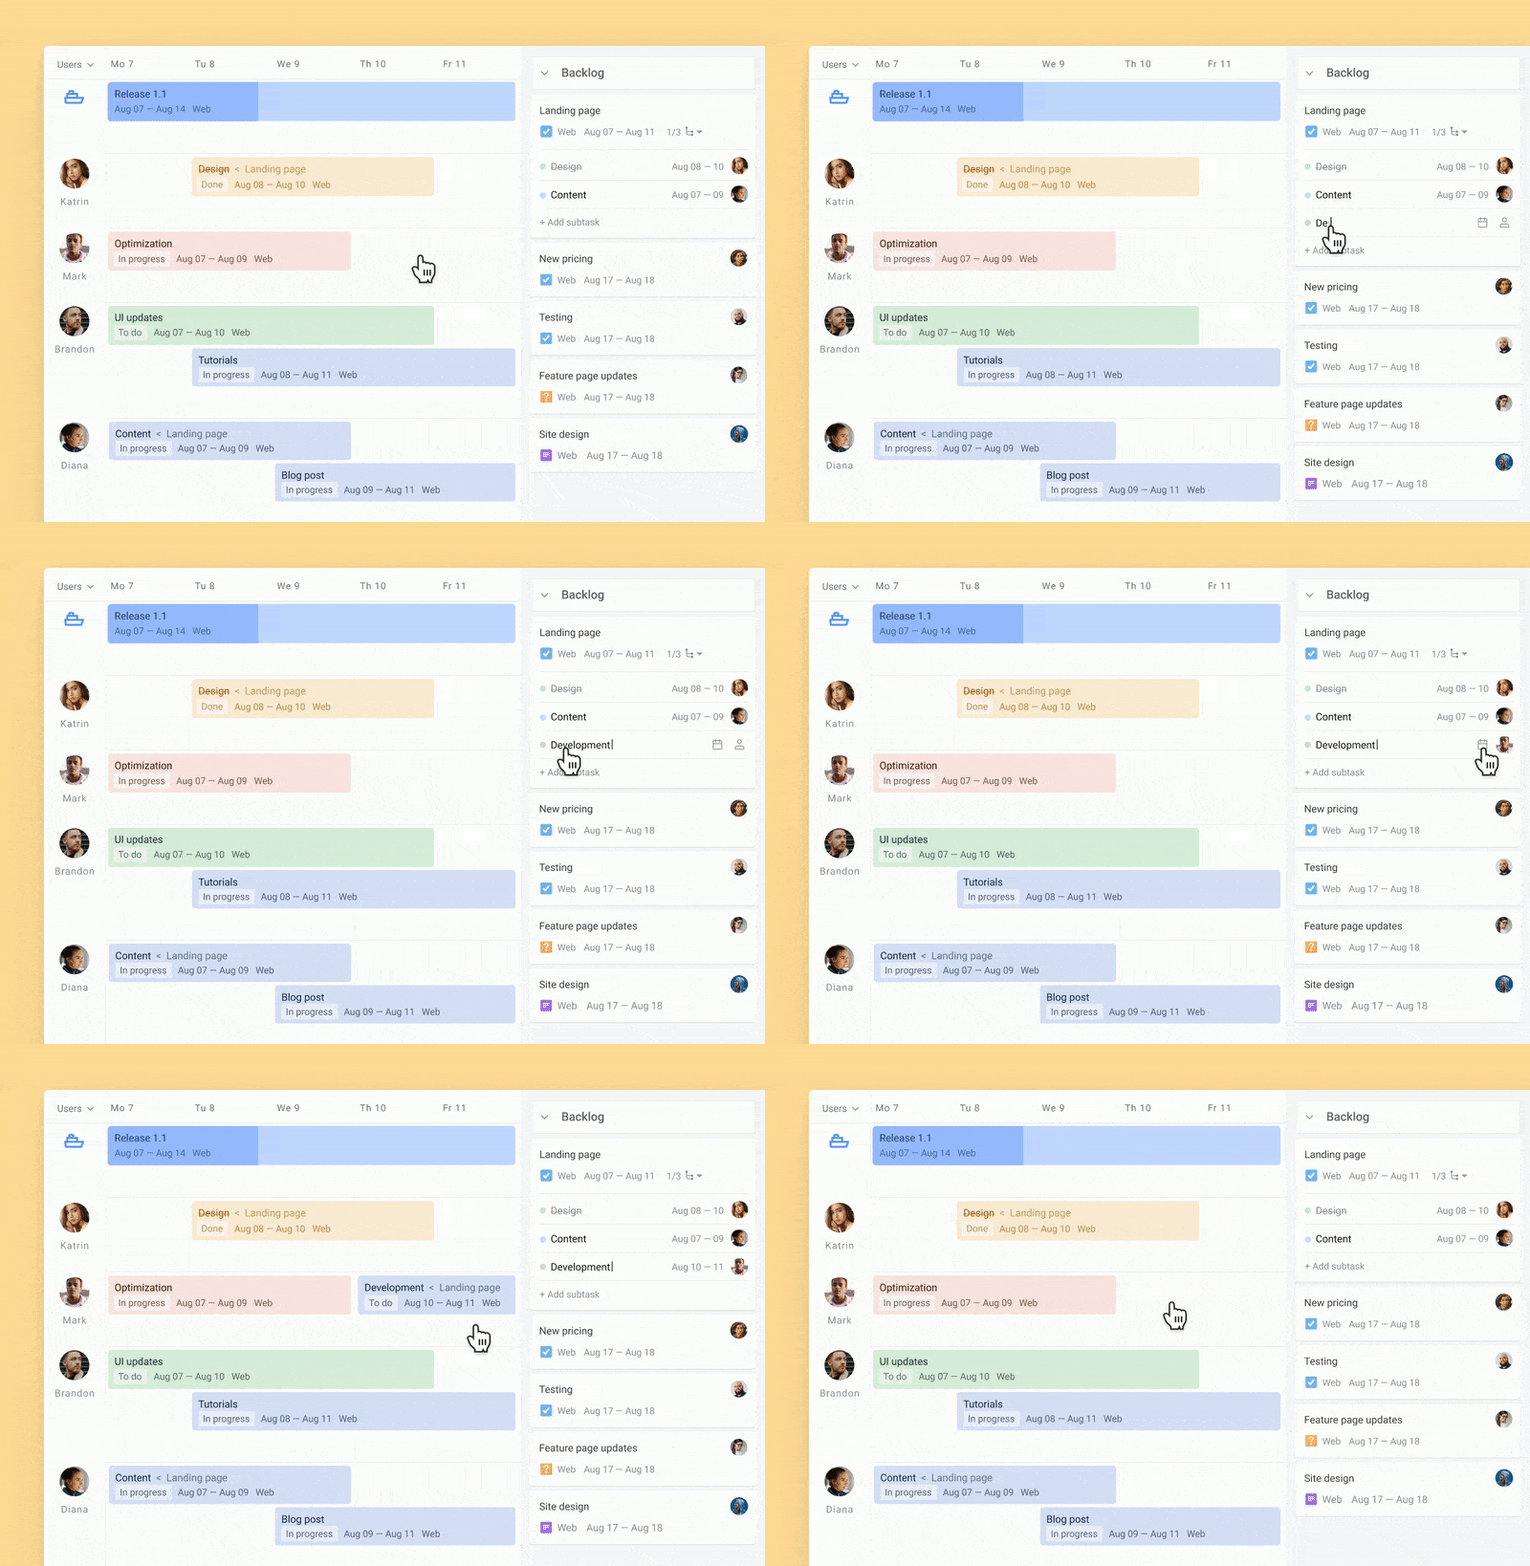
Make subtasks visible
While the majority of alternative plugins show only issues on timeline, while Planyway can visualize your subtasks on the Jira roadmap too. Once you add dates to a subtask, it shows up along with regular Jira issues on the timeline. At any moment, you have a choice to hide them and return to a more high-level planning.
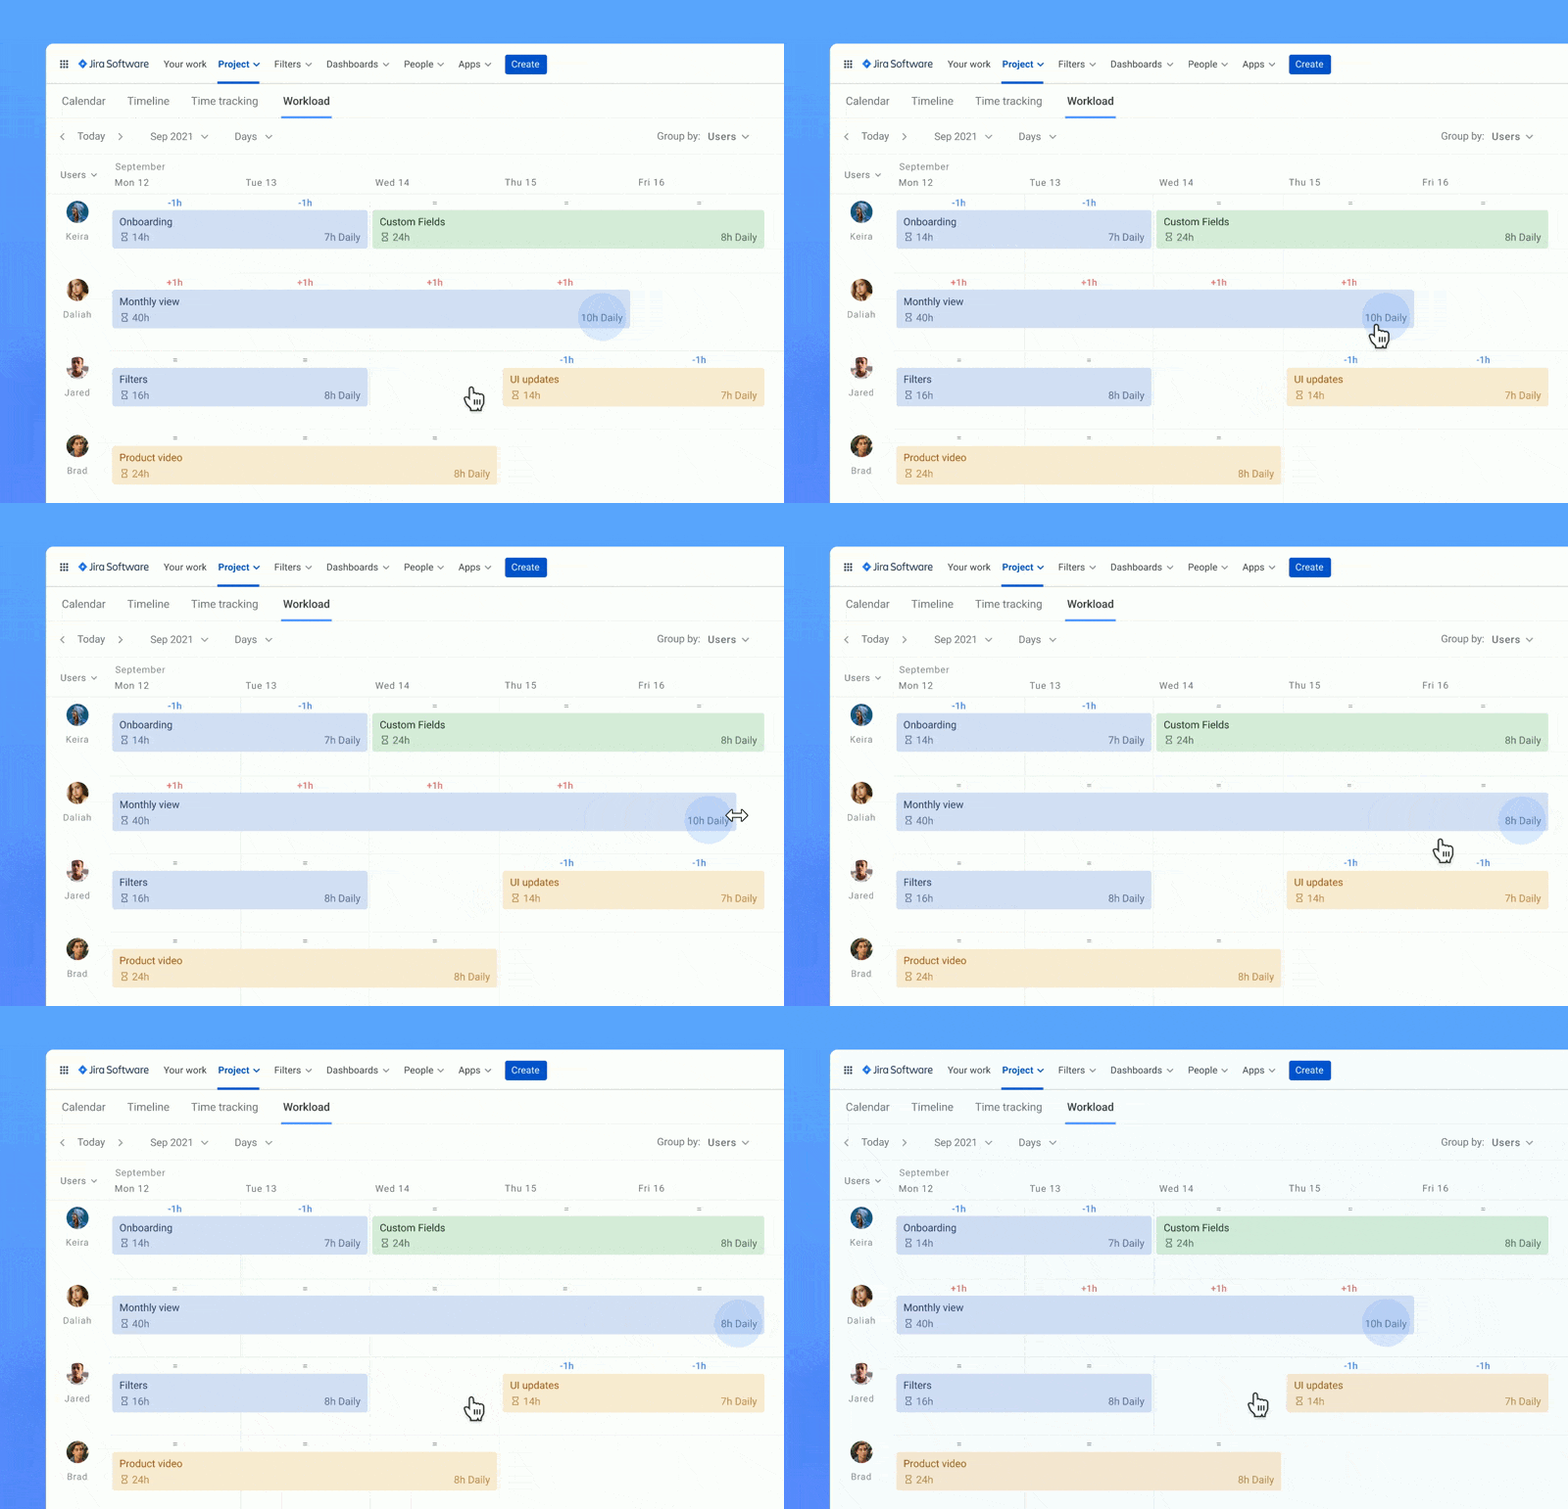
Plan team workload
This way is super handy when you’d like to allocate new work pieces based on the current workload and availability, as you can easily spot potential candidates. The workload mode will also help you balance the workload to make sure no one in the team is overloaded.
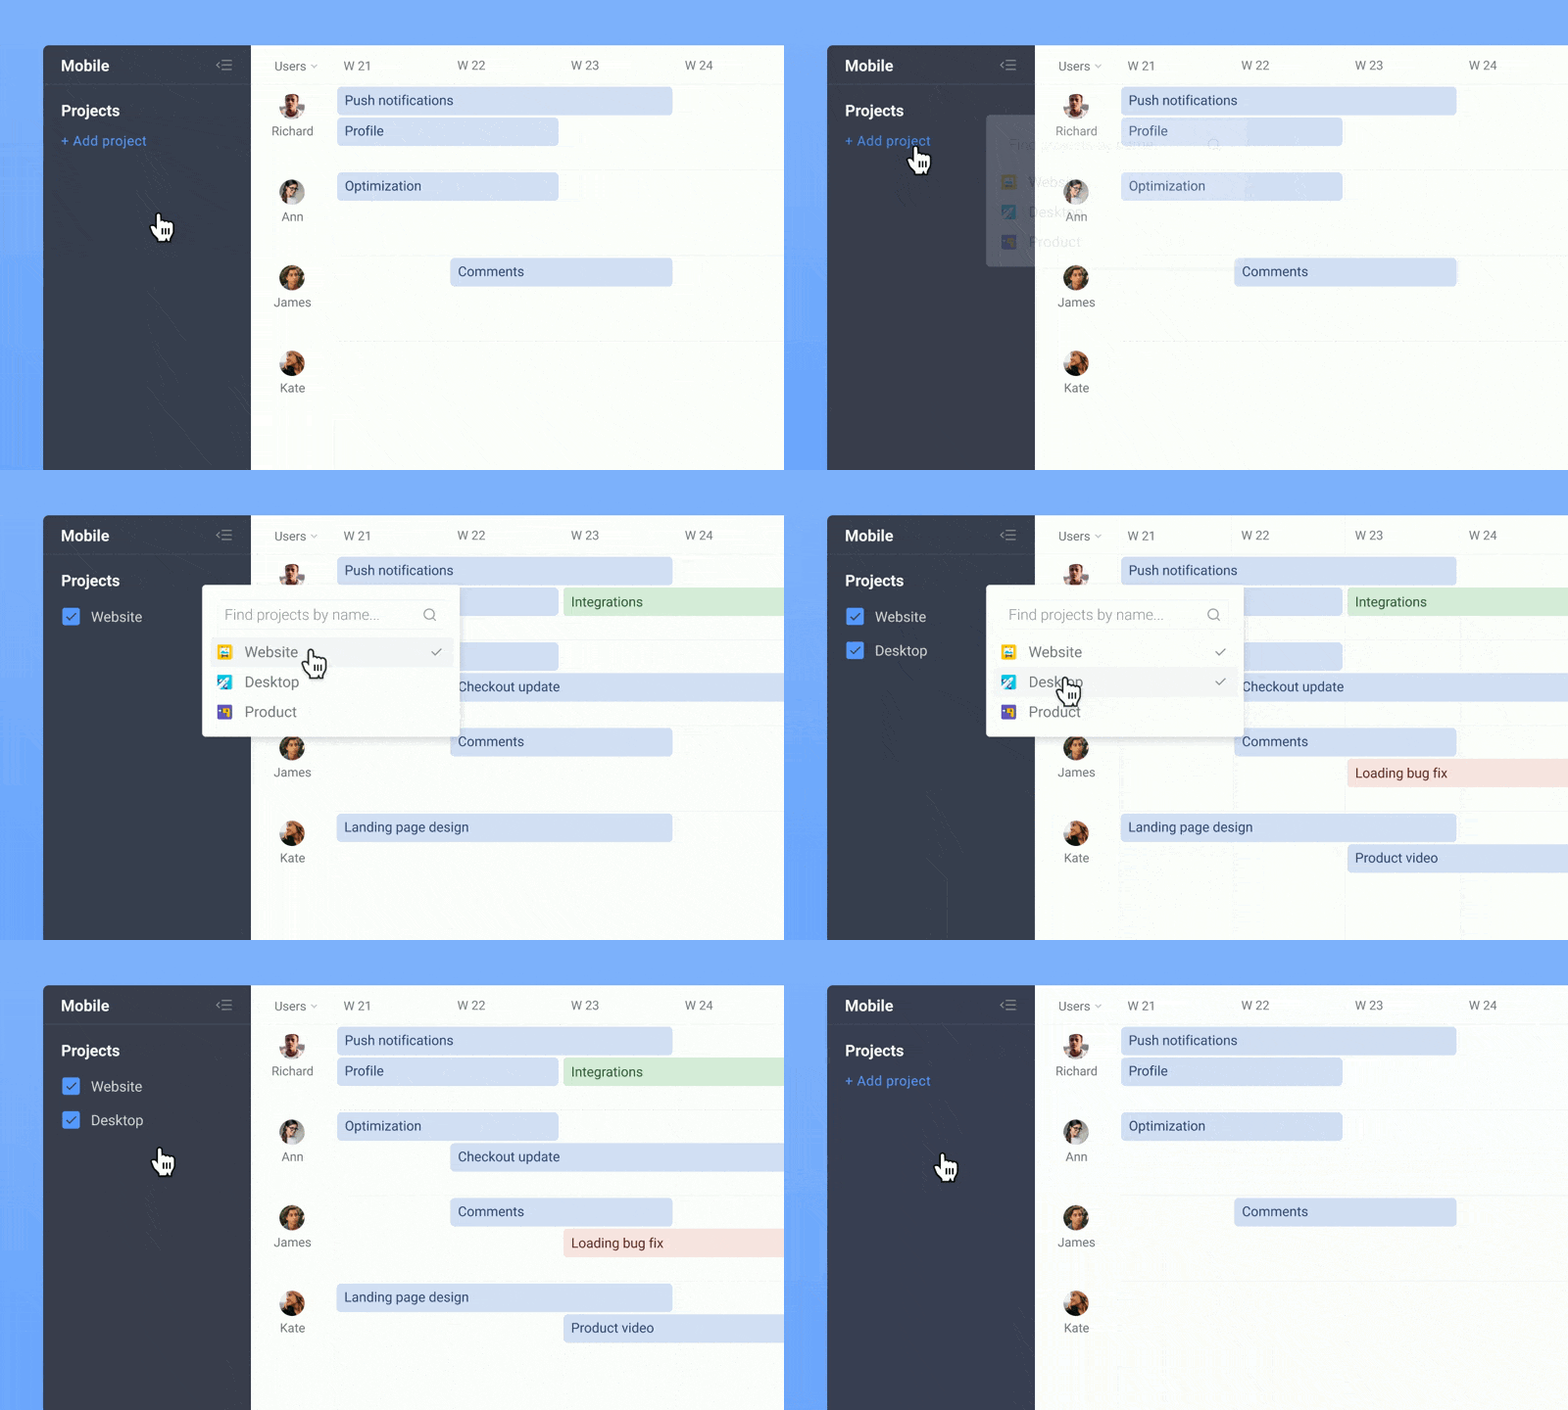
Plan across multiple projects
When your team works on multiple projects, make use of the multi-board view. Connect all the projects you want to keep track of at the same time and see their issues visualized together on one timeline.
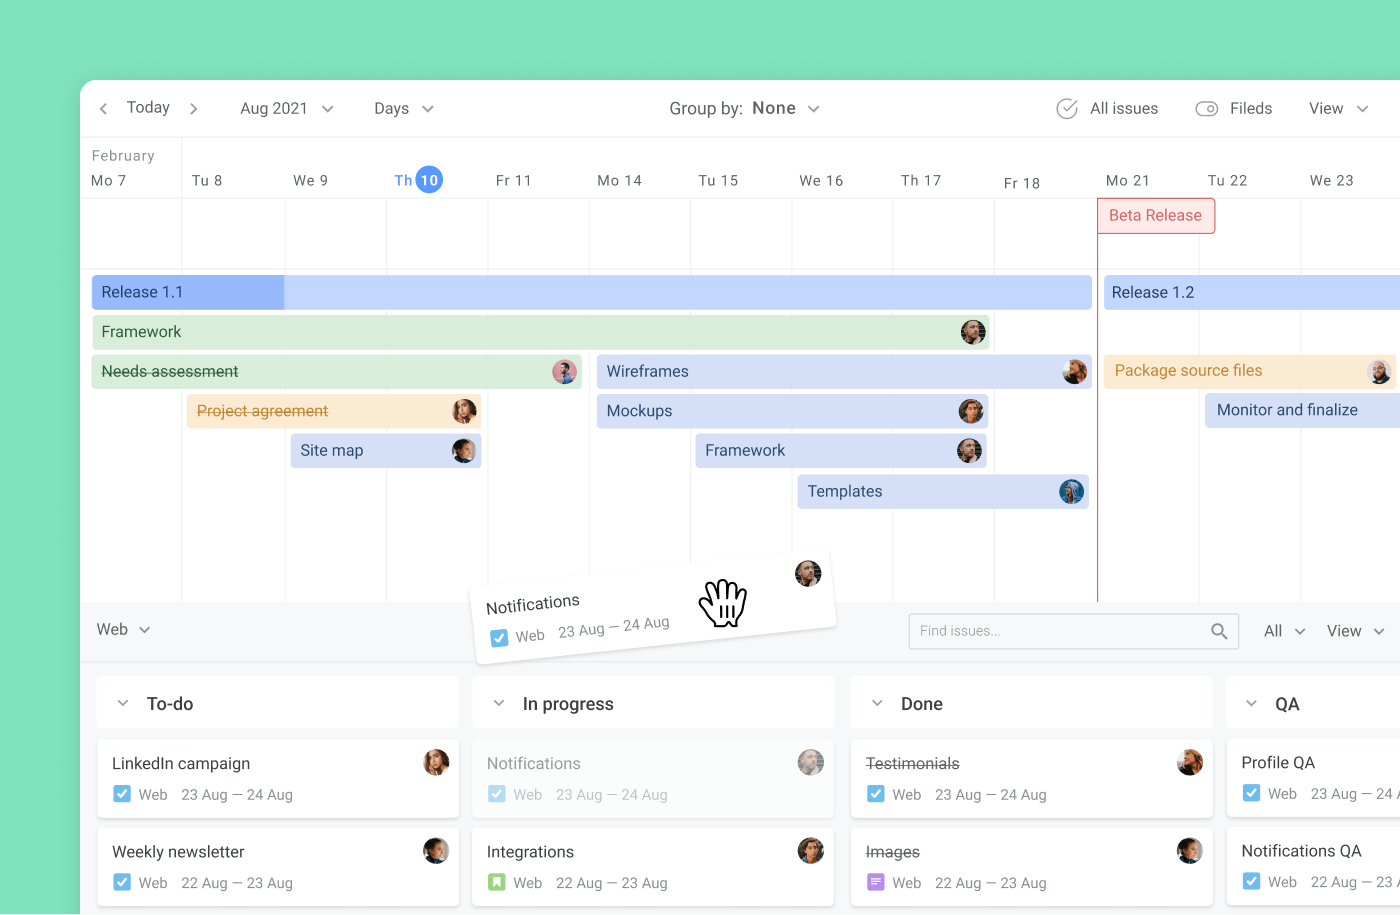
Highlight milestones and releases
There is no project plan without milestones and releases. You can plan out releases along with your Jira issues and see how much work is done already. Milestones play the role of key date trackers that visually remind you of important due dates.
⭐️ Learn more about how to create a timeline in Jira!
Differences between Timeline and Roadmap in Jira
In Jira, one of the default tools is called "Advanced Roadmap." However, in our opinion, it is also of a timeline variant intended for communication with stakeholders. In the following section, we will explore the differences between these tools.
Timeline and its purpose
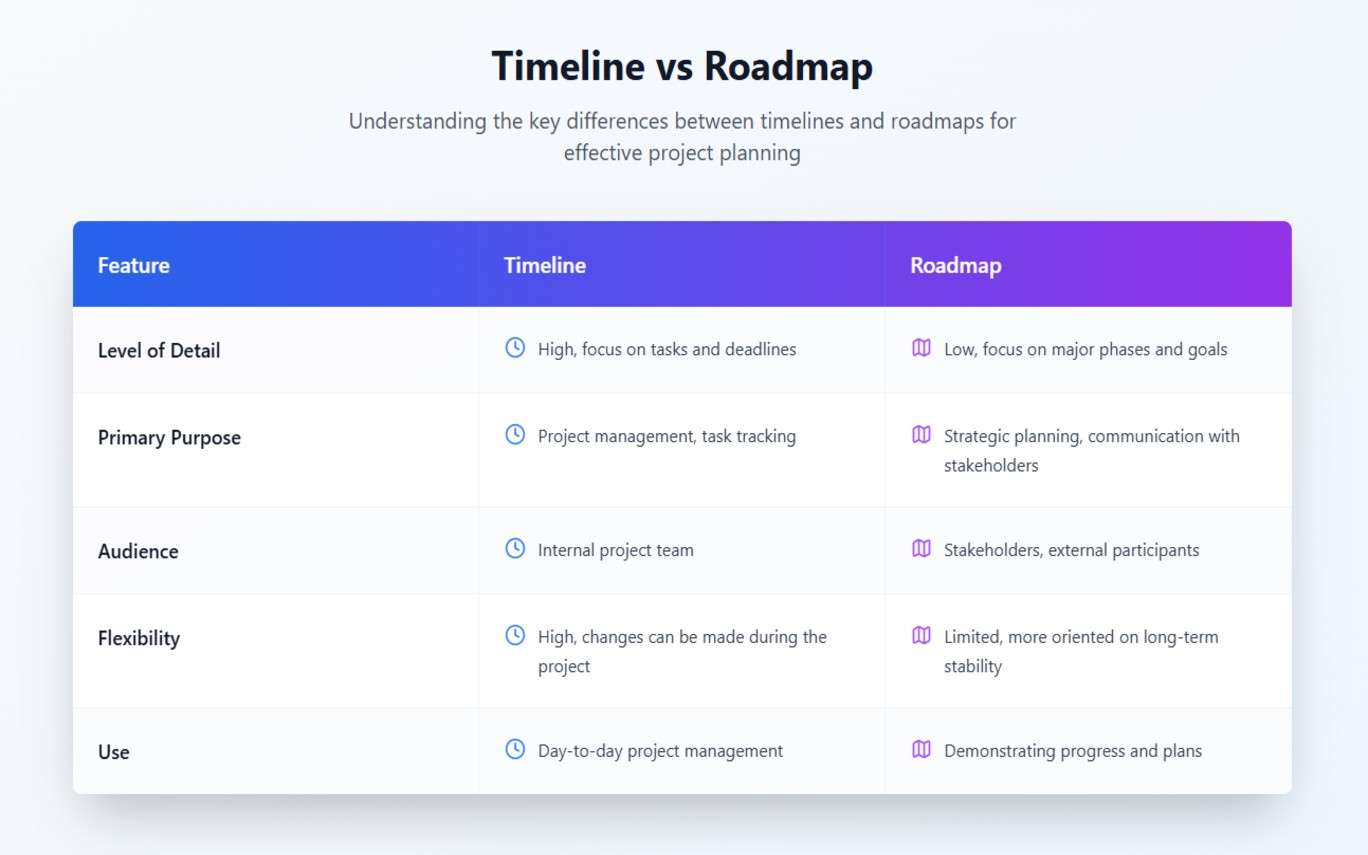
The timeline in Jira is a powerful tool for detailed real-time tracking of task progress. It allows project management by tracking tasks, sprints, and key milestones with high precision. Users can see not only the deadlines for tasks but also their dependencies on one another, which helps adjust the schedule during the process. This tool is especially valuable for Agile teams, as it enables quick adaptation of plans and tracking task execution.
Roadmap and its purpose
The roadmap in Jira is a higher-level version of the tool, focused on long-term goals and key project phases. It is used for visualizing major milestones and for communication with stakeholders, aligning the team with the overall project direction. The roadmap helps to see larger objectives without delving into task details, providing an overview of the project's status. Unlike the timeline, the roadmap is less detailed and is more often used for strategic planning and demonstrating progress to external participants.
Comparison
Differences between Timeline and Gantt Chart in Jira
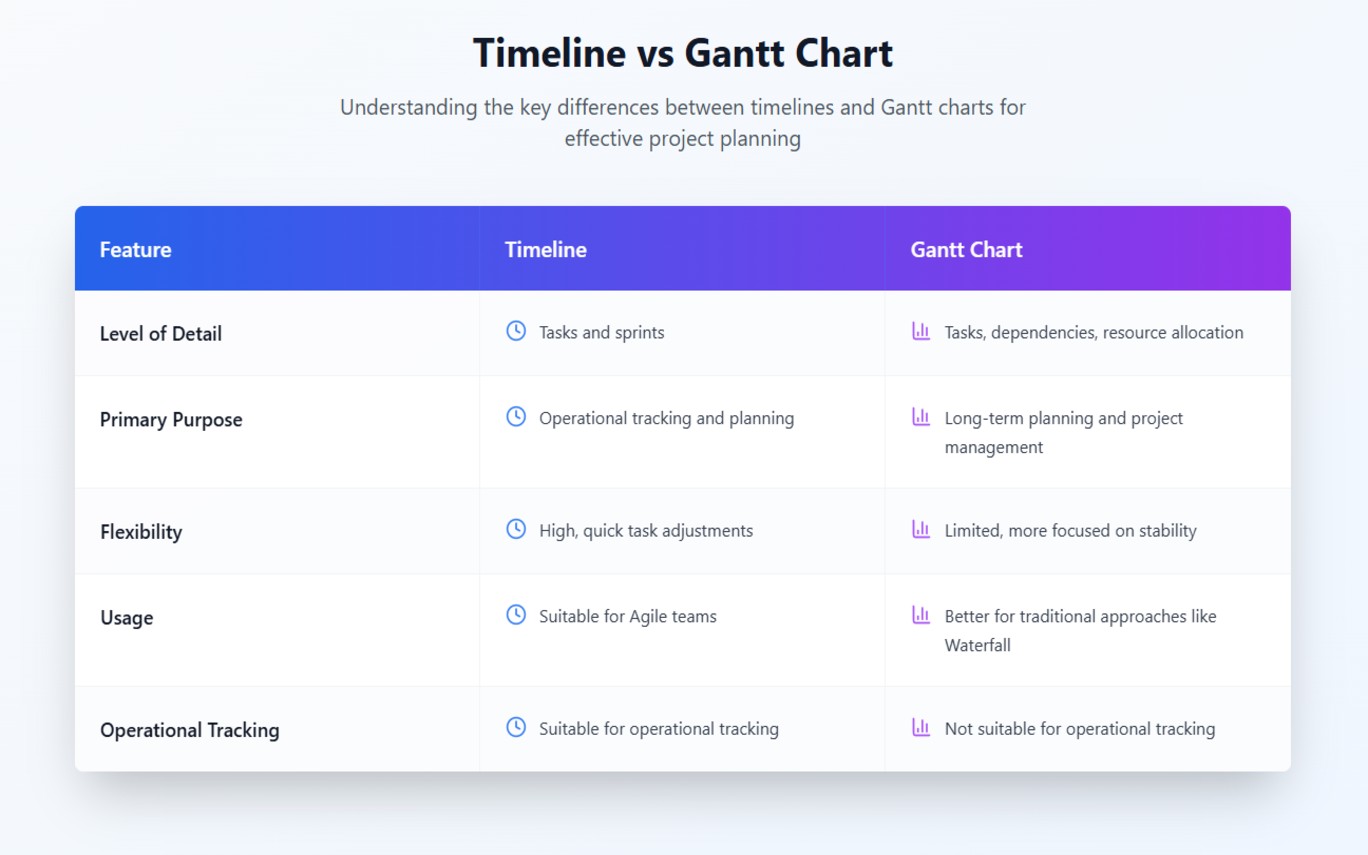
As mentioned earlier, the project timeline in Jira is an ideal tool for Agile teams, while the Gantt chart is a component of traditional project management approaches, such as using the Waterfall methodology.
By default, a Gantt chart can’t be created using Jira's built-in planning tools. For this, you’ll need to connect third-party plugins. The Gantt chart is a visual representation of tasks on a timeline, allowing you to track dependencies, allocate resources, and analyze the project's critical path. It’s used for long-term planning but is not suitable for operational project tracking, as it focuses on overall phases and deadlines rather than dynamic changes and short-term tasks.
The Gantt chart is ideal for situations where a project has clearly defined phases with predictable timelines and dependencies. It helps visualize how tasks are interconnected and allows for controlling deadlines and resources, minimizing risks and delays.
Let’s take a look at the comparison in a table.
Project timeline vs Agile timeline
A project timeline and an agile timeline are two different approaches to managing the time and resources required to complete a project.
The project timeline is usually a linear schedule that outlines the start and end dates for each task, as well as the dependencies between tasks. It is typically created at the beginning of the project and is updated as the project progresses
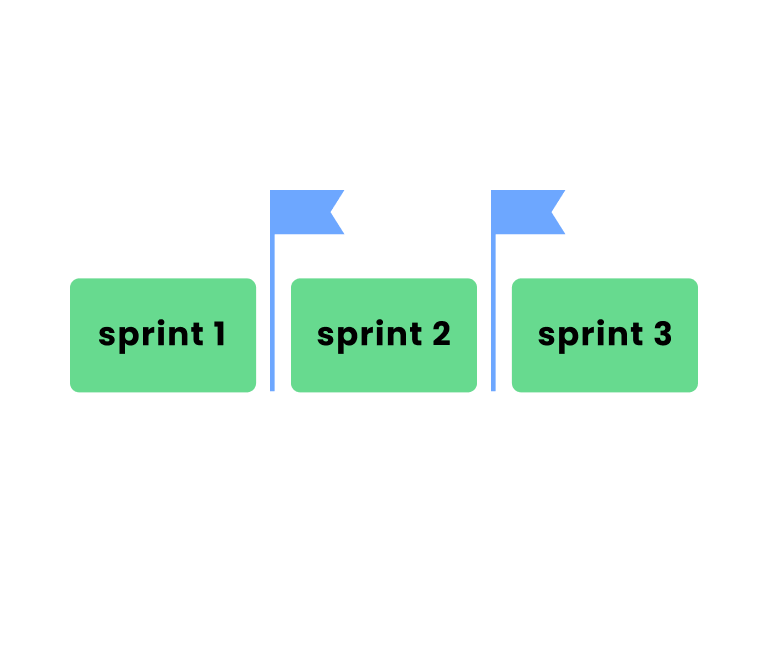
On the other hand, an agile timeline is a more flexible approach to project management that is commonly used in software development projects. Instead of creating a detailed plan at the beginning of the project, the agile timeline is created in shorter increments called sprints. Sprints typically last for one to four weeks and focus on completing a set of prioritized tasks or features. The agile timeline is constantly reviewed and updated during each sprint based on the progress made and the feedback received.
Jira timeline for free
Jira roadmap timeline for tasks may be used for free, if your team consists of 1-10 members. Go planning with Planyway – and save precious time and team forces.
Start creating your Jira project timeline now. Make use of our tips on how to get started with adapting your workflow to the visual planning instrument and see that keeping track of projects and teams can be so easy and effective.
