What is resource smoothing: balance workloads without missing deadlines

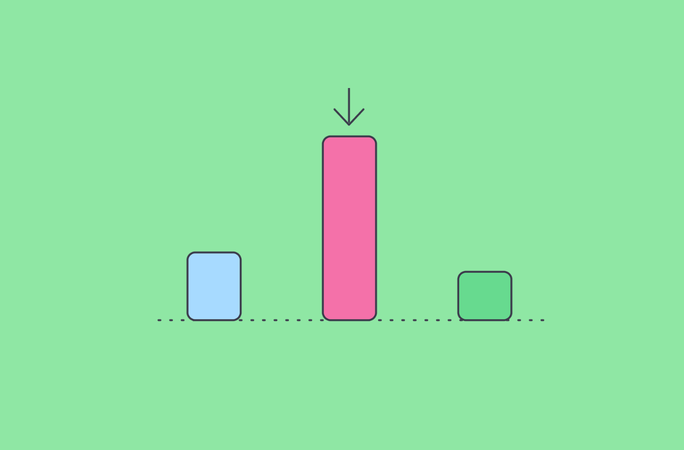
Balancing resource availability against an immovable deadline is a task that every project manager has had at least once in their job. But even after building a critical path, a project schedule, and a perfectly reasonable timeline, you can end up with a resource histogram that looks like a mountain range. One week, you’re over-allocated by 40%, and the other, people are quietly watching TV shows at work with nothing particular on their to-do list. These resource conflicts can quickly put project delivery at risk, especially when teams are working within strict resource limits.
This is where you realize you need to optimize resources. It has two distinct techniques: resource leveling and resource smoothing. Today, let’s talk about the latter.
What is resource smoothing?
According to the Project Management Institute (PMI), resource smoothing is a technique that adjusts the activities of a schedule model such that the requirements for resources on the project do not exceed certain predefined resource limits. It helps reschedule non-critical activities within their available float to even out resource demand, without changing the project end date.
Unlike resource leveling (which prioritizes availability of resources under tight resource constraints, even at the cost of extending the project), resource smoothing is used when the team needs to keep the project deadline intact. At the same time, it smoothes out peaks and troughs in resource demand — hence the name.
With smoothing, you can:
- Move flexible activities within their float. Shift non-critical tasks forward or backward without impacting the overall schedule
- Reduce peaks in resource demand. Smooth out the histogram so you don't need 23 people one day and 10 the next.
- Add resources where necessary. If shifting tasks alone isn't enough, you can increase the number of resources on a task to compress work.
- Keep the original project deadline. The critical path remains unchanged.
Resource smoothing vs resource leveling
The choice between the two optimization techniques largely depends on what your main constraint is: time or resources. Resource smoothing balances the workload within hard deadlines, but if you’re okay with changing the project finish date to fix uneven resource allocation, resource leveling may be just fine, too.
Sometimes, it will even make sense to combine the two resource optimization techniques. But here are the two indicators that signal that resource smoothing might be the best choice.
Your project has non-negotiable deadlines = resource leveling
If there is a fixed launch date, contractual milestone, or regulatory deadline, pushing the project end date isn’t an option.
Resource leveling could resolve over-allocation by moving tasks and extending the schedule, but resource smoothing works within the existing timeframe. It helps you redistribute work and make better use of available resources without sacrificing the deadline.
There’s some flexibility in how work is scheduled = resource smoothing
Resource smoothing works best when there’s room to shift tasks within their available float. If certain activities can start a little earlier or later without affecting dependent tasks or the final delivery date, you can use that flexibility to even out workloads. In this case, there’s less need for the schedule changes that resource leveling typically requires.
How resource smoothing works in practice: two levers
Resource smoothing comes into play after you've created your initial schedule. You identify:
- The critical path — Activities with zero float that cannot be moved.
- Non-critical paths — Activities that have float (schedule flexibility).
Once you've mapped that out, you have two practical levers to pull. You can use either or combine them.
Lever 1: Reduce the headcount (extend duration)
Keep the task in its original time slot, but reduce the number of people working on it. This extends the task's duration, but as long as the extension fits within the available float, the project end date stays intact.
Lever 2: Shift the timing (use float)
Move the start date of a non-critical task later (or earlier) to avoid a resource peak. Thus, you “pay” with float instead of extra budget, because you’re repositioning work, not adding headcount.
Example:
If you have a non-critical task with 5 days of float that currently uses 10 people, you could:
- Reduce the headcount to 5, extending the task duration by 2 days
- Or delay the task start by 3 days, using float to shift the resource demand to a less busy period.
Step-by-step: how to actually smooth a schedule
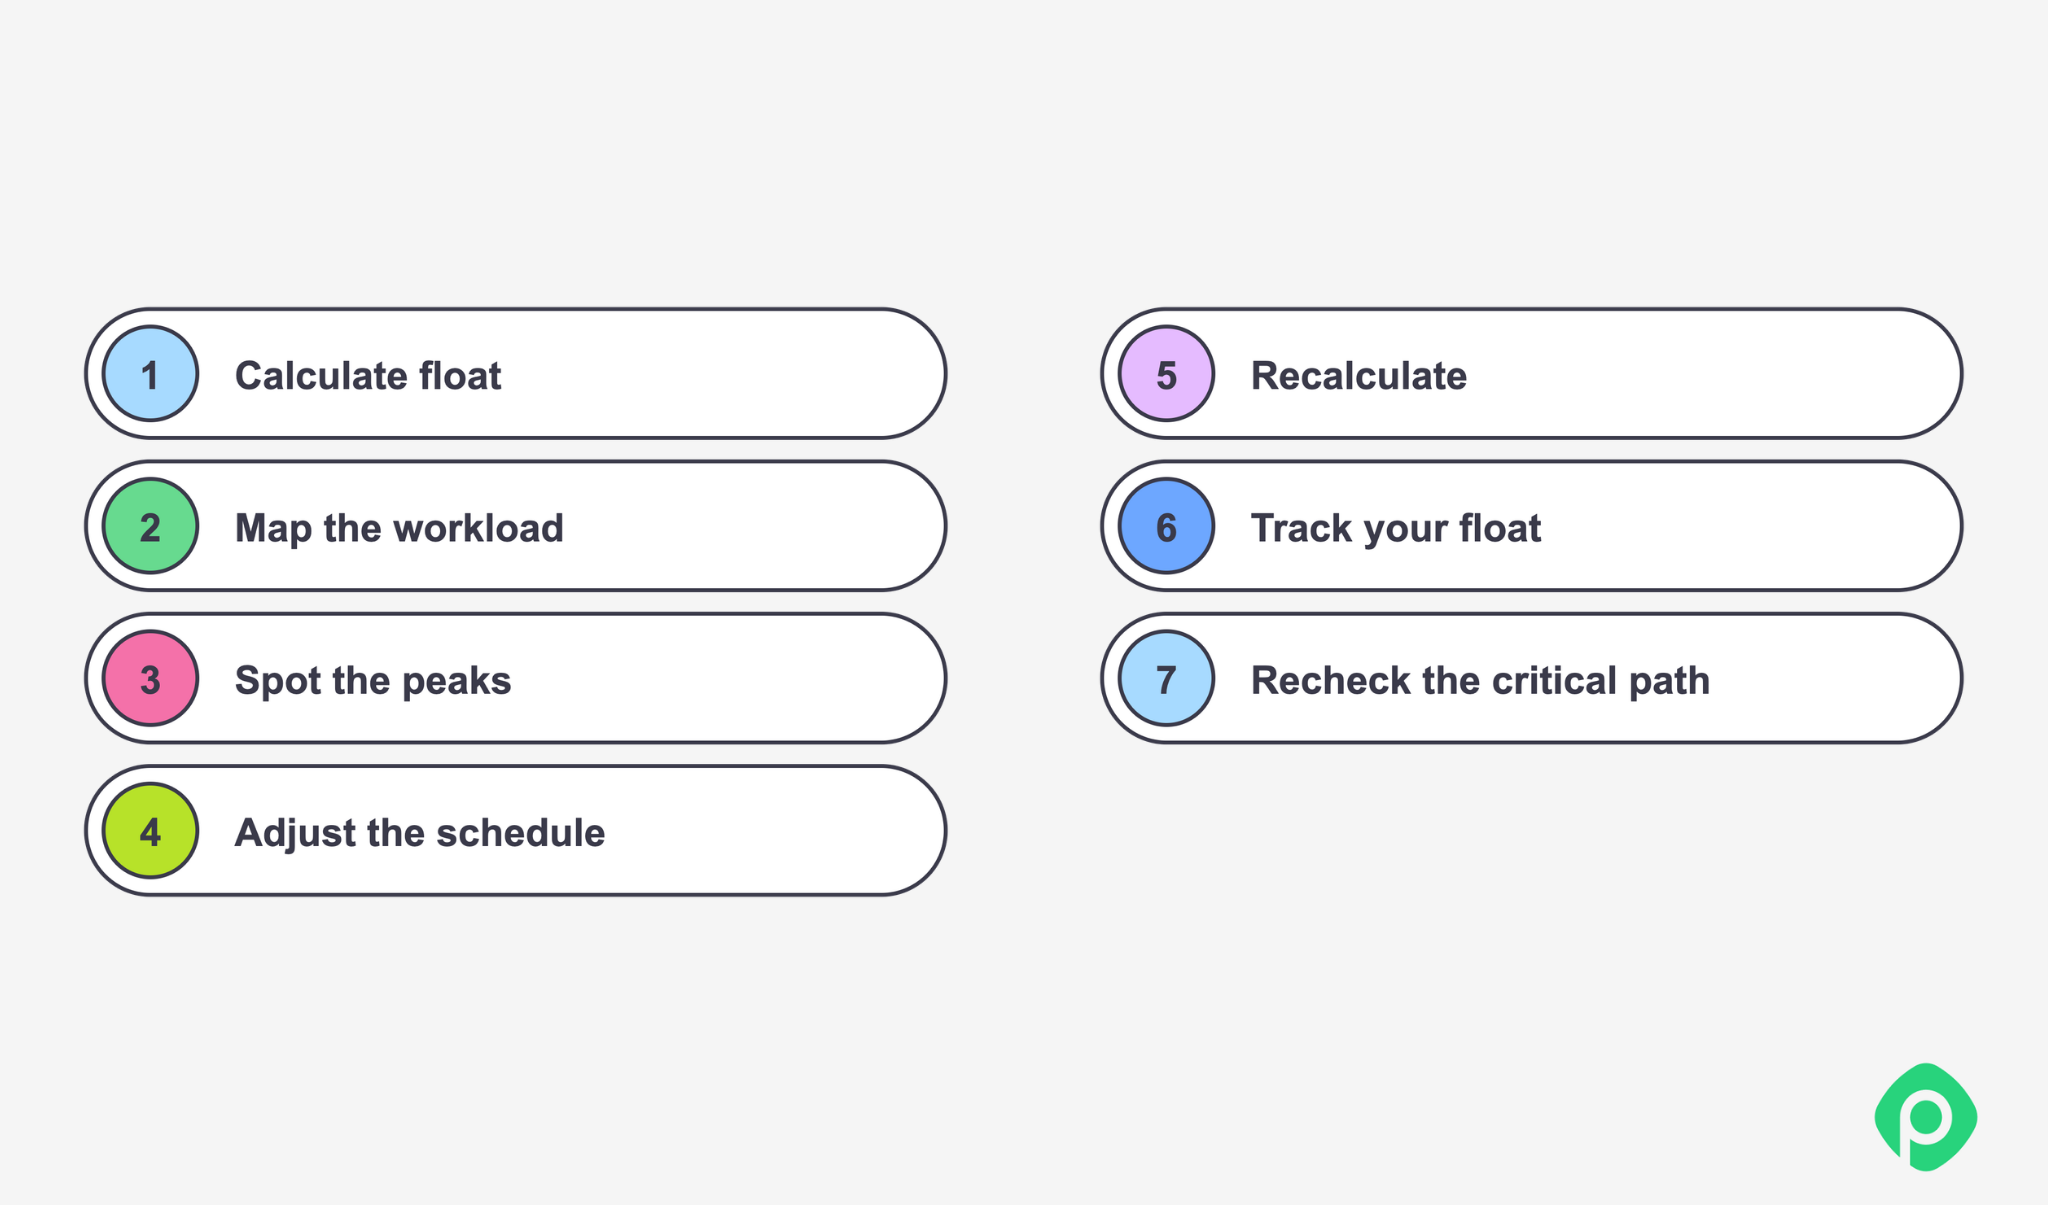
If we put it all together, here’s what the resource smoothing process looks like:
1. Calculate float for every activity
To do that accurately, remember that the potential delays can be divided in two categories: free and total float.
- Total float is the amount of time an activity can be delayed without pushing the project completion date.
- Free float is the amount it can be delayed without delaying its successors.
In resource smoothing, total float is usually more important because the project deadline is the constraint.
2. Build your resource histogram or workload profile
Plot resource demand (people per day or week) across the project timeline and identify the peaks. These are your smoothing targets.
If you’re working in Jira, Planyway for Jira can make both views easier to analyze. Its Workload view lets you see how work is distributed across individual team members and identify overloads over time. You can also group the timeline by team to see separate team lanes reflecting each team's overall capacity.
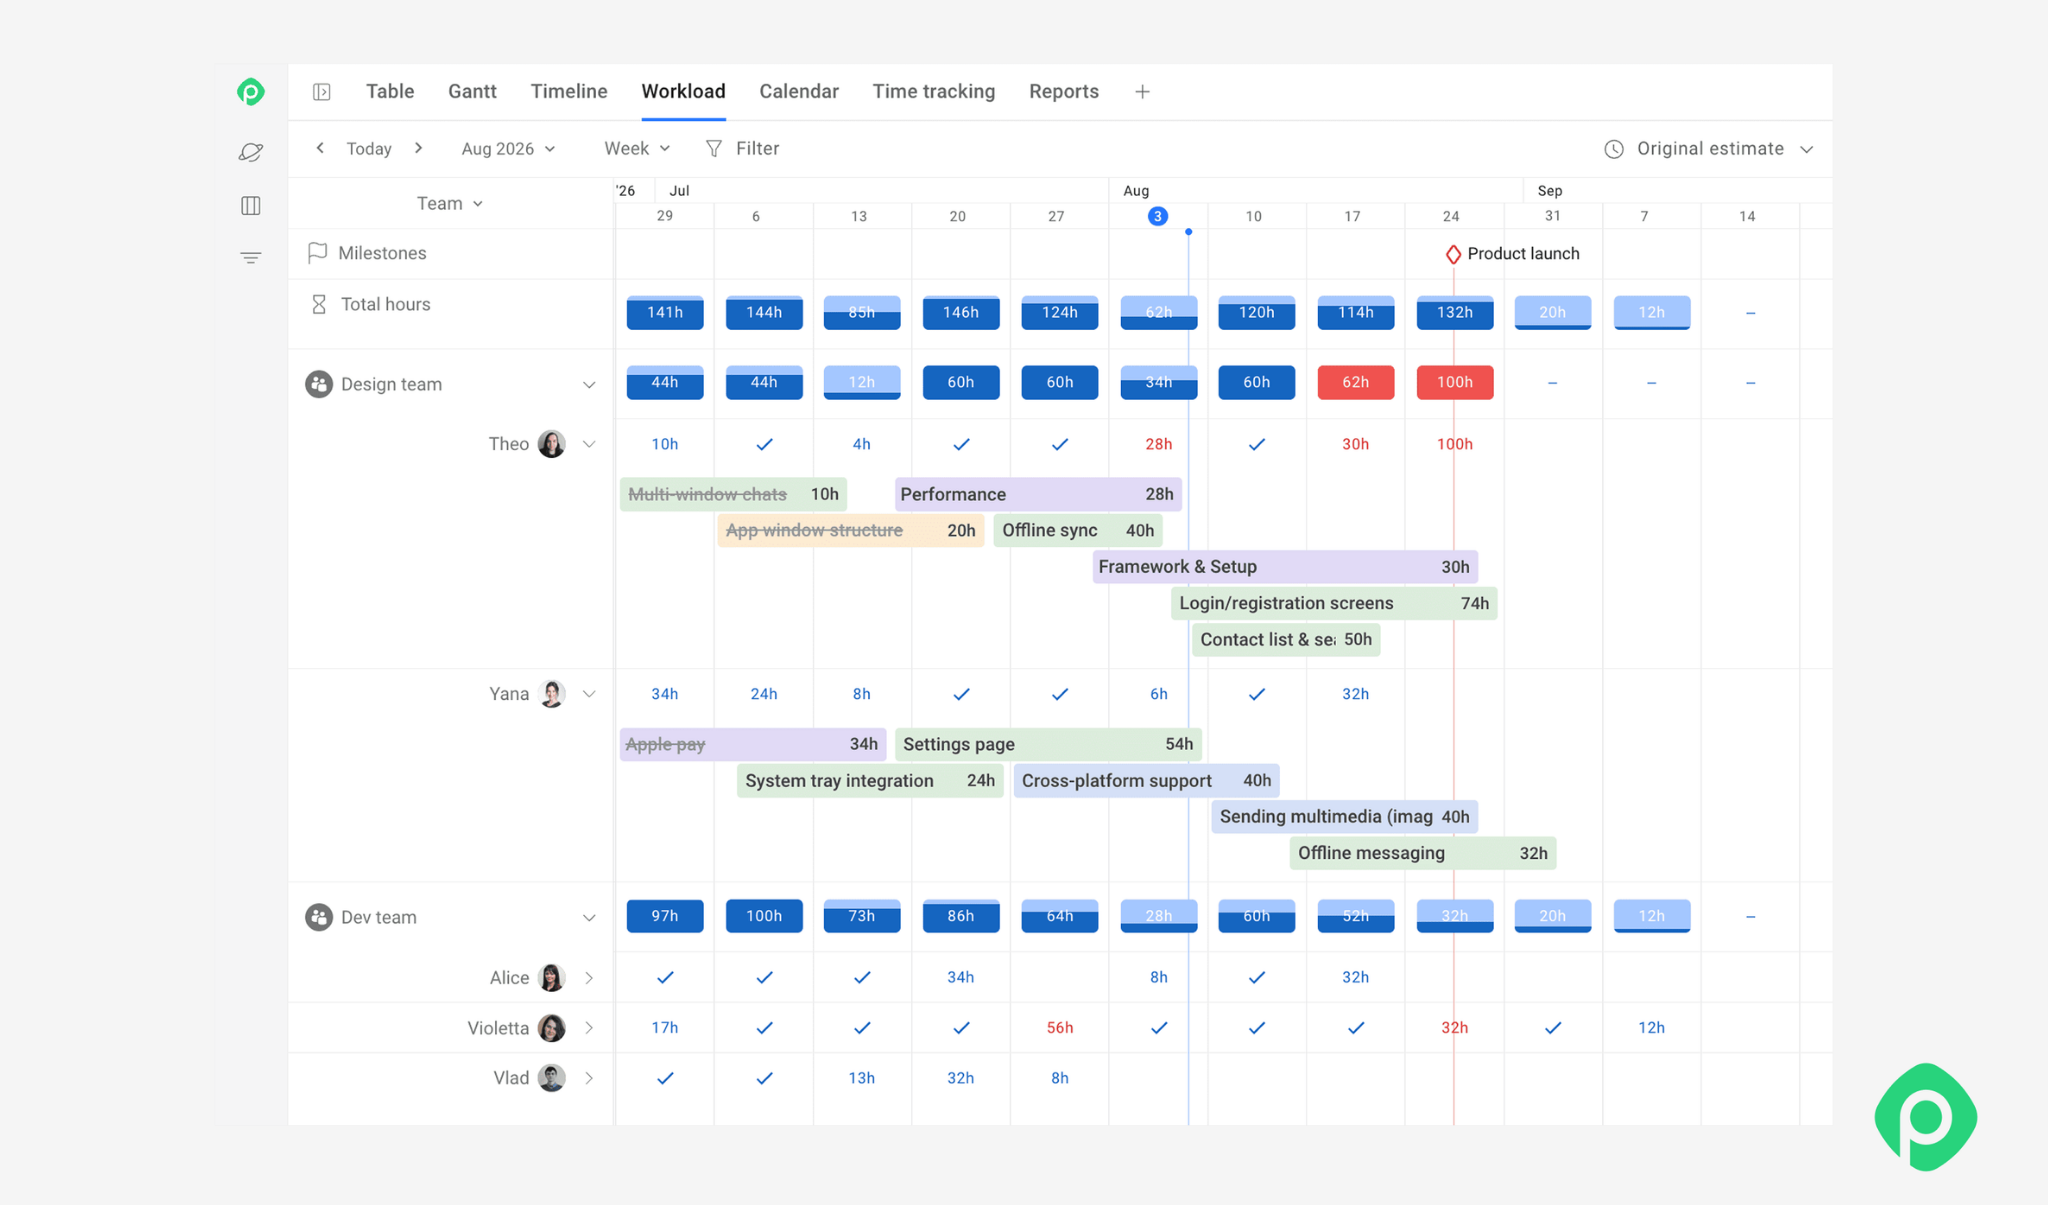
Together, these views make it easier to spot where resource demand exceeds available capacity — and where work could potentially be shifted. For example, an overloaded team member may still be able to hand work over to someone with available capacity, while a team-wide overload may require rescheduling activities or reallocating work across teams.
3. Identify the culprits
Look at the activities running during peak periods. Those of them that are on non-critical paths and have available float are your best smoothing candidates.
4. Apply the levers
For each candidate, decide whether to shift the activity within its available float, adjust the resources assigned to it, or combine both approaches. If reducing resources extends the activity, make sure the resulting duration still fits within its available float.
The key is to use those changes within the flexibility your schedule allows: in a traditional resource-smoothing scenario, moving or extending an activity should not consume more float than is available or push the project end date.
5. Recalculate the resource profile
After each adjustment, check the new resource demand. If the peak is still too high, iterate. If you’ve flattened the peak, move on to the next one.
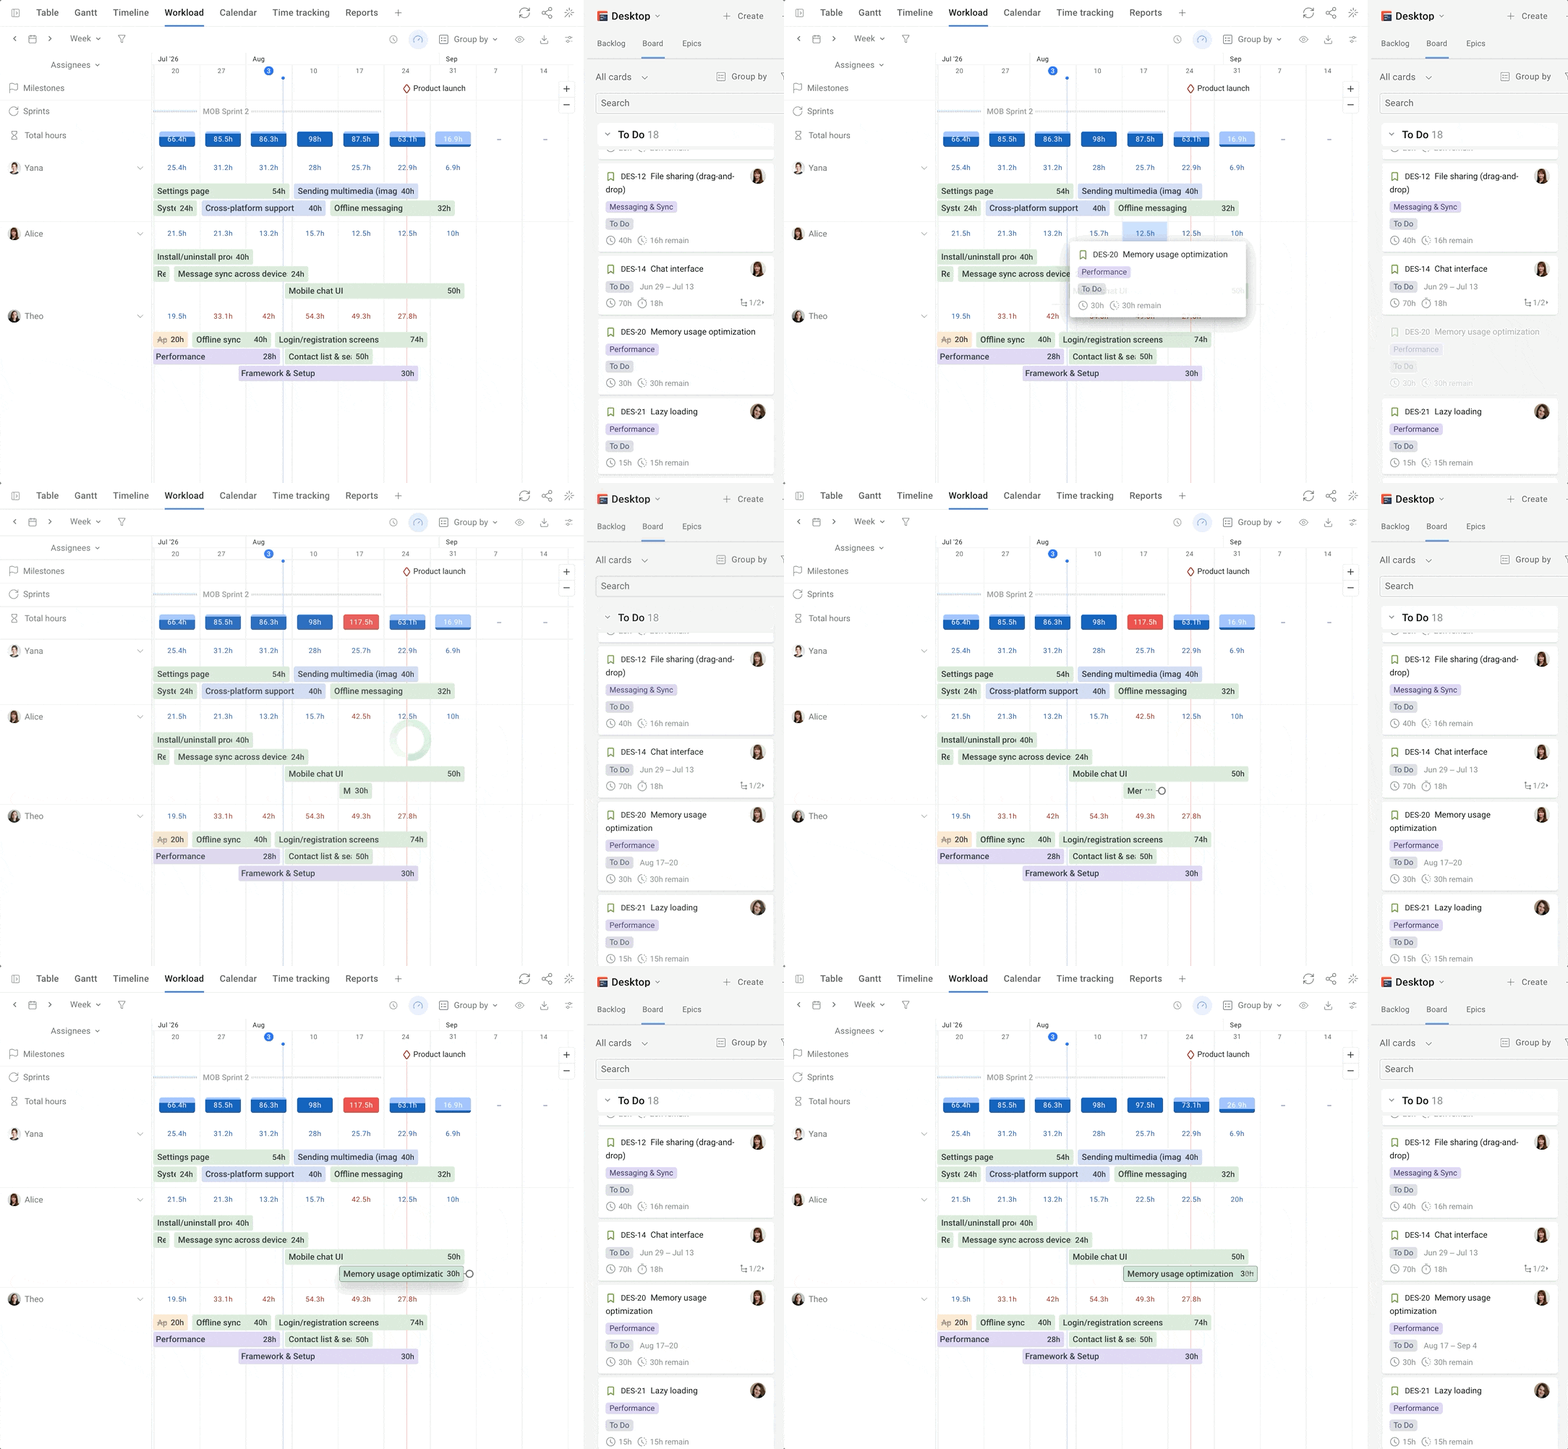
In Planyway, Workload Indicators update as you adjust issue duration or estimates, so you can immediately see how each scheduling change affects team workload. This makes it easier to test different balancing scenarios, check whether an overload has been resolved, and identify remaining peaks before moving on to the next adjustment.
6. Track remaining float
Delaying or extending a non-critical activity consumes some of its available float. To keep track, you can make a simple log, such as: “Task A: consumed 2 of 5 days of float; 3 days remain.” This helps prevent you from using more float than the schedule can absorb.
Pay particular attention to resources shared across multiple projects. Smoothing one project in isolation can simply move the bottleneck somewhere else if the same person or team is already committed elsewhere.
7. Validate the critical path
After smoothing, recalculate the critical path. Consuming enough float can cause a previously non-critical path to become critical, so verify that the project duration remains unchanged.
Get more insights on critical path method ->
The hidden risk: float is not infinite
One of the most common mistakes in project management is treating float like an unlimited resource. At some point, such an illusion may significantly impact the project success.
Every time you delay a task or reduce headcount (which also extends duration), you consume float. If you consume all the float on a non-critical path, that path becomes critical. That means any further delay pushes the project end date out — in that case, you’ll quickly switch from resource smoothing to leveling. In projects with hard deadlines, this is a huge risk.
How to avoid it?
To prevent overestimating your float, never consume more than 80% of available float on any path. Keep a safety buffer for unforeseen delays, sick days, or new requirements.
Cost implications: adding resources vs. shifting
Usually, resource smoothing doesn’t mean adding extra resources. However, some scenarios may involve that.
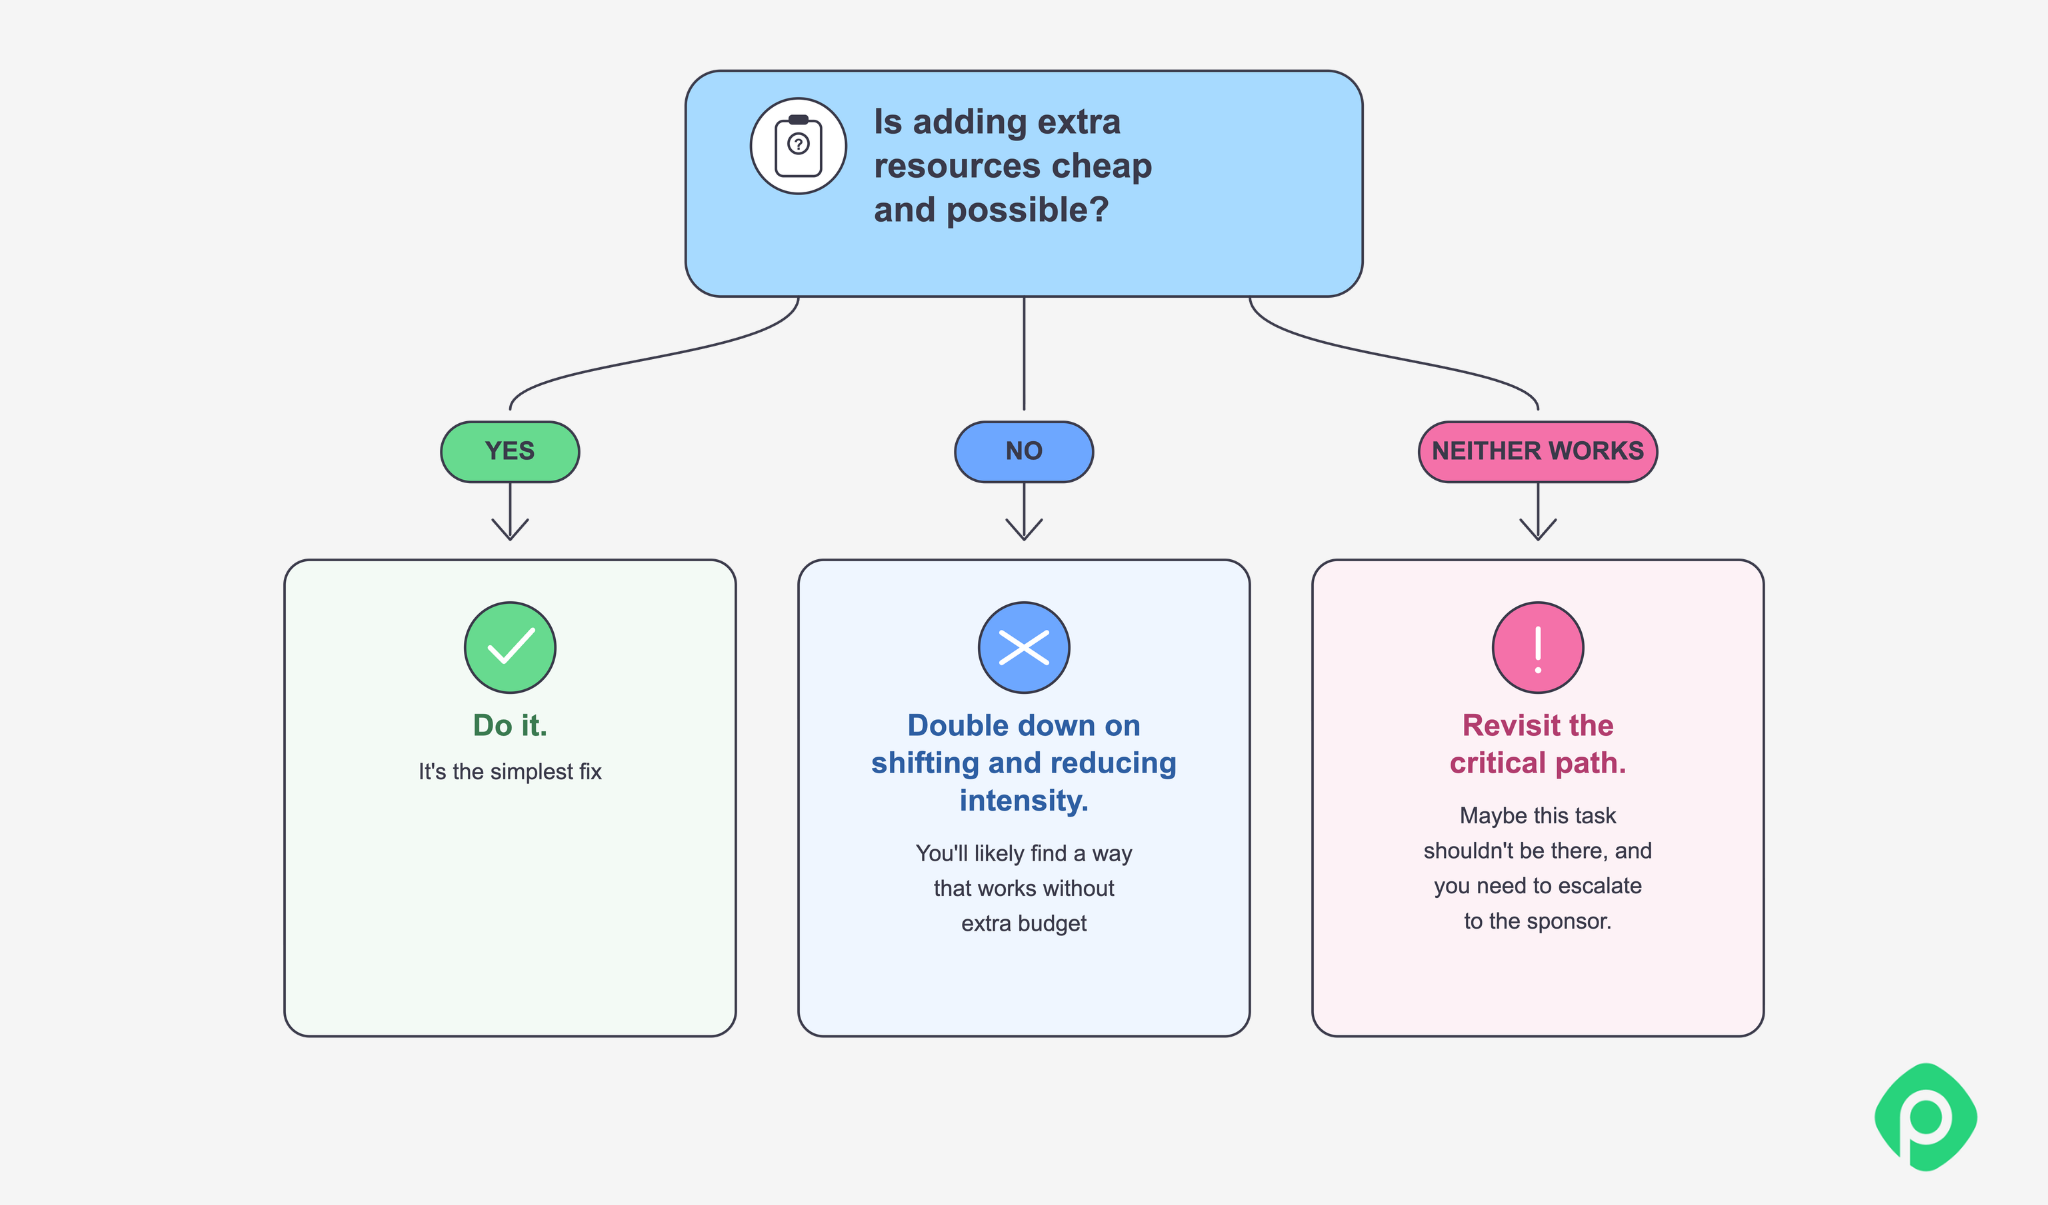
When shifting activities within float isn't enough to flatten a peak, you have a choice:
- Add more resources to the peak period (increases cost, keeps schedule untouched).
- Accept a smaller smoothing effect and leave a moderate peak (lower cost, but more strain on the team).
In this case, your course of action depends on what you answer to one question.
When to stop smoothing and switch to leveling (or overtime)
Even the most effective resource smoothing has its limits. Usually, you can tell that it’s time to explore alternative methods when:
- You've already consumed all available float.
- You've stretched tasks so far that they approach the critical path.
- Reducing headcount would make the task duration exceed the available float.
If the above seems relevant for your project, there are three realistic options to choose from.
- Accept overtime. A temporary, but at times the least disruptive fix if the peak is short.
- Add resources. This option would increase costs but keep the schedule intact. Technically, it remains within the resource smoothing technique — just with extra budget.
- Switch to resource leveling. That means you accept that your deadline is no longer a “hard” one and will definitely move. Such project delays have to be escalated to the stakeholders.
To avoid these scenarios, remember to stop and evaluate if smoothing consumes more than 70% of the available float on any path. Beyond that point, the safety buffer is reduced to dangerous levels, so even one unexpected sick day or blocker can push you over the edge.
Smooth your resources, not your schedule
The main goal of resource smoothing is finding a practical balance between workloads and deadlines without having any team members burning out. Instead of automatically adding resources or extending the schedule, you look for ways to shift flexible tasks, use available float, and reduce workload peaks while keeping the project end date intact.
If your deadlines are tight and resources have some flexibility, resource smoothing can help resolve over-allocation without disrupting the overall project plan. But if shifting work isn’t enough, it’s a signal to re-evaluate your priorities or your critical path.
Seeing where those adjustments need to happen can be tough. With resource management software like Planyway for Jira, you can see workloads, capacity, deadlines, and dependencies in one place — and make resource smoothing the smoothest part of your project planning workflow.


FAQ
Resource levelling prioritizes resource availability, even if that means changing the project schedule or end date. Resource smoothing, on the other hand, works within fixed deadlines and uses available float to balance workloads without extending the project.
Imagine a software project where a developer is assigned three tasks during the same week. One of those tasks has two weeks of float, while the other two are on the critical path.
Instead of adding another developer or pushing the project deadline, the project manager moves the flexible task to the following week. This reduces the developer’s workload during the peak period while keeping the project's final deadline unchanged.
Resource optimization is the process of making the best possible use of the people, equipment, time, and other resources available to a project. Resource smoothing and resource leveling are two common resource optimization techniques. Which one makes sense depends on whether your primary constraint is the project deadline or resource availability.
Planyway for Jira gives project managers a visual way to spot and resolve workload imbalances. Its Workload view shows scheduled work against each team member’s capacity, making it easier to identify over-allocated resources. You can then drag or stretch Jira issues on the timeline to shift work and rebalance workloads.
You can also define individual working hours and account for holidays and vacations, so your capacity calculations reflect actual availability. Planyway supports cross-project workload visibility, team-level capacity planning, and dependency tracking, which can help you smooth workloads without losing sight of deadlines or creating new scheduling conflicts.