How to create a sprint in Jira: quick and easy tutorial

In project management, sprints give Jira teams room for planning, building, and delivering results. But if you're new to Jira or simply don't use sprints often, the setup can feel less obvious than it should.
In this guide, we'll explain how to create a sprint in Jira step by step, from clearing the backlog to starting your first sprint. You'll also see a few practical tips for planning sprint scope and keeping your team on track.
TL;DR
- To create a Jira sprint, open your Scrum backlog, create a sprint, add issues, set the dates and goal, review the scope, and start it.
- Plan for what your team can actually deliver: check capacity, estimates, past velocity, and dependencies before committing to sprint work.
- Leave some capacity unplanned. Something always comes up, and a sprint filled to 100% is a sprint that carries work over.
What is a sprint in Jira?
A sprint in Jira is a fixed period of time when a Scrum team works on a selected set of tasks, usually with the goal of delivering a usable increment of the product. Sprints typically last between one and four weeks, but the most common choice for teams is two weeks.
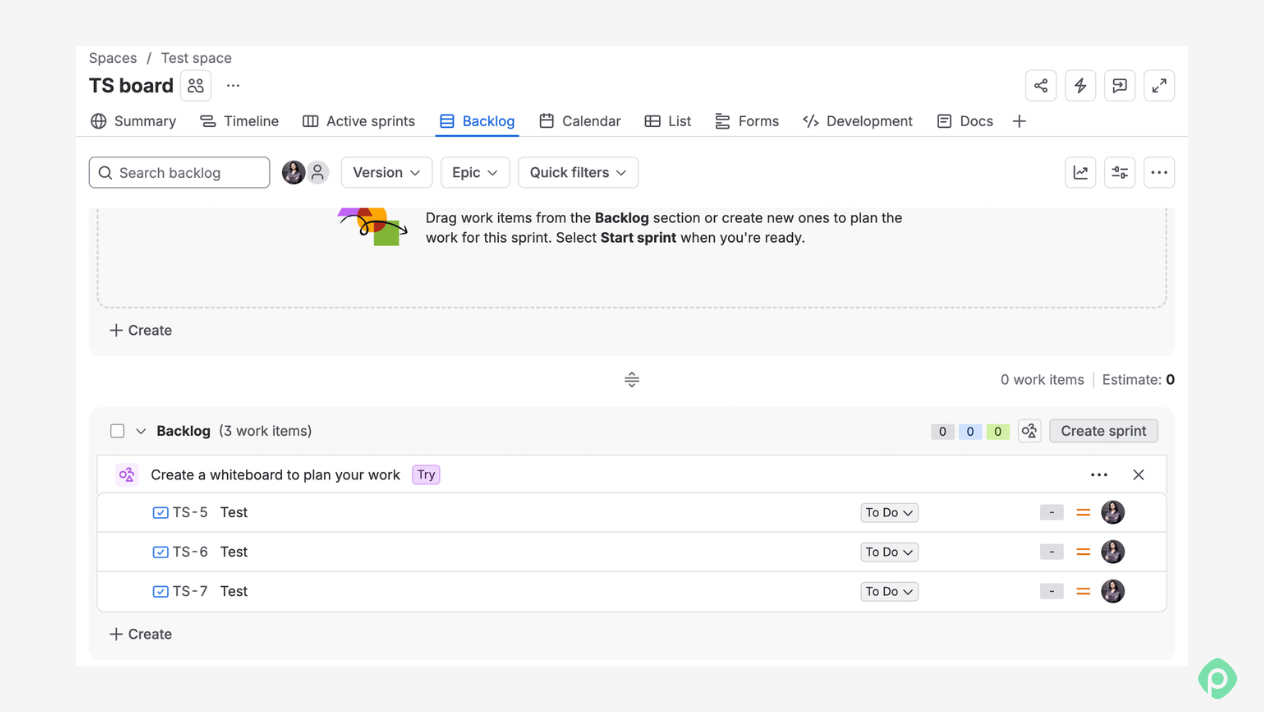
In Jira, the sprint is connected to the team's backlog tab. You create a sprint there, move the relevant issues into it, and then start the sprint when the team is ready to begin. Once it's active, Jira provides tools for updating issues, adding tasks and bugs, and tracking the team’s progress.
Usually, a sprint has:
- A name, such as Sprint 17
- A start date
- An end date
- A set of Jira issues
- A clear sprint goal where applicable
Unlike a simple range of dates, a sprint gives Jira teams a commitment and a shared view of reality. It makes it easier to prioritize, spot problems early, and have a clear conversation about what can (or can't) be delivered by the end of the sprint.
Before you create a sprint
Jumping straight into a sprint may be too hasty a decision. Before creating one, make sure that:
- Your Jira project uses a Scrum* board
- You have access to manage sprints
- Your backlog contains the issues you want to work on
- The team has agreed on the sprint goal and schedule
*Why a Scrum board, though? In project management, this board tracks fixed-length sprint cycles and resets after each sprint. Meanwhile, a Kanban board supports a continuous, ongoing flow of work that never resets, without focusing on time-boxed periods.
How to create a sprint in Jira
Creating a sprint in Jira takes just a few steps.
1. Open your Jira backlog
Go to your Scrum project and open Backlog from the project sidebar. You'll see your existing issues and, depending on your setup, a section for future sprints.
2. Create a new sprint
Click Create sprint above the backlog screen. Jira will add a new sprint to your backlog.
3. Add issues to the sprint
Technically, your sprint is already created — it’s time to make it workable and meaningful.
Drag and drop issues from the backlog into your new sprint. Choose work that matches your team's priorities and capacity for the sprint.
You can add such work items as:
- Stories
- Tasks
- Bugs
- Other issue types supported by your board
You can also select multiple issues and move them into the sprint at once.
4. Set the sprint details
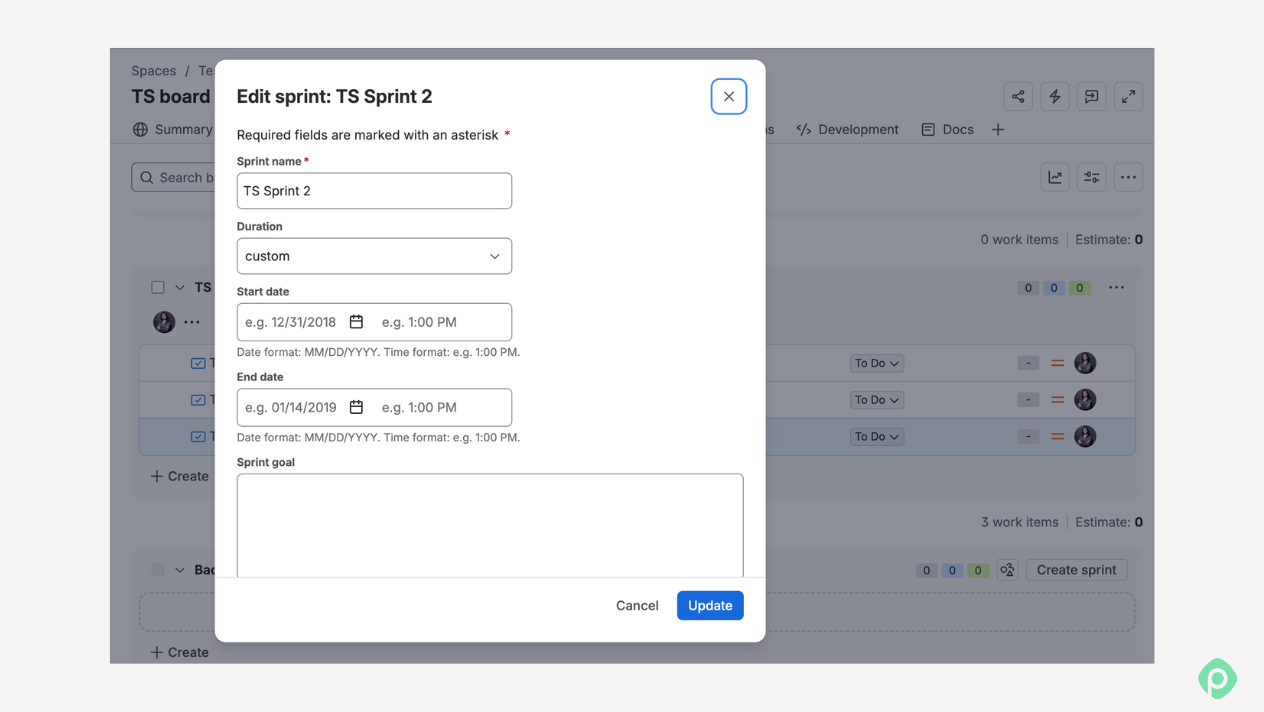
Click Edit sprint and add a clear sprint name. Then set the start date, end date, and, if it makes sense, a sprint goal.
Clear goals help the team understand what the sprint is meant to achieve, and how their success will be measured.
5. Start the sprint
When everything is ready, click Start sprint.
Jira will open the sprint configuration window, where you can enter:
- Sprint name
- Start date
- End date
- Sprint goal
Your sprint is now active, and Jira will start tracking its progress.
How to plan the right amount of work for a Jira sprint
Creating a Jira sprint is almost as easy as reading the previous section. Deciding what actually goes into it is the harder part. A product backlog can hold dozens of high-priority issues, and none of that means the team can finish them in the next two weeks.
So once the sprint exists and you've picked a rough scope, check three things before you start it: team capacity, estimates against past velocity, and dependencies.
Check team capacity
Start with how much time the team actually has available. It doesn’t always (almost never) mirror the “how many people are assigned to the project” situation.
Consider:
- Whole team availability and working hours
- Planned vacations and time off
- Meetings and recurring responsibilities
- Support, maintenance, or on-call work
- Individual workload across projects
- Work already committed elsewhere
For instance, if three people in a development team are available for a two-week sprint but one is taking three days off, and another spends part of each day on customer support, the team's real capacity is much lower than the headcount suggests.
Keeping that in mind is tricky, but this is where Planyway for Jira can make your sprint planning session more visual. You can see Jira issues on a timeline, compare planned work with team availability, and fix overload before the sprint begins.
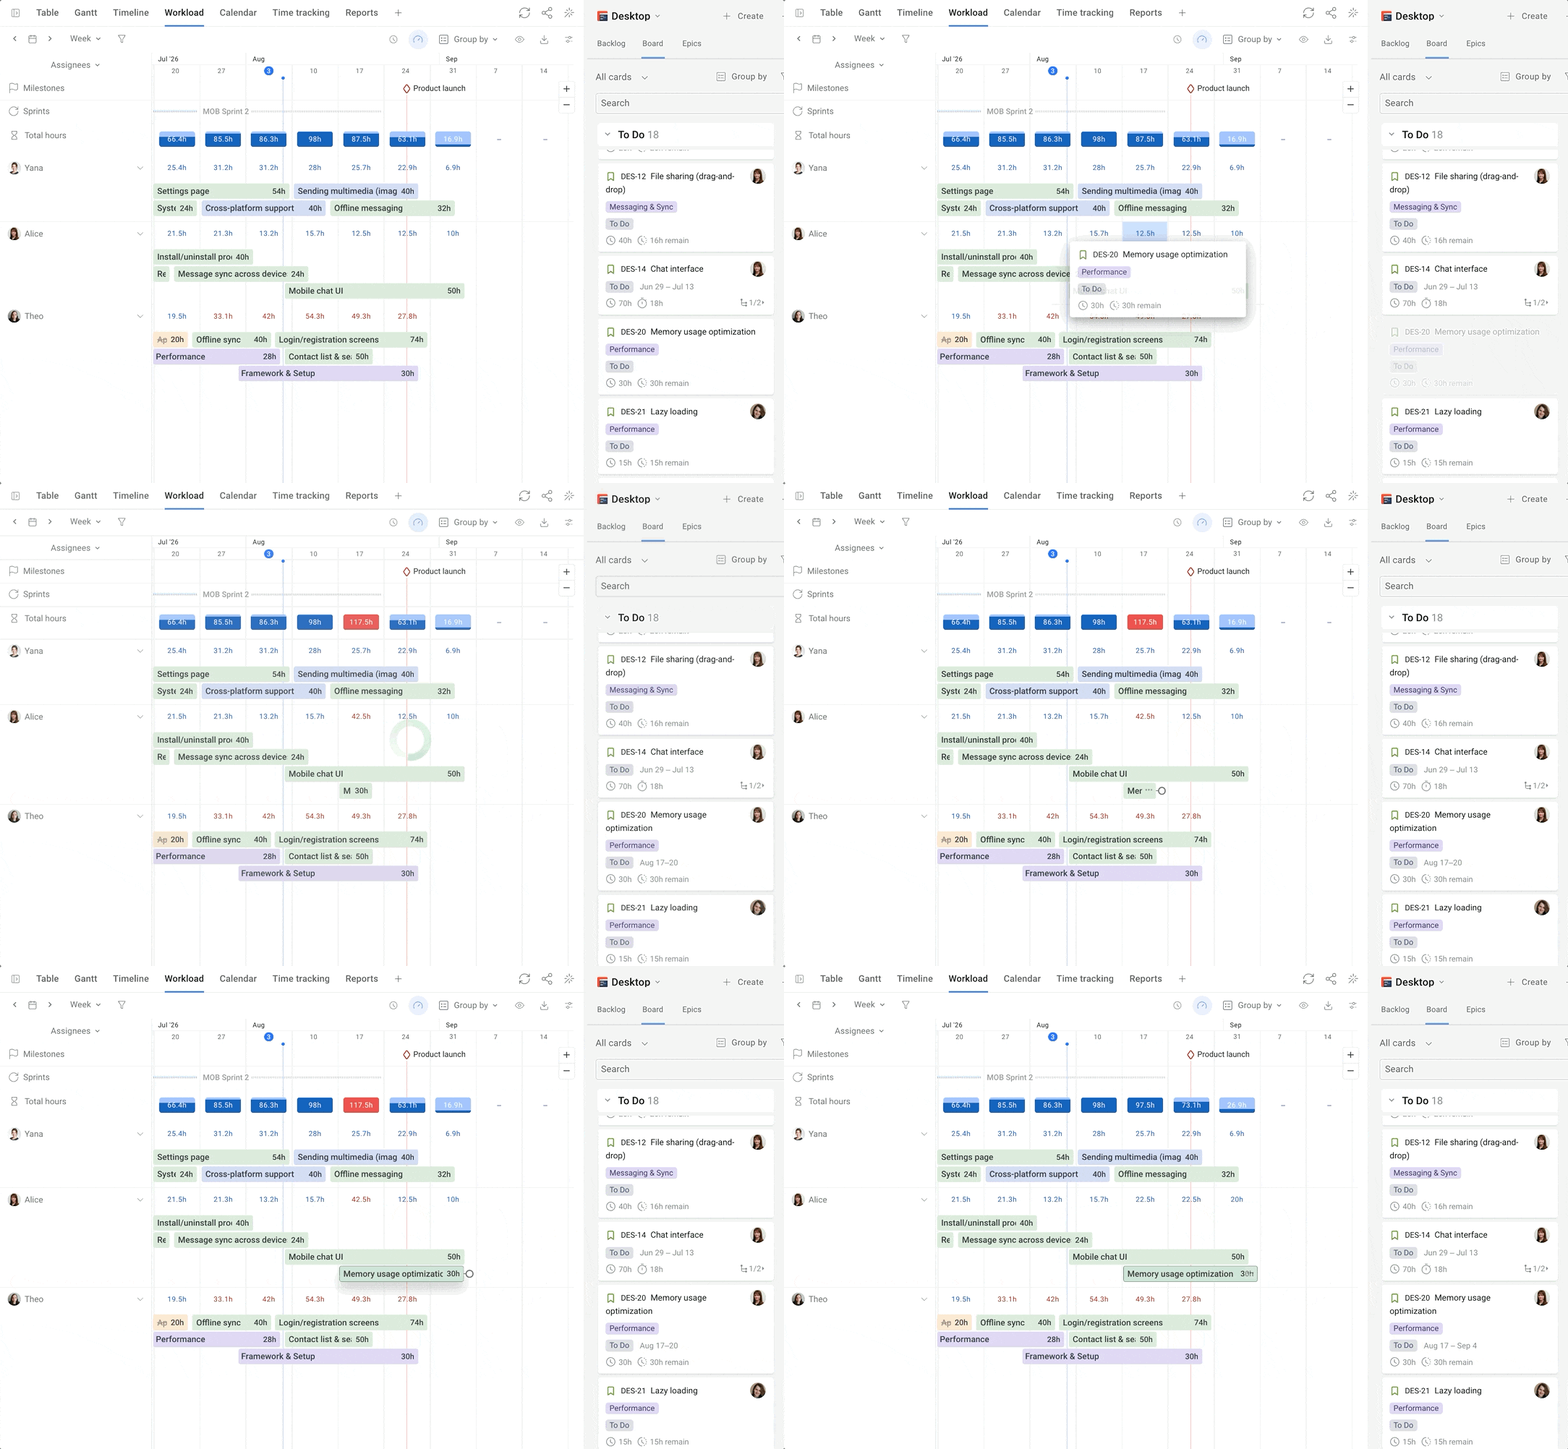
Capacity planning helps you decide whether to move an issue to the next sprint, redistribute work, or adjust the scope.
Compare what you planned with what actually happened
Velocity tells you how much the team finished. It doesn't tell you where the estimates were wrong. That's the difference between a number and a lesson. A sprint that lands 30 points instead of 40 says the same thing every time: we overcommitted. It never says that integration work takes twice as long as anyone writes down, or that code review is eating a day a week nobody plans for.
To see that, you need estimated time against logged time, broken down by the kind of work it was. After a couple of sprints, the pattern shows up on its own, and that's what makes the next sprint's scope realistic — more than any single velocity figure.
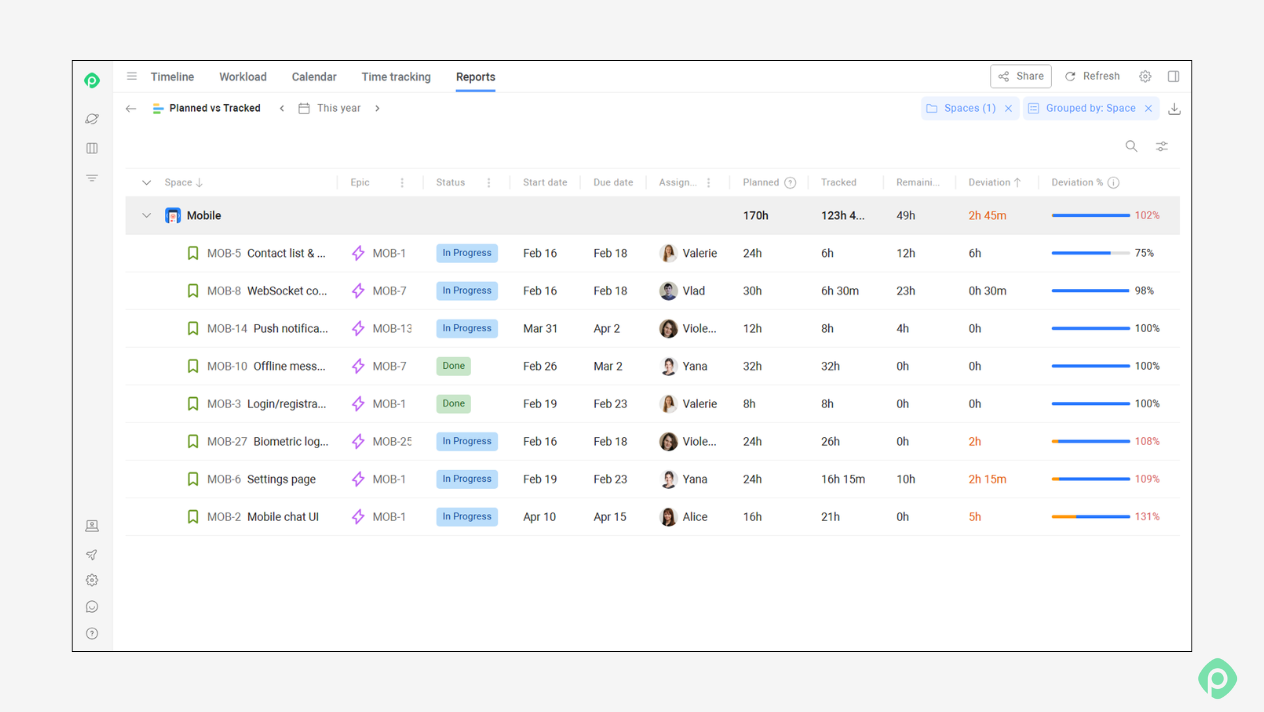
After a couple of sprints, you can see which kinds of work you consistently underestimate — and that's what makes the next sprint's scope realistic, more than any single number.
Dependencies
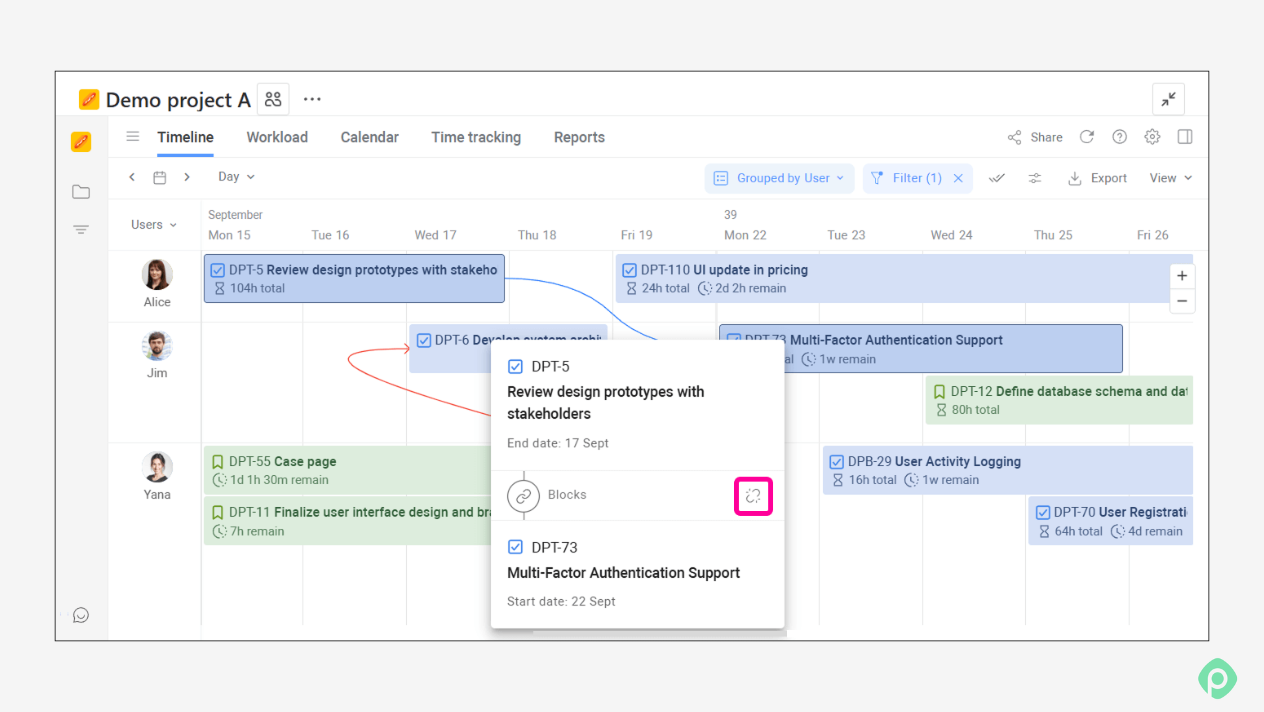
Before a team commits an issue to the sprint, check whether you can actually start and finish it.
Look for dependencies on:
- Another team
- Another Jira project
- A previous task
- A specific team member
What happens after you start a sprint?
Once you start a sprint in Jira:
- The selected issues move into the active sprint
- Team members work through the issues according to the team's workflow
- The team tracks progress toward the sprint goal
- New work can be added when necessary, but changes to scope should be deliberate
- The team monitors progress and adjusts when blockers or unexpected work appear
However, if your team regularly carries unfinished issues from one sprint to the next, it may be a planning signal. Try reviewing your sprint scope, estimates, capacity assumptions, and dependencies to find out why the team is consistently overcommitting.
How to complete a Jira sprint
When the sprint is coming to an end, review the work and make sure the team understands what was completed and what still needs attention.
Here are five steps project managers usually do to complete a sprint:
- Review the sprint backlog. Check which issues are done and which are still in progress or unresolved.
- Finish or update remaining issues. Close completed work and update the status of anything that isn't finished.
- Handle unfinished issues. Move incomplete work back to the backlog or into a future sprint.
- Review the sprint goal. Confirm whether the team achieved the set goal.
- Click “Complete sprint.” In Jira, open the active sprint and select Complete sprint to officially close it.
All great projects started with their first sprint
Creating and starting a Jira sprint is easy and straightforward. But making sure it contains the right work, fits the team’s capacity, and isn’t threatened by hidden dependencies is a lot more challenging.
A good sprint starts with realistic planning and ends with an honest review of what was delivered. Planyway brings the bigger picture into Jira, helping project managers make project planning more predictable, transparent, and effective.


FAQ
A sprint in Jira is a fixed period during which a Scrum team works on a selected set of issues with a specific goal. Sprints typically last one to four weeks, with two weeks being common.
The “Create sprint” button is available when you're working with a Scrum board and have the necessary project permissions. If you can't see it, check whether you're using a Scrum project and whether you have permission to manage sprints. Your Jira administrator may need to update your permissions if the option is still missing.
The five common stages of a Jira sprint are sprint planning, sprint start, sprint execution, sprint review, and sprint retrospective. During planning, the team selects and estimates work. The team then completes the planned issues, reviews the results at the end of the sprint, and discusses improvements for the next one during the retrospective.
Yes, Jira can have multiple existing sprints on the same Scrum board if parallel sprints are enabled. This can be useful when multiple teams share a board but work on separate sprint cycles.
Yes. Jira includes the core tools needed for sprint planning, including a Scrum backlog, issue prioritization, estimates, sprint creation, and sprint reports. For more visual planning, Planyway for Jira adds timeline-based planning, team capacity views, and dependency tracking, helping teams check whether planned sprint work is realistic before they start.