Easy Guide to Jira Board: How to Use and Customize Boards Like a Pro (with Examples)
15 min read
Let's be honest: using and customizing Jira boards can be overwhelming, whether you're managing complex projects across multiple teams or just getting started. It's easy to feel lost among dozens of boards, hundreds of tickets, and miscellaneous labels. Especially when the board doesn't naturally match your team's workflow and the Atlassian ecosystem doesn't always have the answers.
As the team behind the capacity management tool that works directly within the Atlassian ecosystem, we open our Jira dashboard every single day. Over time, we’ve learned the ins, the outs, and the workarounds of how to manage work on Jira boards. In this article, we've compiled the key benefits and limitations to help your team stay organized.
TL;DR
- A Jira board is a lens, not a container. It filters and displays your issue list. You can delete a board without losing a single issue, or create multiple boards for the same project to give each team its own view of the work.
- Start with Scrum if you're unsure. You can always turn off sprints and make a Scrum board behave like Kanban. Going the other way (adding sprint functionality to a Kanban board) is either limited or impossible, depending on your space type.
- Jira boards show status, not time. They tell you what stage a task is in, but not when it'll get done or who has bandwidth to take on more. For cross-project planning, workload visibility, and portfolio-level roadmaps, you either upgrade to Premium for Jira Plans or add a planning layer like Planyway on top.
What is a Jira Board?
Jira board is a visual project management tool built into Jira. It displays issues in columns matching workflow stages, helping teams track and manage work using Agile methodologies.
One thing most people get wrong: a board is not where your issues live. It's a visual representation of your project data, a filtered view (technically, a JQL query) that displays issues in columns. Your issues don't live on the task board — they live in the project. The board is a visual tool that gives you a clear overview of what's in flight and makes it easier to manage.
You can delete a board, reshape it, or have multiple boards for the same project — the issues in your backlog won't care. They'll stay right where they are, waiting for your team to pick them up, regardless of which frame you use to look at them.
Jira offers two board templates aligned with the most common agile methodologies: Scrum and Kanban. Both are types of agile boards designed to visualize work. The difference comes down to how your team decides what to work on right now.
Jira Scrum Board: the basics
When you go down the Scrum route and adopt the Scrum framework in Jira, you’ll get some off-the-shelf Scrum-only items, which also double as the key features of a Jira Scrum board. Below are some basic elements to get started. Core Scrum principles (transparency, inspection, and adaptation) are baked into how these elements work together.
- Sprint is a time-boxed window in which the team commits to completing a specific set of work.
- Sprint planning is the process where the team drags issues from the Backlog into the upcoming sprint, sets a sprint goal, estimates effort, and hits “Start Sprint” to move them onto the active board.
- Story points capture how complex, uncertain, and large a piece of work feels relative to other work. A task that takes two hours but involves no unknowns might be a 1. A task that takes two hours but requires digging through legacy code might be a 5.
- Velocity is how many story points the team typically completes per sprint, averaged over the last few sprints. It's not a performance score, but a planning tool. After three or four sprints, velocity tells you how much work to pull in next time without overcommitting.
- Burndown chart is a live graph that shows how much work is left in the sprint versus how many days remain.
Here's how these pieces fit together:
- The team pulls issues from the backlog into a sprint;
- Columns show them moving through stages;
- The burndown chart tracks whether you're on pace;
- And when the sprint ends, velocity helps you with planning your next sprint.
Every morning, the board becomes the centerpiece of daily stand-ups. This is the essence of iterative development: each sprint builds on what the team learned in the previous one, then the cycle repeats. The Scrum Master typically facilitates this process, and the Product Owner prioritizes the backlog. Work is typically broken into user stories small enough to complete within a single sprint.
One thing that catches almost every new team member off guard: you create a project, add a bunch of issues, open the board, and see blank columns staring back at you because your board is completely empty. The thing is that the Scrum board only shows issues from the active sprint. Until you create a sprint in the backlog, drag issues into it, and hit “Start Sprint,” there are no board cards to display. Don’t worry, your issues are safe, sitting in the backlog, waiting to be pulled into a sprint. The board just won't show them until you pick up some to focus on. You can create multiple sprints ahead of time.
Once you get past that initial empty-board surprise, the Scrum board is fairly predictable. The sprint creates a rhythm that keeps things tidy. Kanban boards don't have that built-in cleanup mechanism, which is both their strength and their biggest trap.
How Jira Kanban Boards work
When you choose a Kanban board, you opt for a system built around continuous flow rather than fixed iterations: work moves through as a steady stream. Unlike Scrum, there are no prescribed roles or ceremonies.
Here are the key elements you get out of the box:
- Continuous work stream: issues appear on the board the moment they enter an active status and move through columns until they reach “Done.”
- WIP (work-in-progress) limits: caps on how many issues can sit in a single column at once. When the limit is hit, the column turns red.
- Cumulative flow diagram (CFD): the key Kanban report, showing how many issues are in each status over time, making it easy to identify bottlenecks.
- Cycle time: how long it takes a single issue to travel through columns. This is the metric Kanban teams optimize for: the shorter the cycle time, the faster the delivery.
The logic is simple. New work enters the queue, the team pulls from the prioritized list, and issues move left to right across the columns. Work-in-progress limits prevent starting new work before finishing what's already in progress. The CFD and cycle time tell you whether the flow is healthy or if something is stuck. This is how Kanban emphasizes continuous improvement: measure, adjust, repeat.
Interestingly enough, many Jira users are not huge fans of how Jira handles Kanban. Unlike board-first tools like Trello, Jira was not designed with Kanban at its core, so it can feel less intuitive than other Kanban-first systems. Also, Jira Kanban boards are guilty of growing excessively long over time, making it harder to get a clear snapshot of work.
There are some ways to improve the look, feel, and default features of Kanban boards, which we’ll touch upon later.
How to choose between the Jira board types? Jira Scrum board vs Jira Kanban board
Let’s preface by saying that technically, you don’t have to choose only one board per project. You can have both Scrum and Kanban within the same project. But unless you’re a pro who knows how to sync different workflows and statuses, toggling between the two may result in major reporting and visibility conflicts. So, for many teams, it’s actually better to commit to one template to ensure that their data doesn’t get mixed up and the team stays on the same page. But it’s still up to the way your team works.
Anyway, choosing between a Scrum and Kanban template in Jira is crucial because the reports, the sprints, the backlog, and the behavior are all tied to the option you choose. Getting this decision right is one of the simplest ways to boost your team’s efficiency in Jira. Let’s look into the core differences below.
| Category | Jira Scrum board | Jira Kanban board |
|---|---|---|
| Philosophy | A Scrum board is more prescriptive: built for structured, time-boxed iterations. | A Kanban board is more forgiving: built for a flexible flow and continuous delivery. |
| Planning Style | Upfront: the team plans a fixed scope at the beginning of each sprint. | Along the road: work is pulled from the backlog as capacity opens up. |
| Backlog | On by default. All issues live here until pulled into a sprint. There is a product backlog (everything) and a sprint backlog. The board only shows what's in the active sprint. | Off by default. Without it, all the tasks land directly on the board. Can be enabled in board settings to keep the board clean. |
| Key configurations | Enabling story points, setting sprint length and sprint goals. | Setting limits per column and due dates on cards. |
| Work Transitions | Batch: a group of issues moves into a sprint during planning, then progresses through columns. | Continuous: issues are pulled one by one as soon as a column has room. |
| Default Statuses | To Do, In Progress, Done. Board is empty until a sprint is started. | To Do, In Progress, Done. All matching issues appear on the board immediately. |
| Estimation | Story points or time estimates. | Optional. Kanban focuses on cycle time and throughput rather than estimation. |
| WIP Limits | Implicitly controlled by sprint scope — the team commits to a fixed amount of work per sprint. | Explicitly set per column. The column turns red when exceeded, but Jira doesn't block new cards from being added. |
| Reporting | Burndown chart, burnup chart, sprint report, velocity chart, epic report, and more. | Control chart (cycle time) and cumulative flow diagram. |
| Visibility | Only the active sprint is shown on the board. Backlog and future sprints are in a separate view. | Everything is visible on the board at once (unless backlog is enabled or sub-filters are configured). |
| Best use case | Best for teams that need to track and manage sprint-scoped work with a predictable delivery cadence: product development, feature delivery, roadmap-driven teams, cross-functional teams of 5-9 people. | Best for teams that need to track and manage a continuous flow of incoming work: support teams, DevOps / IT operations, bug triage, continuous delivery pipelines, content creation and marketing teams. |
If you're not sure which board to pick, starting with Scrum is the safer bet. You can always water down a Scrum board by simply not using sprints (in this case, it'll behave like a Kanban board).
Going the other way is harder: Jira doesn't let you switch board templates after creation. In team-managed projects, you can toggle the Sprints feature on and off, which gives you some flexibility. But in company-managed projects, the board type is locked the moment you create it. So if there's any chance your team might want sprints down the road, Scrum is the more forgiving starting point.
How to create a Jira board?
In Jira Cloud, boards don't exist on their own — only as a part of a space, so creating a new board usually begins with creating a new space. Here are the steps:
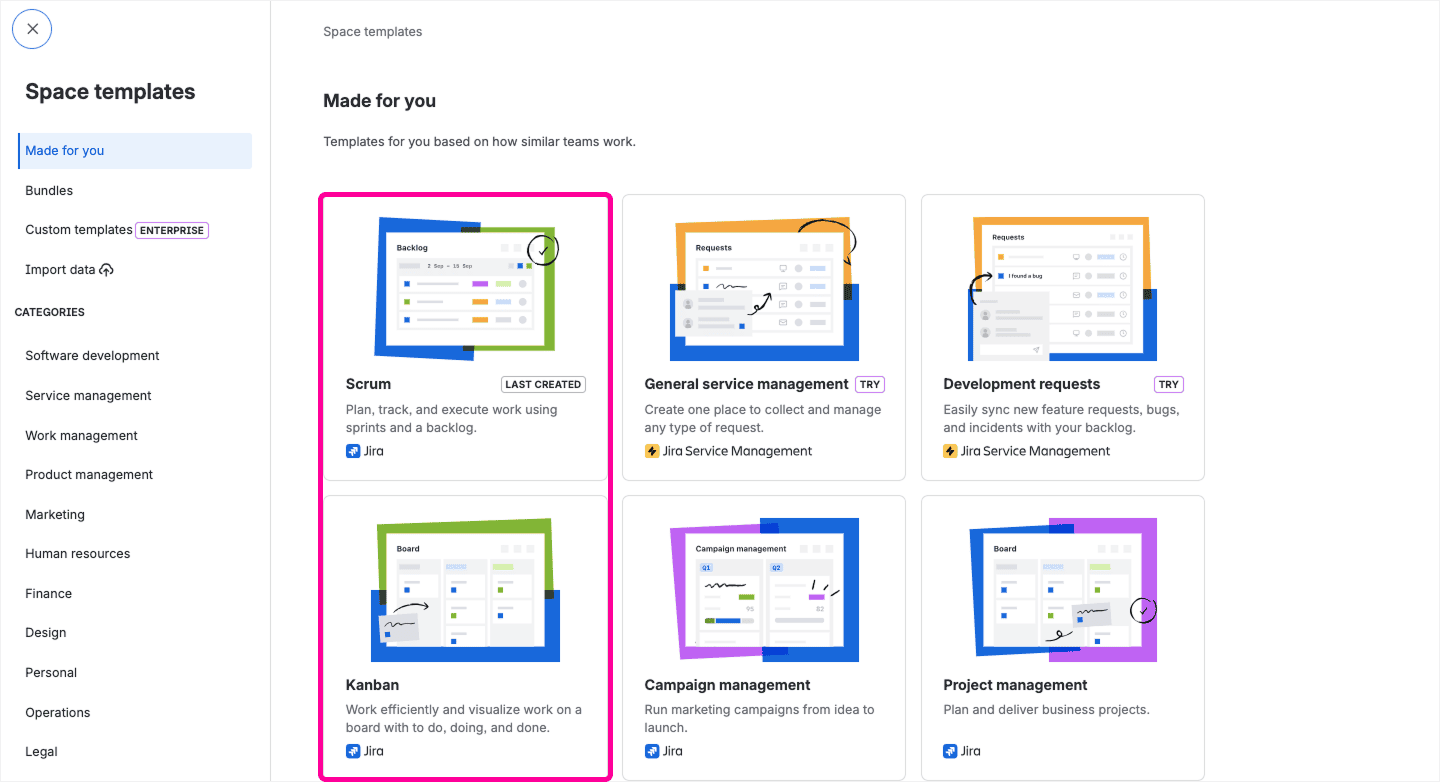
- Click “+” next to “Spaces” in the left sidebar to Create Space:
- Choose the Scrum or Kanban template:
- Pick Team-managed or Company-managed. This choice is permanent and affects your board's customization options. Team-managed spaces let each team set up its own workflows independently, while company-managed spaces share standardized workflows and configurations across the whole organization.
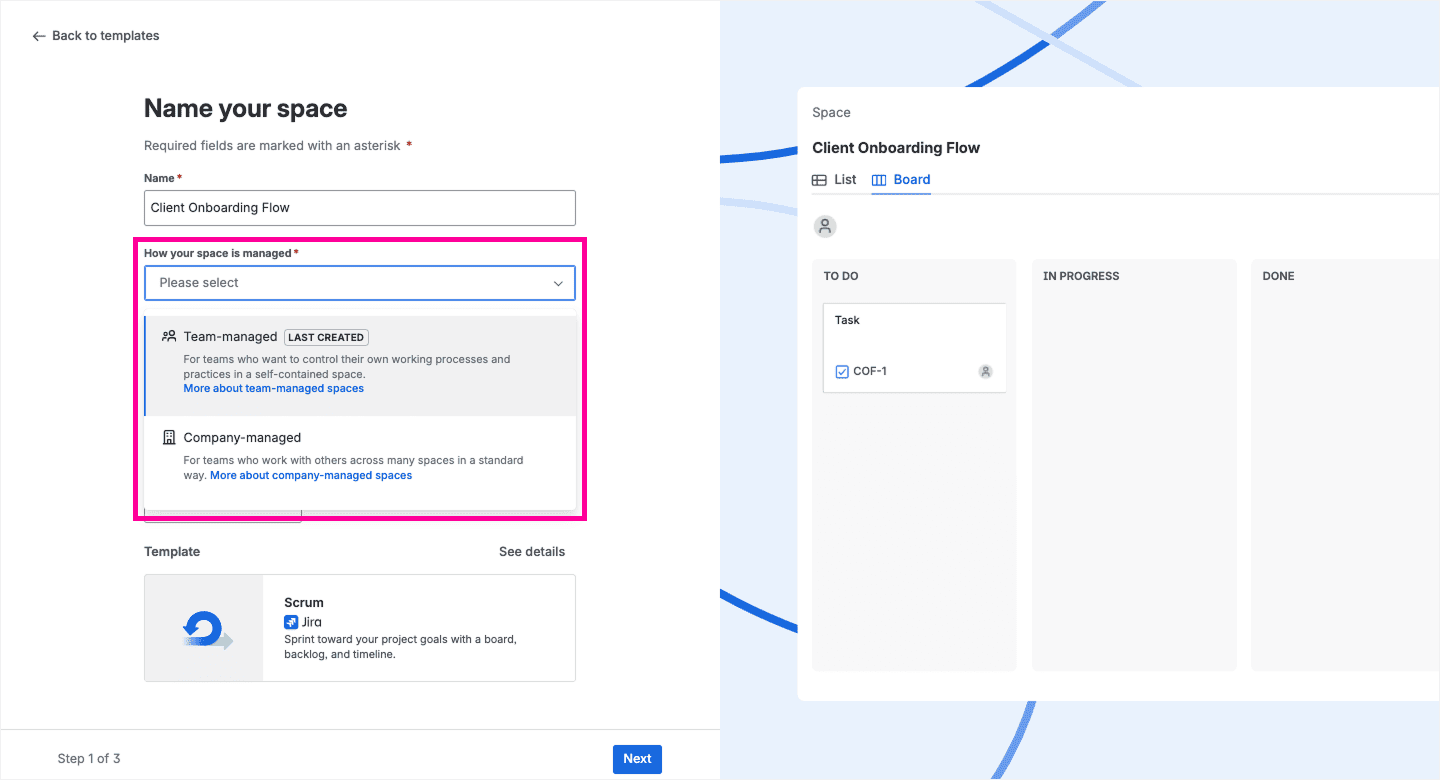
- Name your space, choose the Key (a descriptive prefix for your space’s work item), and click Create. Pick a descriptive board name: “Client Onboarding Flow” instead of “Board 1.”
- Your new board is ready. Jira creates it automatically as part of the space.
☝️If you want an additional board in an existing space, it only works in company-managed spaces. Hover over the space name in the sidebar until a + icon appears, then select Create board. In team-managed spaces, each space gets exactly one board, there's no way to add another.
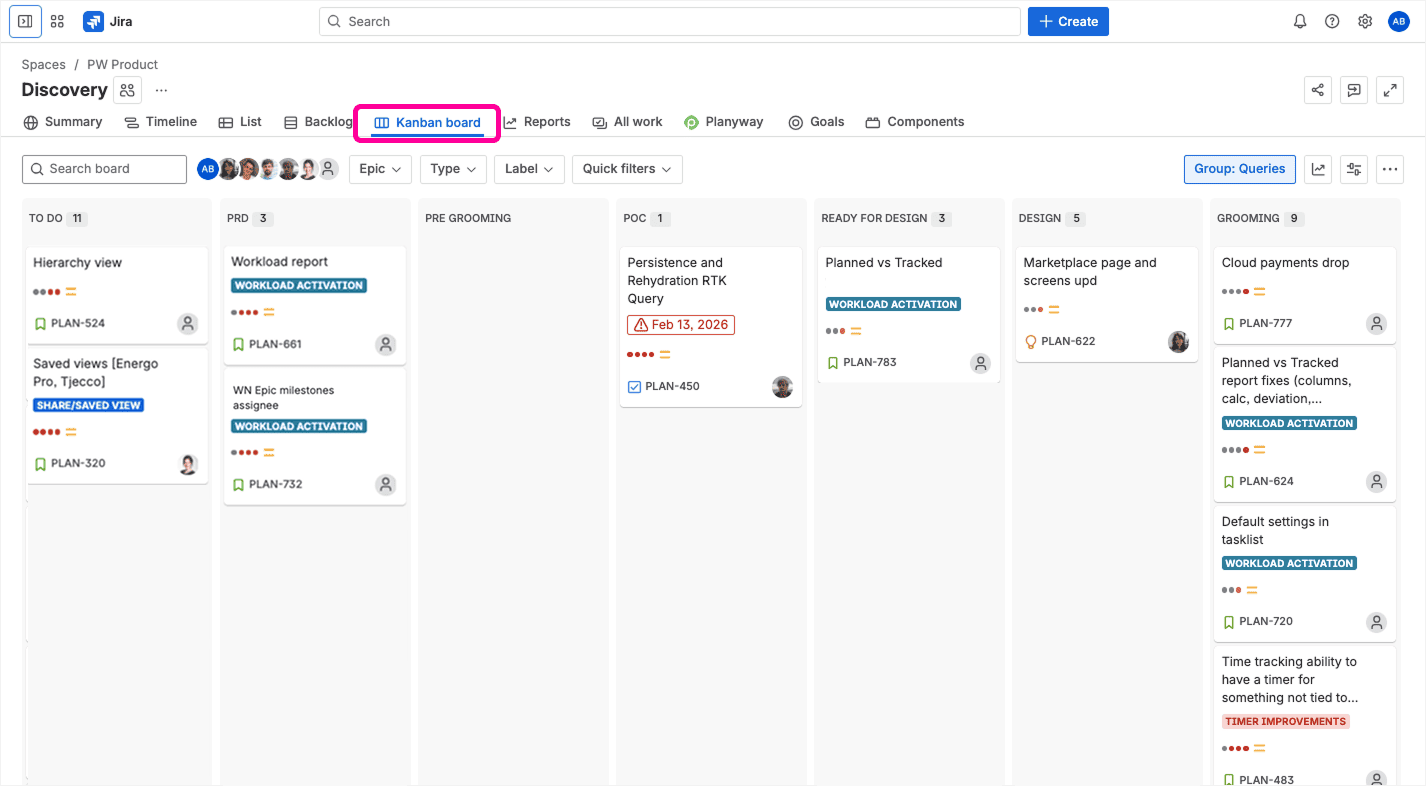
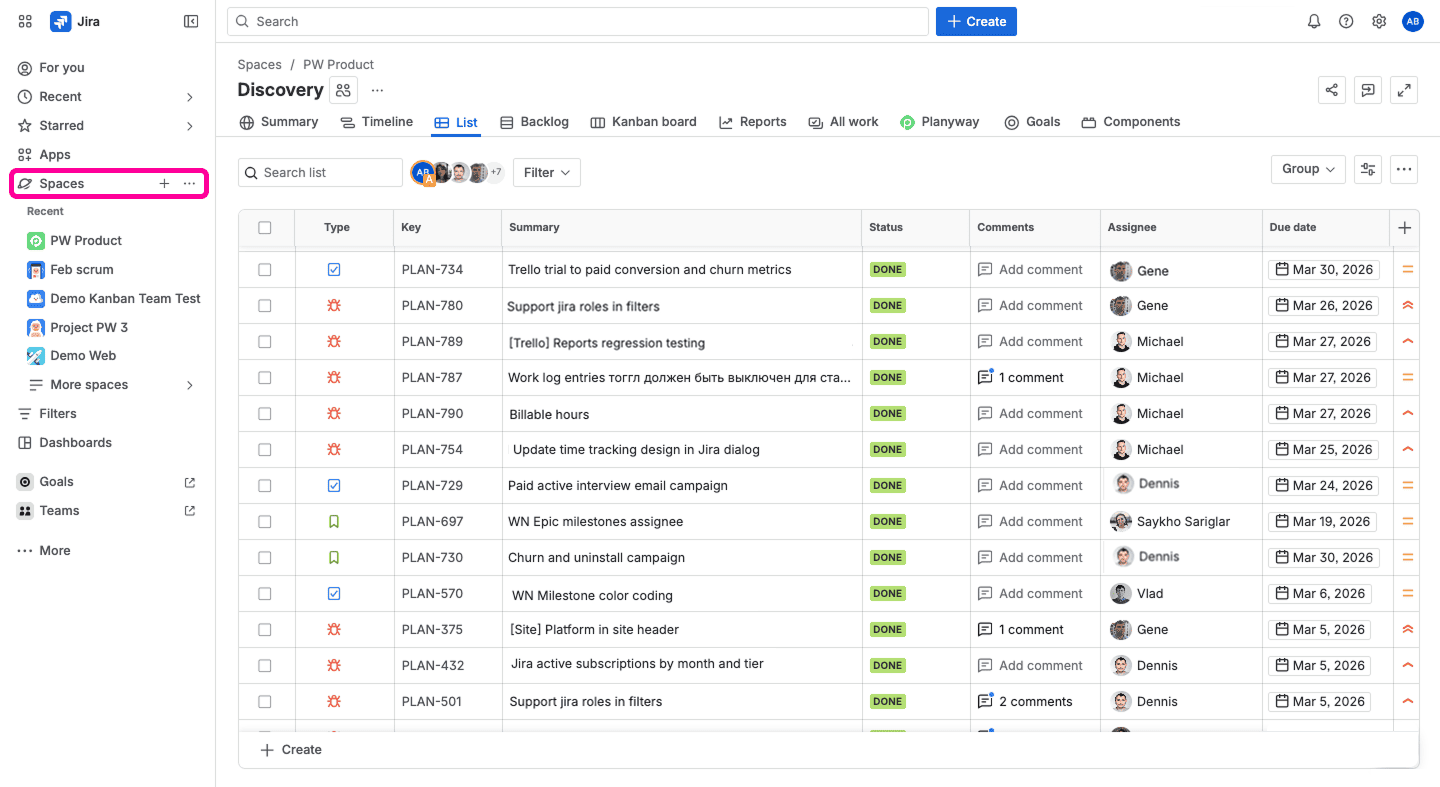
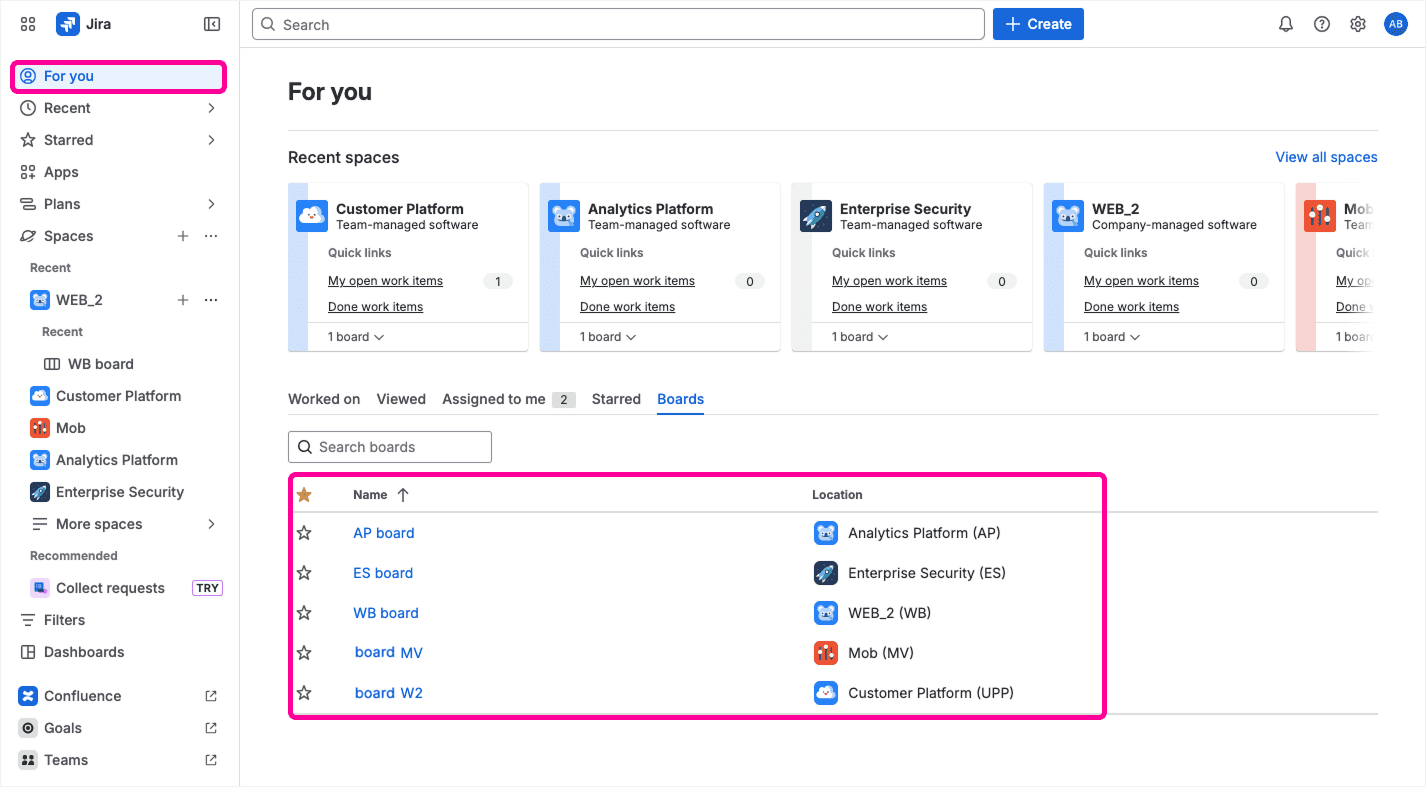
To find all your existing boards, go to Your work ⇒ Boards tab ⇒ View all boards:
Though the setup is simple, things tend to get messier once a real team starts working. Here are a couple of things worth knowing before you invite everyone in:
Permissions are layered. To see a board, a user needs three things at once: access to the saved filter the board is based on, Browse Project permission for the spaces whose issues appear on it, and a Jira Software license. If someone says, “I can't see the board,” make sure that all three boxes are ticked.
Issues vanish from the board without warning. If an issue disappears, it's almost never deleted — it's filtered out. Common causes for that include: the board's JQL filter not matching the issue's project or type, a quick filter being toggled on, a status not mapped to any column, or the issue being a sub-task (sub-tasks don't show in the Scrum backlog by design).
Seven most important Jira board customizations you’ll need
Jira is extremely customizable at the platform level. Boards themselves are less flexible, yet there’s still enough wiggle room to adapt them to the way your team actually works. Most Jira board customization falls into three big themes: board structure, board visibility, and board scope.
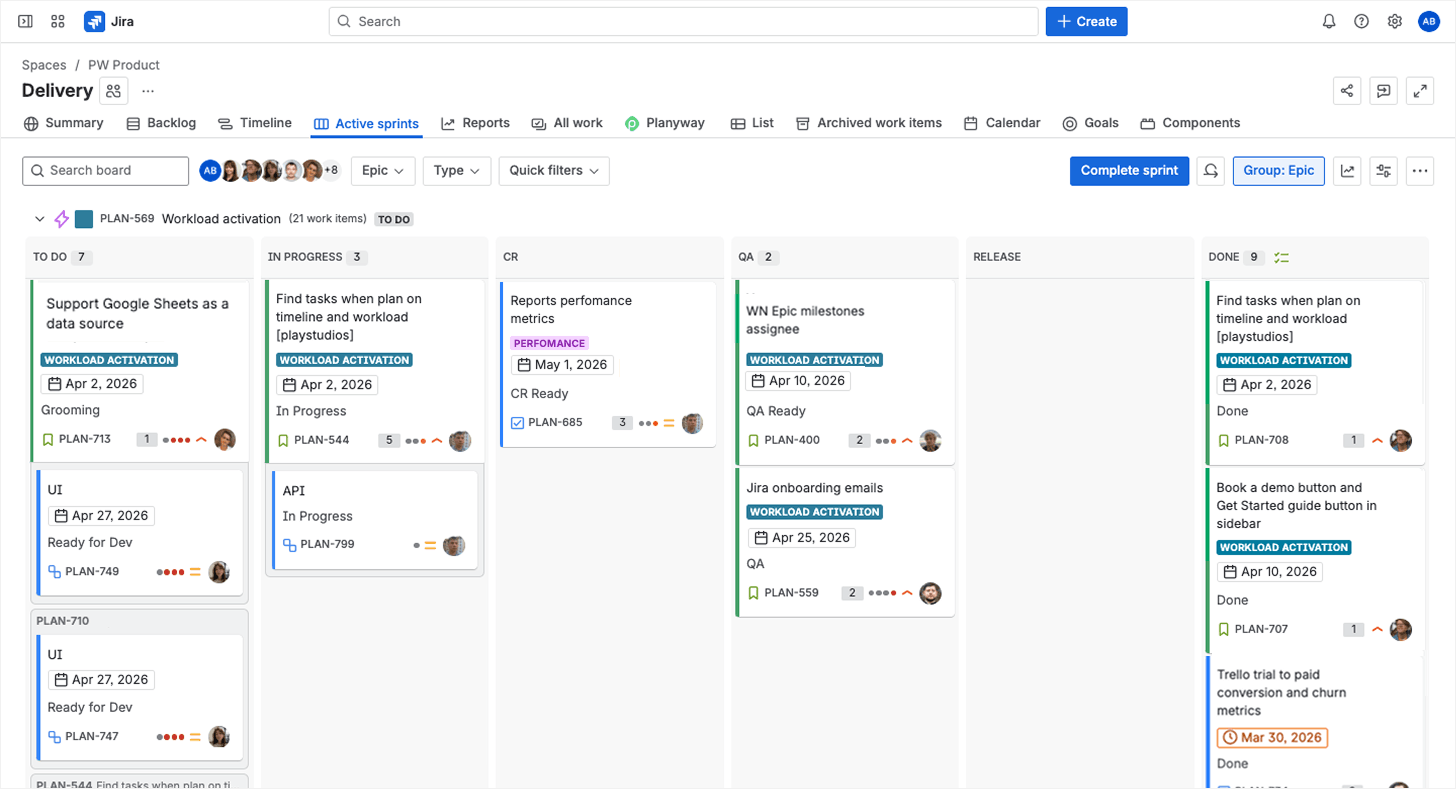
Columns and workflow mapping
Each column on your board maps to one or more Jira statuses. When an issue transitions to a new status, it moves to the corresponding column. The default setup has three columns: To Do, In Progress, Done. But every workflow is unique, and you most probably need more stages, like a “Ready for QA” or “Code Review”. To have that covered, you can add columns for the stages you need and map the right statuses to them. Don't go overboard: 4–6 columns is enough. Beyond that, it becomes hard to scan.
📌 Pro tip: You can map multiple statuses to a single column. It’s useful if you have eight statuses but don't want eight columns cluttering the board. Just be careful with the rightmost column: any status mapped there counts as completed in reports. If you add a “Released” column to the right of “Done,” everything in “Done” will suddenly stop counting as finished.
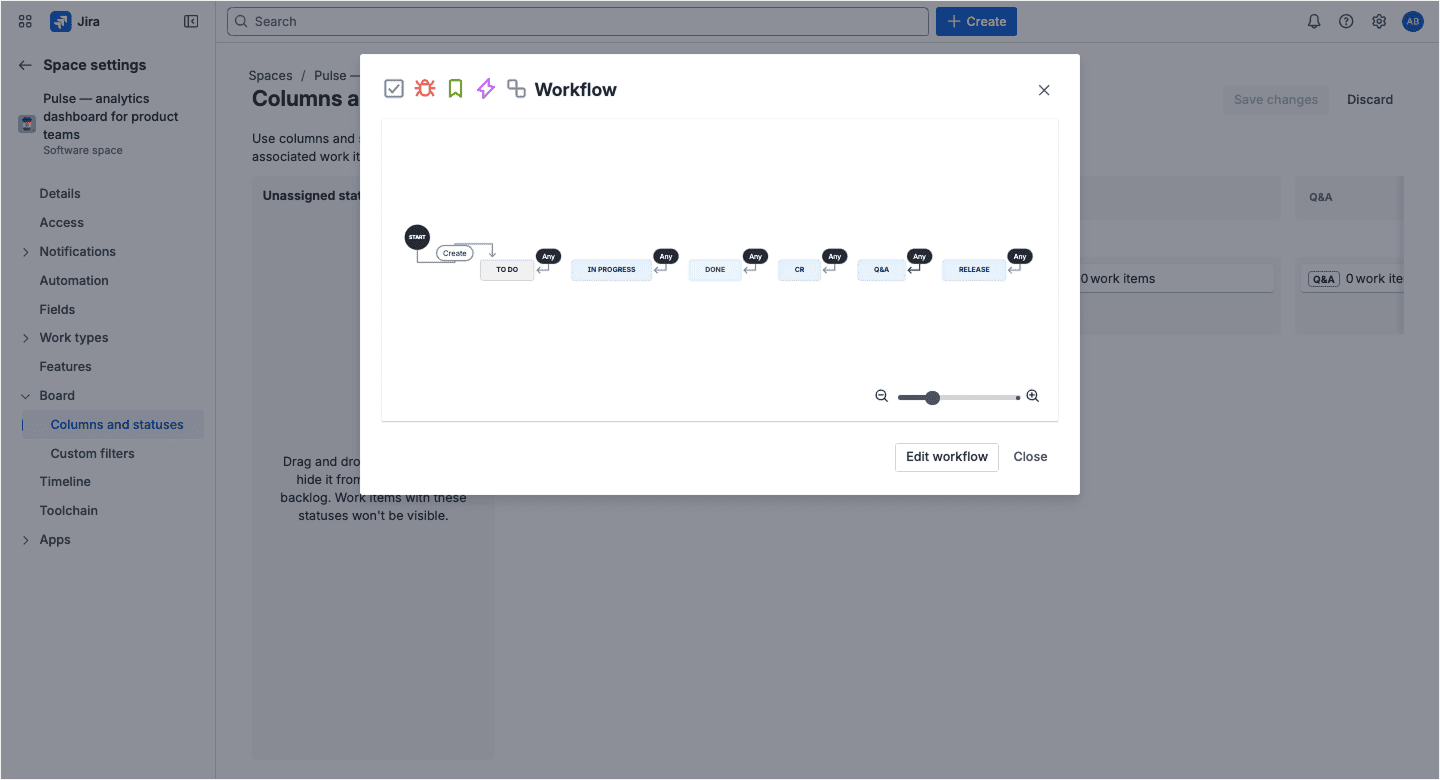
Once you've set up your columns, it's worth checking what happens between them. Behind every column is a workflow transition, and you can see the full picture in Space settings → Columns and statuses → Manage workflow. By default, Jira sets every transition to “Any” — meaning an issue can jump from any status to any other. That's fine for getting started, but as your process matures, it's worth tightening these transitions. For example, you might not want issues to skip QA straight to Release. Restricting transitions ensures that cards always move through the stages your team must follow.
Swimlanes
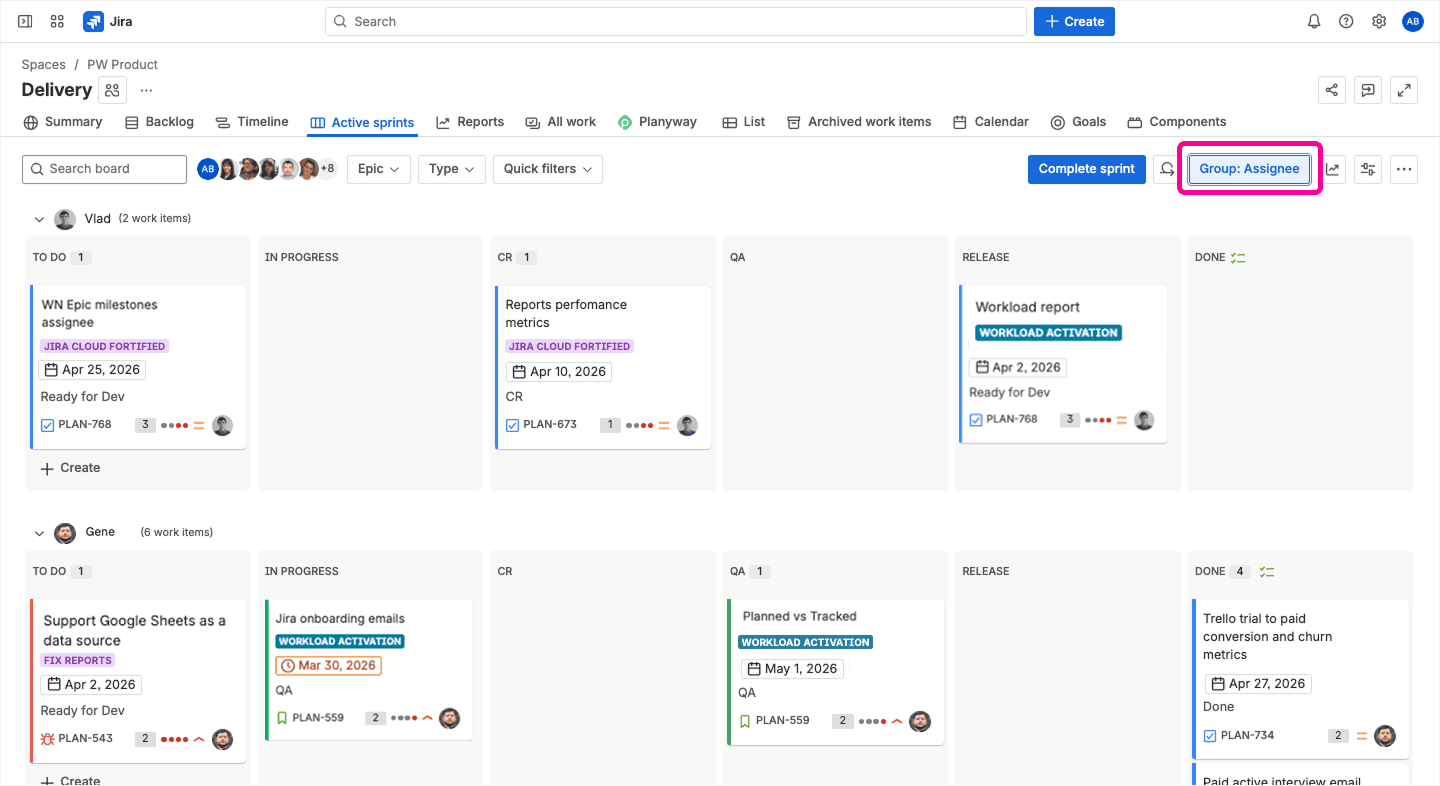
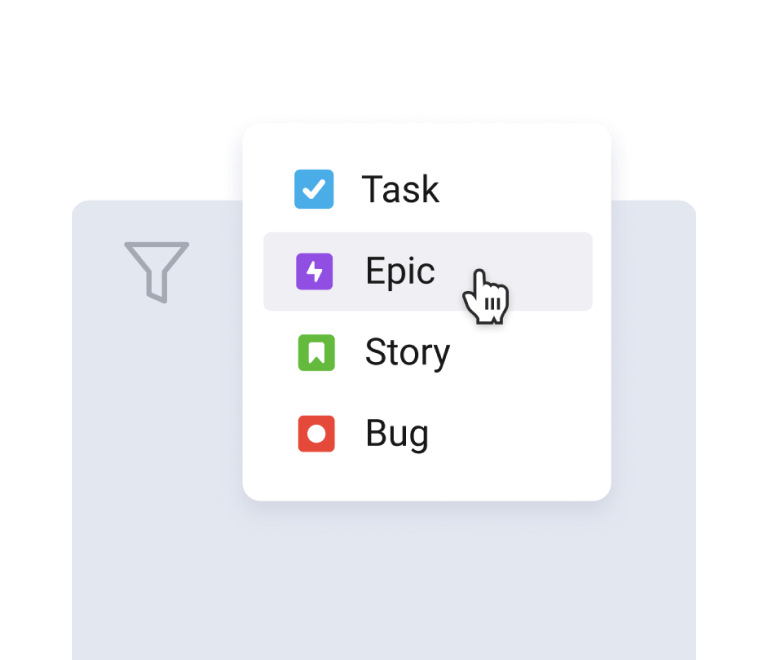
Swimlanes are horizontal rows that split the board into sections. These sections can vary, and you can group your issues by different criteria: epic, assignee, priority, or even custom JQL queries. The last option is the most powerful: you can, for instance, create separate swimlanes for Bugs and Features on the same board. But for now, it’s only available in company-managed spaces (team-managed spaces are limited to Assignee, Epic, Subtask, or None).
Card layout and card colors
By default, cards show very little — just the issue title, key, and assignee avatar. But you can add fields like priority, labels, story points, and due dates directly onto the card face. Due dates are hidden by default, which means your team might be missing deadlines without realizing the dates were never visible. Turn them on in Board Settings ⇒ Card layout.
📌Pro tip: You can color-code cards using JQL queries. Go to Board Settings ⇒ Card colors, select “Colors based on: Queries,” and set up a traffic light system. For example: red when duedate ≤ now () AND status not in (Done, Closed), yellow when ≤ 5d, green < 5d. The order of the queries matters; Jira applies the first match.
One-click filters
To configure filters, go to Board Settings => Quick Filters and add a JQL query. They let you focus on specific subsets of issues: “Only my issues,” “High priority,” “Current sprint only.” You can stack multiple filters at once, they combine with AND logic.
📌Two one-click filters every board should have. The first one is “Flagged” (Flagged = Impediment) — this one surfaces every flagged issue in one click if your team uses flags to mark blockers. It's the fastest way to spot stuck work during a standup. The second — ”Due soon or overdue” (resolution = Unresolved AND duedate is not EMPTY AND duedate < startOfDay(7d)). This one shows everything with a deadline in the next seven days, plus anything already past due.
Board filter (JQL)
The board filter is the underlying query that determines which issues appear on the board at all. It's the most powerful customization and the one most teams never touch. But if you need a cross-project board — say, one view that shows issues from three different spaces — this is where you do it: edit the board's saved filter and write a query like project in (”Space1”, "Space2", "Space3").
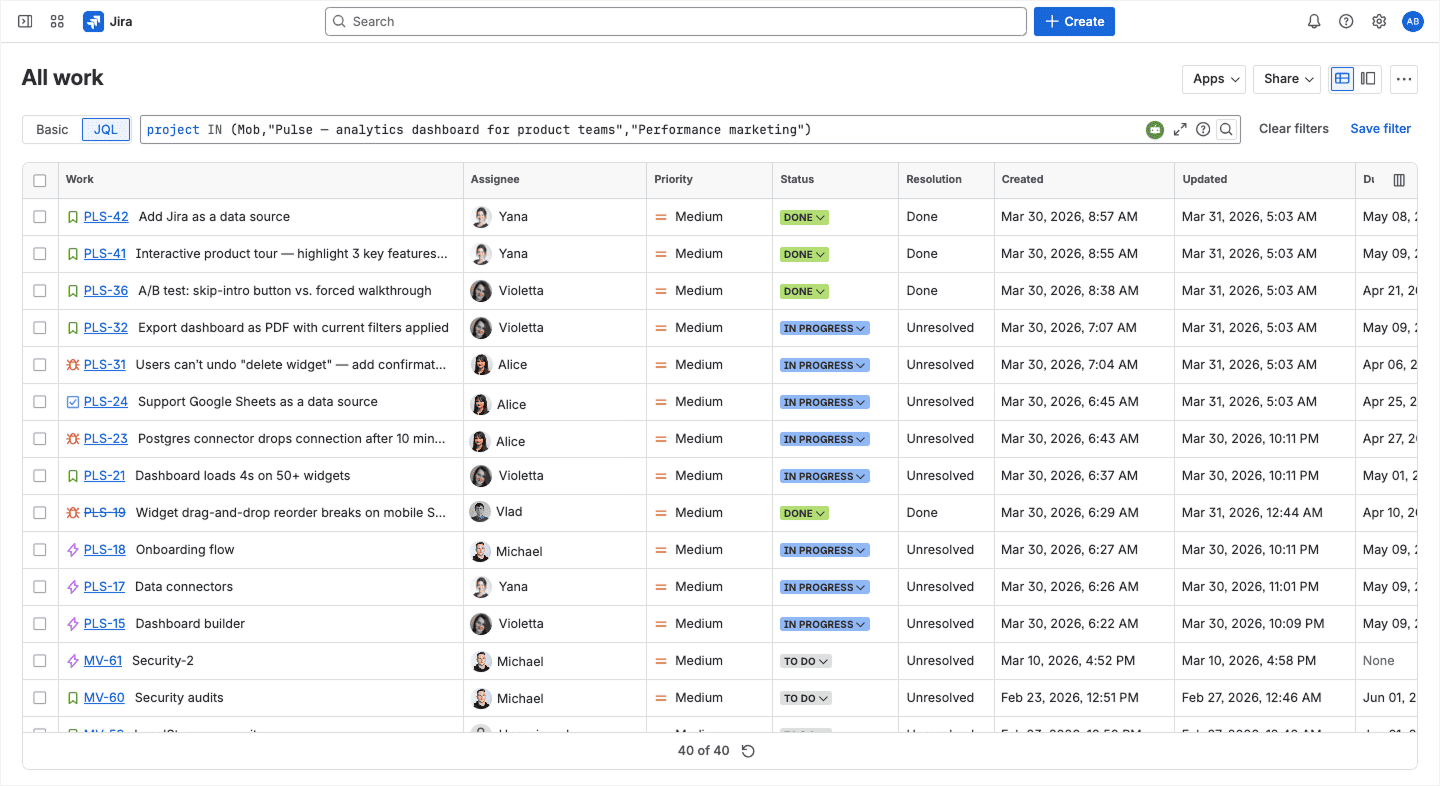
Then go to Boards ⇒ Create board and choose “Board from an existing Saved Filter.” Note that this only works in company-managed spaces.
Also, even if your board filter pulls issues from multiple projects, the Timeline and List views will only show issues from a single project. The board view works cross-project, but the other views don't. This surprises a lot of teams that build a multi-project board and then wonder why the timeline is half-empty.
Estimation settings
You can choose how your board measures work: story points, original time estimate, or simple issue count. If your team doesn't estimate at all, switch to Issue Count — velocity charts and sprint reports will still work, just based on the number of issues completed rather than points.
One thing to avoid: don't switch estimation methods mid-project. If you go from story points to time estimates after a few sprints, your historical velocity data breaks, because the chart can't compare points to hours.
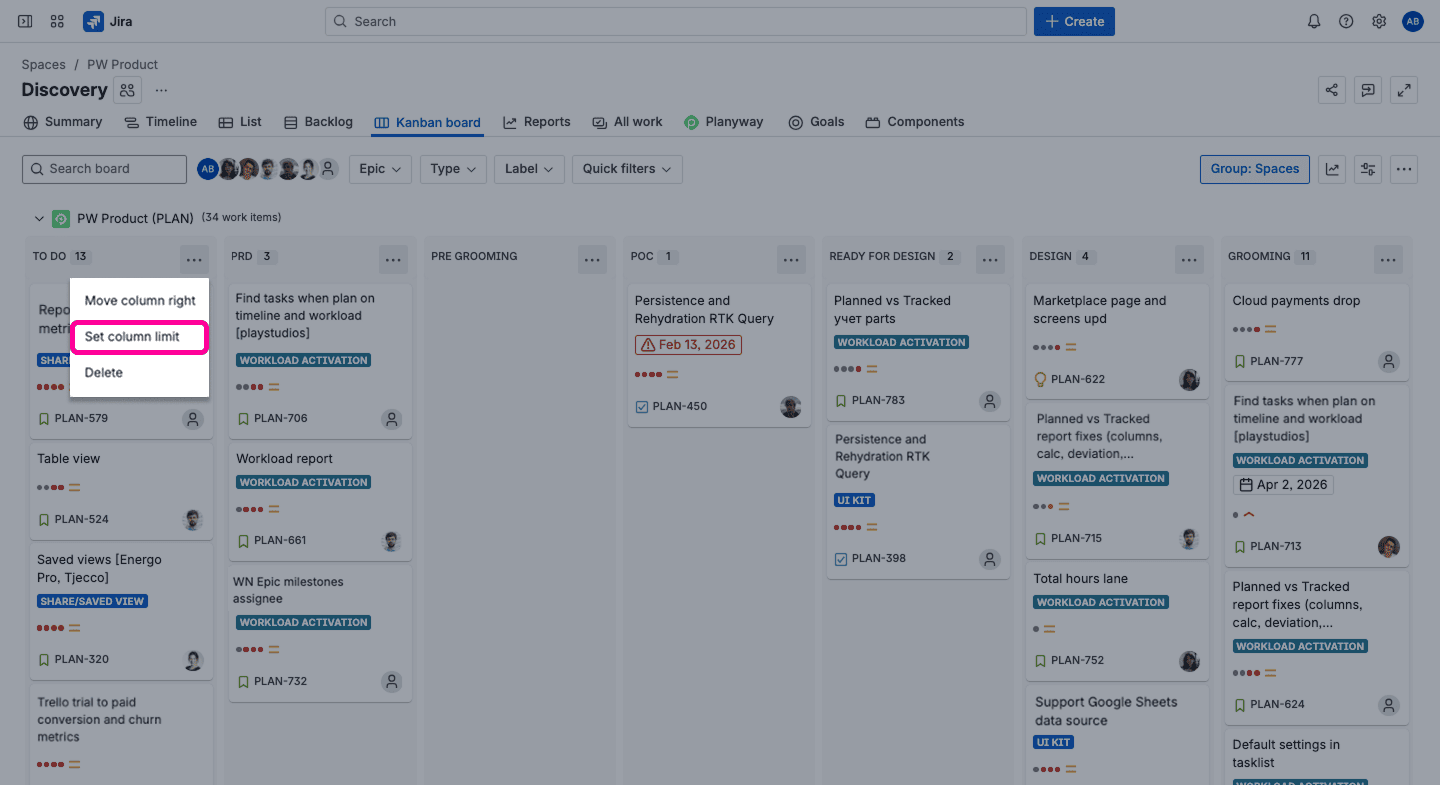
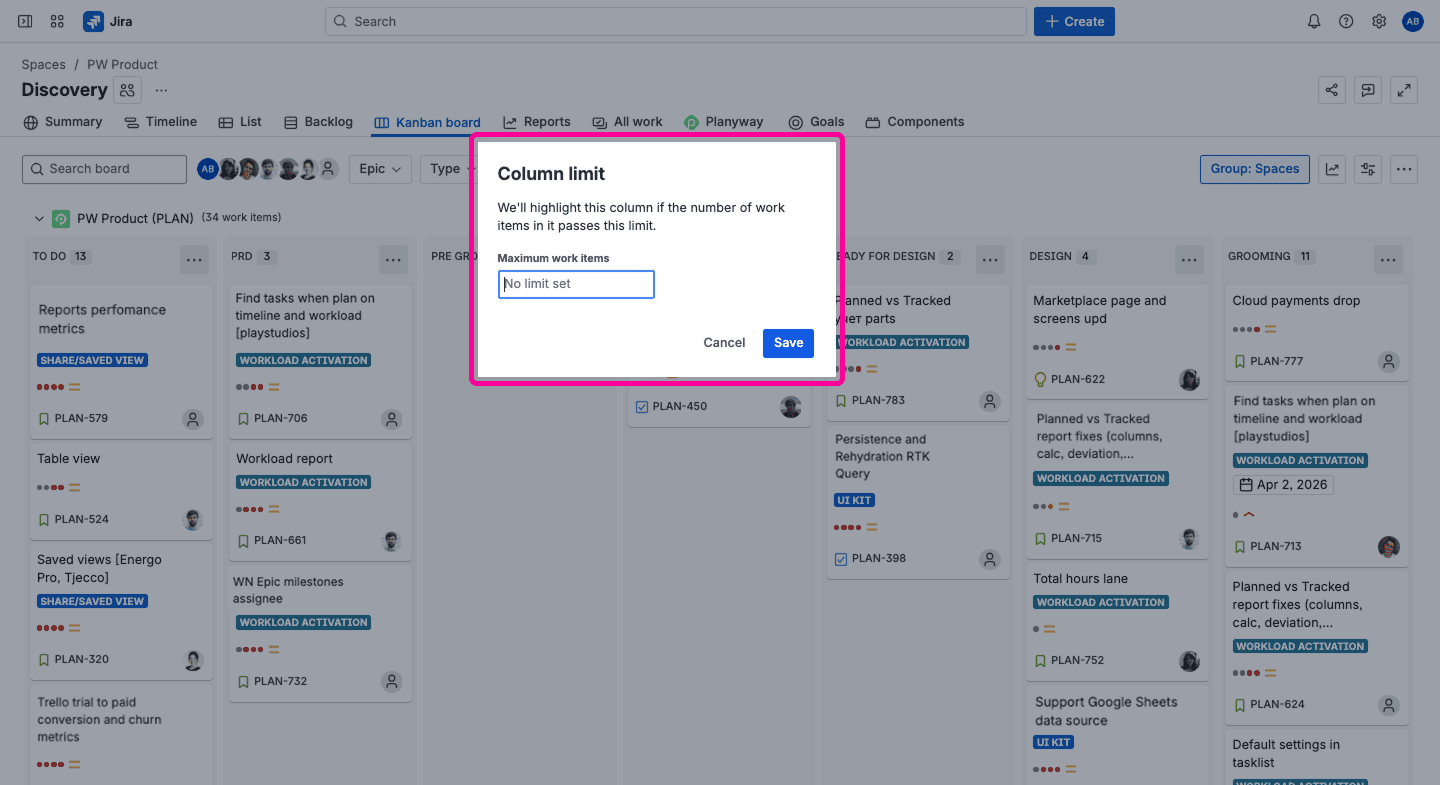
WIP limits
Work-in-progress limits the number of issues that can sit in a single column. They're essential for Kanban boards. A practical starting point: set a limit on a specific column, like “In Progress”, to your team size plus one. You can easily adjust these after a couple of sprints once you see how work actually flows.
Where Jira boards fall flat and what can be done about it
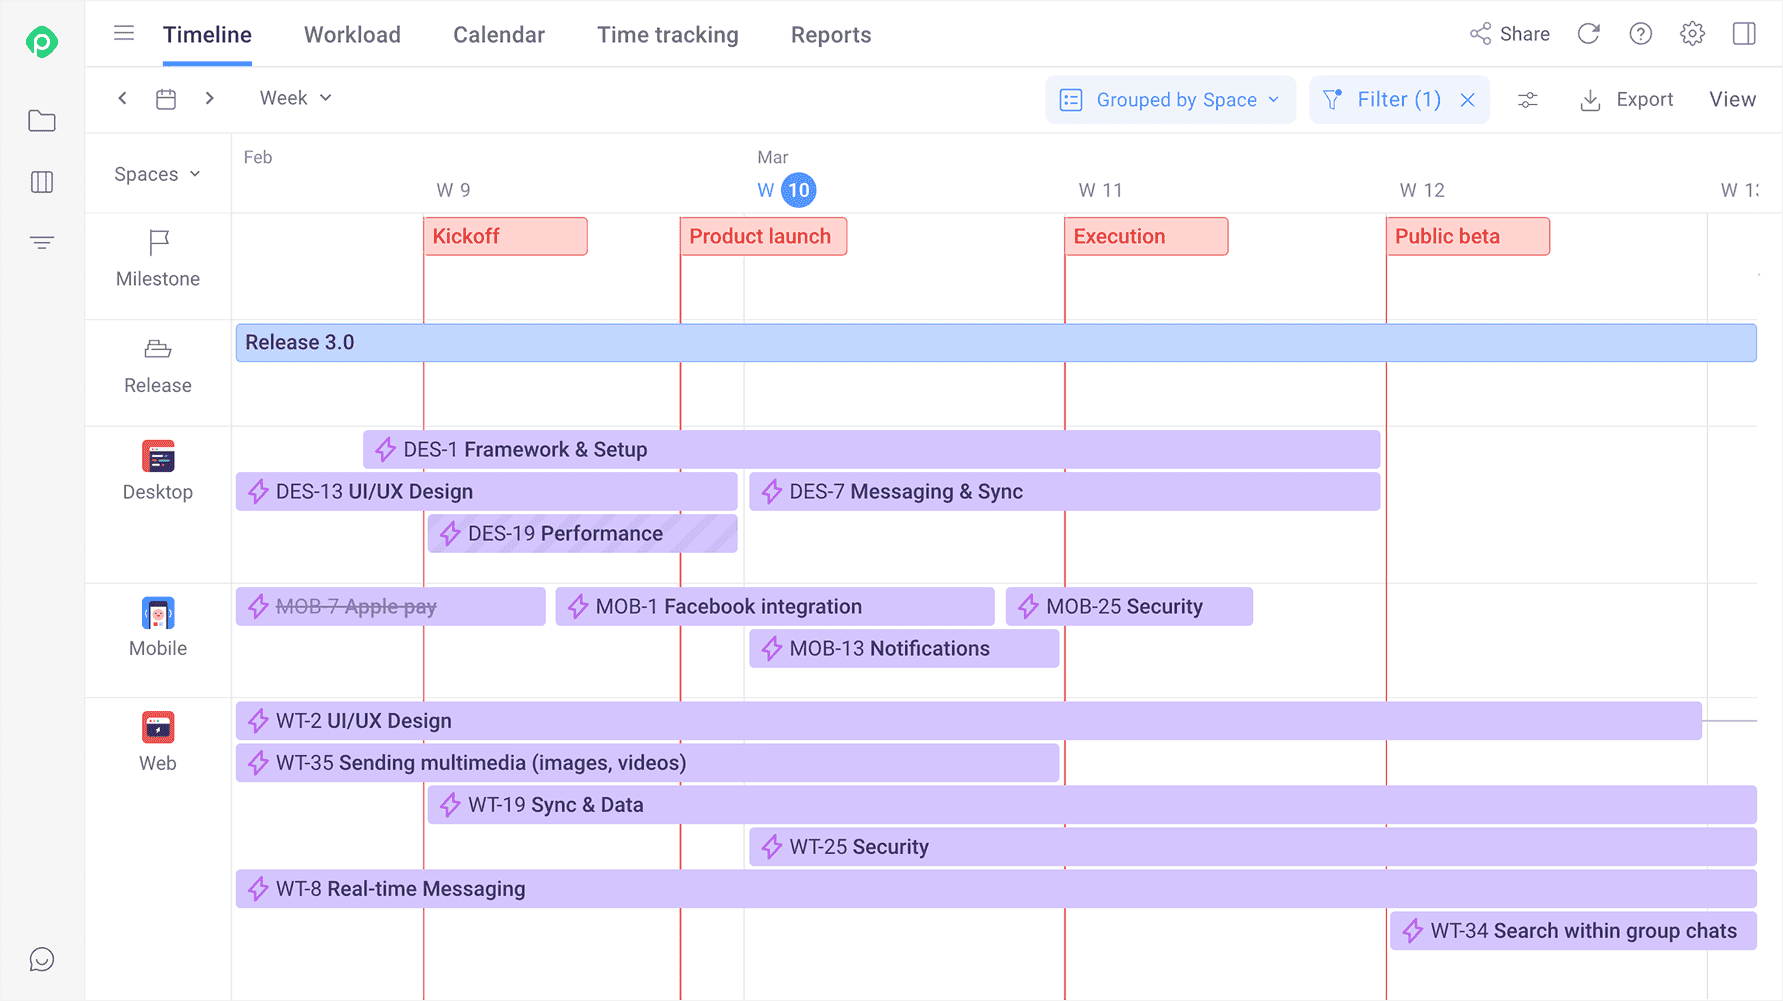
Jira boards are great for standups where teams discuss progress column by column, but not so great at showing the bigger picture or visualizing particular aspects of the overall process. Once your team needs visibility into things like workload per person, cross-project dependencies, or portfolio-level roadmaps, the board alone isn't enough. Jira Premium covers some of these gaps, but not all, and the cost scales with every seat. Planyway fills these gaps in one place at a lower cost.
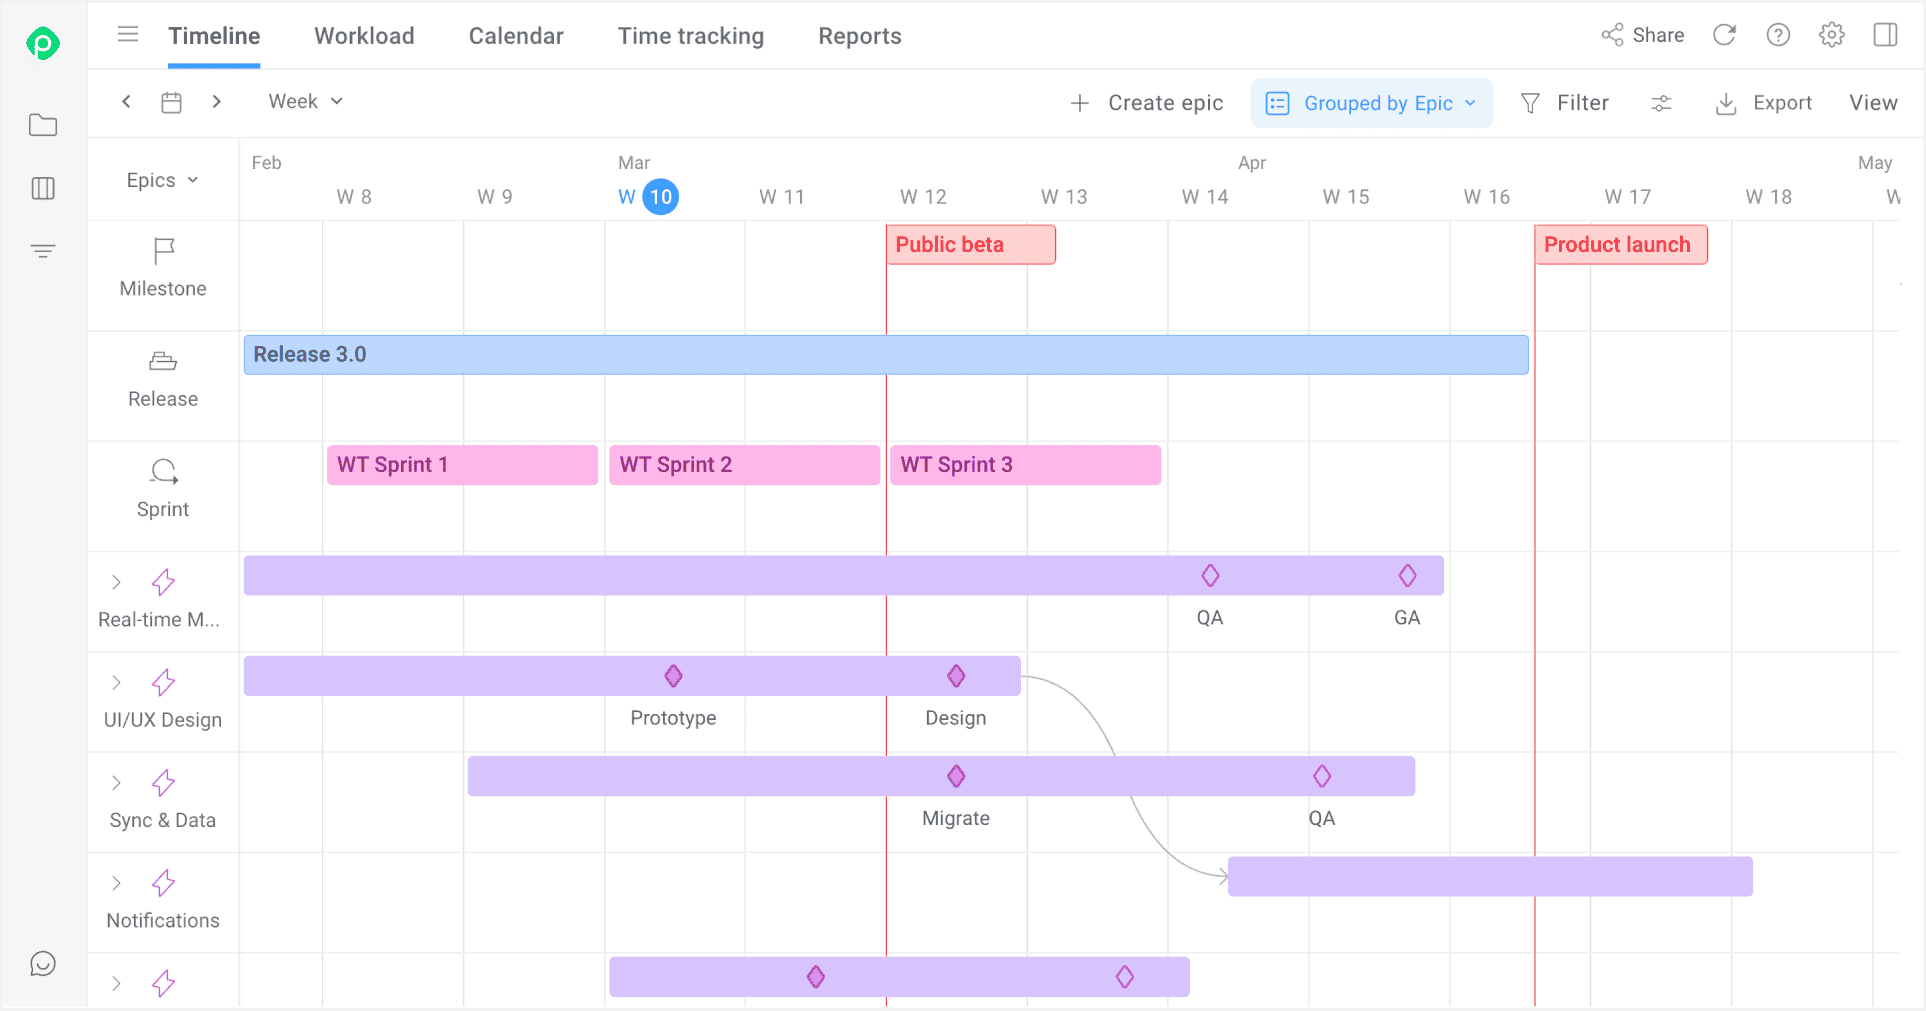
Timeline and schedule insights
Boards show a task status, while the timeline shows when the work is happening. The timeline displays start dates, due dates, and duration bars on a calendar. On Free and Standard plans, this view works within a single project, but cross-project planning requires Jira Premium.
With Planyway: you get a cross-project timeline with milestones and releases that keep key deliverables visible alongside everyday tasks in multiple projects.
Dependencies buried inside issue links
On the board, dependencies are invisible, and you have to click into each issue to discover tasks related to it. The timeline does show dependency lines and flags date conflicts, but only within a single project. Tracking cross-project dependencies requires Jira Premium.
With Planyway: you get the same cross-project dependency arrows, plus they live alongside workload and time tracking views. This enables you to see not just what depends on what, but whether the people assigned to those critical tasks actually have the capacity to deliver on time.
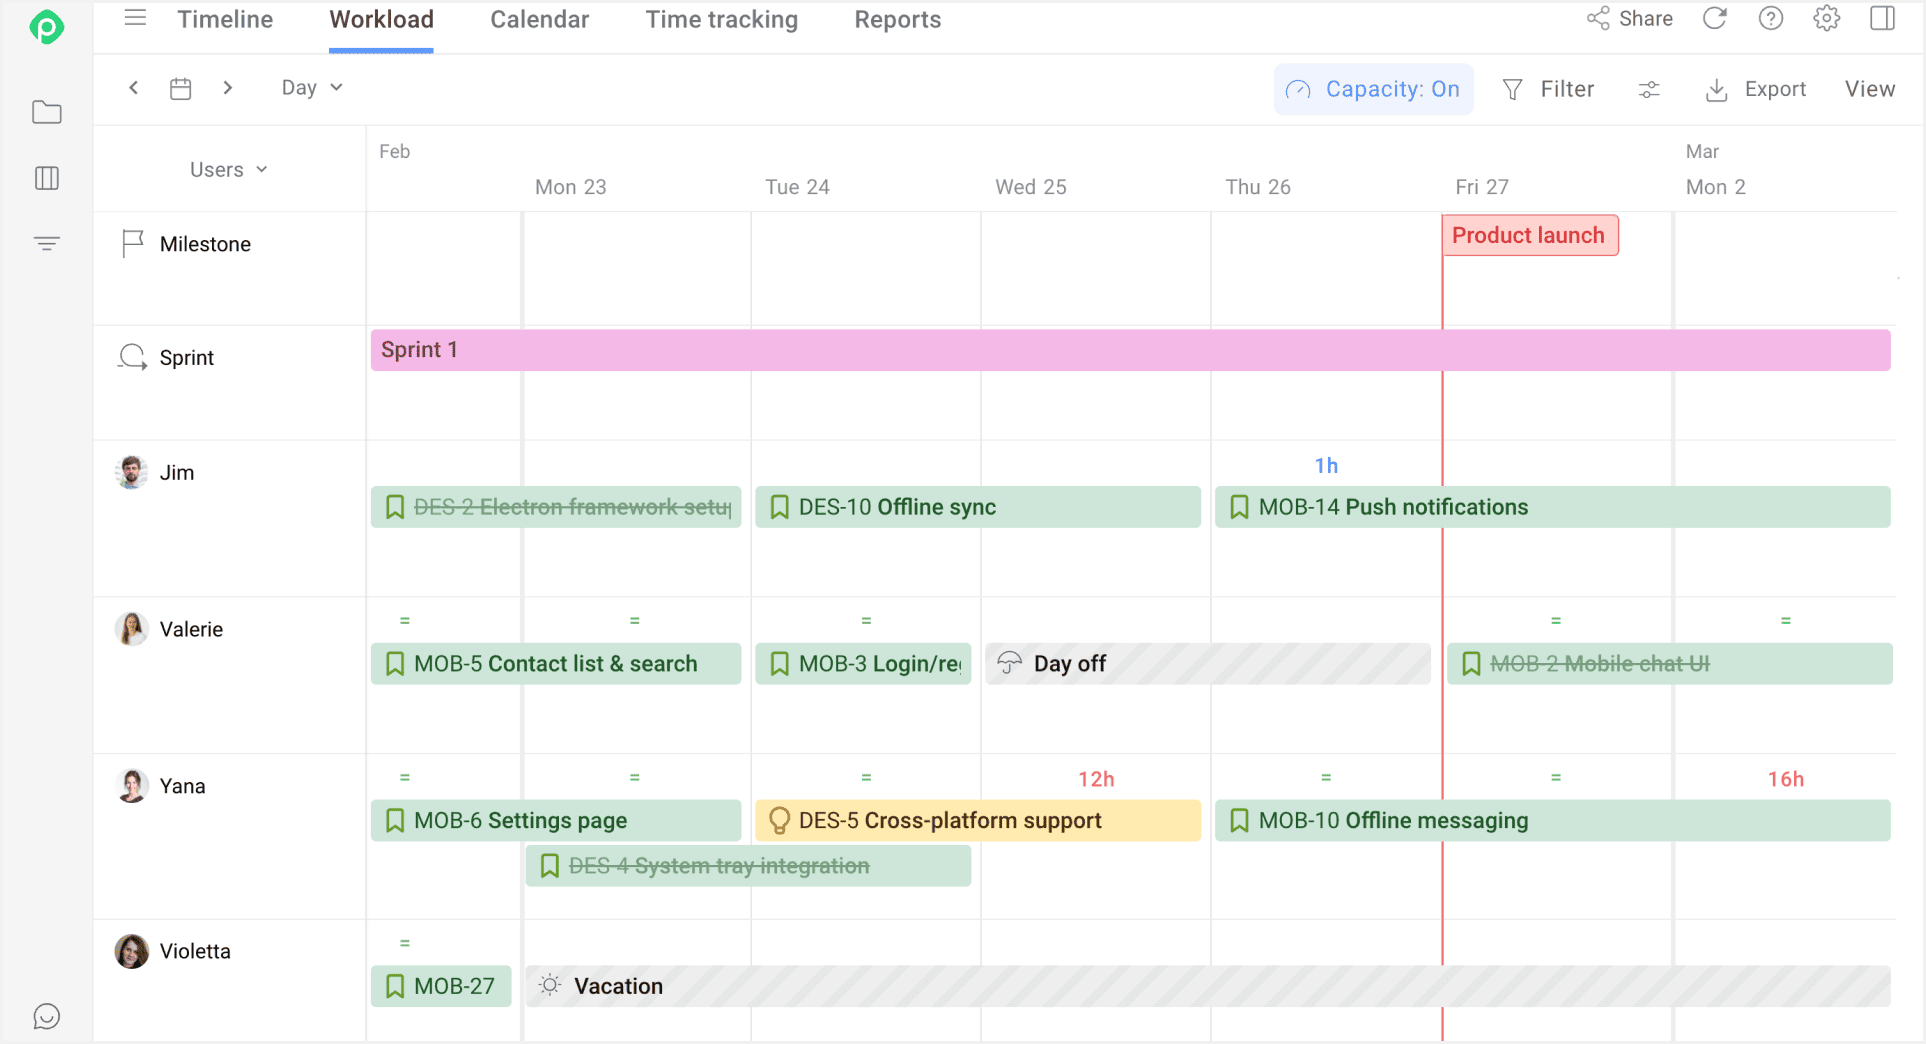
Blind spots in team capacity
In Jira boards, you can see how many cards each person has and in which columns. But card count doesn't equal workload and won’t show who's actually overbooked versus who has room, or how your team’s efforts are distributed across the calendar.
With Planyway: the workload view shows each team member's capacity heat map, highlighting who's overbooked and who's available. You can rebalance work by dragging tasks between people directly on the timeline.
No cross-project or portfolio view
Jira boards are single-project tools. If you manage multiple teams or products, you're constantly switching between boards with no unified picture. And even within a single project, the board doesn't show how today's sprint work fits into the bigger product roadmap. There are no milestones to mark key dates and no way to see whether the launch is on track or slipping. Jira Plans can solve some of this, but it's mainly a Premium feature.
With Planyway: you can pull issues from multiple Jira projects into one timeline, group by space, team, assignee, or component, and zoom out to see releases and milestones alongside everyday tasks. Key deliverables stay visible, not buried in individual issues. And you can share the view with a client or executive in PDF or via a link.
Jira boards + Planyway = an unbeatable duo for multi-team planning
As we said at the start, boards in Jira are a visual lens on your backlog. They're designed to help your team manage work, stay focused, and deliver on time. And like any tool, boards have blind spots, including limited timeline visibility, no cross-project planning, and zero insight into team capacity.
In most cases, you'll have to upgrade to premium tiers to get those limitations out of your way. Or you can install a plugin like Planyway on top of your current instance and avoid paying a hefty price for an update just to access the same features.
Planyway has a timeline that shows when work is scheduled, a workload view that gives valuable insights into who has capacity, dependency arrows, and a multi-project view that brings everything onto one screen. Your data stays in Jira while Planyway adds several planning layers that boards don't have. If you want to create a unified up-to-date view across projects to share it with stakeholders, Planyway does this without Premium.
If your team has outgrown the simplicity of basic columns but hasn't outgrown your Jira plan, give Planyway a try.
FAQ
Jira is a project management and issue tracking tool by Atlassian. It is most commonly used in software development, but also in operations, marketing, HR, and other fields. Teams use it to plan work, monitor delivery, and improve based on reporting.
A Jira board is a visual filter on your backlog. It displays your issues in columns that represent workflow stages in a way that's easier to manage and discuss.
A Scrum board is a specific type of Jira board built around time-boxed sprints. At the beginning of each sprint, the development team pulls issues from the backlog and commits to finishing them by the end of the sprint. The board shows how these issues move through stages, helping the team track progress toward Done.
No, a Kanban board is one of two board types that Jira offers. Jira is the platform, and a Kanban board is a view within it. It is designed for teams that work in a continuous flow without sprints. Work flows continuously: as soon as one task is finished, the next one is pulled from the queue. The focus is on how fast a single task travels from “To Do” status to “Done”.