Jira Export to Excel. Easy Guide in 2026
7 min read
Like it or not, Excel is a staple in every Jira-savvy team’s tech stack. Mainly because that’s a universal way of sharing Jira data with external stakeholders who don’t have a Jira license. But building those spreadsheets by hand and copying everything over is a bit of a journey.
So, is there a faster, easier way to export Jira to Excel? We’ll tell you about 4 methods for getting Jira data into Excel, along with other crucial information and hands-on tips.
TL;DR
- Jira's native export gets the job done for simple, one-off tasks, but it produces raw CSV data that needs cleanup before it's useful for reporting or analysing.
- Third-party apps and automation tools fill the gaps that Jira's built-in export leaves open, like structured data or time tracking. Which one of them makes sense for your team depends on your individual use case.
- While export itself is fairly easy, making that data readable and valuable for the rest of the team might be challenging. That’s why, if the data is clean before it leaves Jira, everything downstream gets easier.
How to export data from Jira? 4 options
In terms of data sharing, Jira offers a few native methods, which, unfortunately, don’t cover all scenarios and data types, plus come with a fair share of other limitations. That’s why teams usually end up combining several approaches depending on the reporting needs, audience, and level of detail required. These methods work across Jira Software, Jira Service Management, and Jira Work Management — though available export options may vary slightly by product.
Option 1: The built-in CSV export (manual)
Out of the box, Jira Cloud allows users to export their data as a CSV file and then work with it in Microsoft Excel. With that said, true XLS/XLSX-style exports are also available, but only for Data Center users with a configuration change.
The built-in CSV export is, of course, the most straightforward method to export Jira issues, built directly into Jira's standard issue navigator. Jira’s export to CSV is always based on a filtered issue list.
You can't export a board view or a timeline, just the issues that match your current filter or JQL query.
How it works
- Go to the Issue tab in the top navigation and open the issue navigator (or use Filters > Advanced Search).
- Run a filter or JQL query to find the issues you want to export.
- Click the Export button in the top-right corner.
- Choose either Export Excel CSV (all fields) or select Export Excel CSV (current fields) from the dropdown menu. These are the Excel options available in the dropdown menu.
- Jira generates a downloadable CSV file — open it in Excel.
What data is included in the native CSV Jira export?
A native export usually includes core issue fields like issue key, summary, status, priority, assignee, due date (if set), and any visible custom fields that are available in the current setup. What you get depends on the view you export from and how the Jira instance is configured.
In other words, the CSV gives you a snapshot of the issue list, not a polished report. It is useful, but it is still raw data.
What's missing: comments, attachments, subtask hierarchy (subtasks appear as separate rows, not nested under their parents), time tracking worklogs (only the totals — not individual log entries), and any visual context like sprints or epics in a readable format.
Limitations of the built-in Jira export
- Jira Cloud hard-limits exports to 1,000 Jira Cloud issues per export. If your backlog is larger, you'll need to split it into multiple exports and merge them manually.
- Despite the “Excel” label, when you export CSV from Jira you get a plain text file, not a formatted spreadsheet. Dates, durations, and some custom field values often need reformatting before Excel can use them properly.
- You can't export a Gantt chart view, resource allocation data, or anything visual.
- Every export is a one-time snapshot. Manual exports like this go stale the moment you download them.
- Fields like multi-select labels or user pickers often collapse into single cells with awkward delimiters.
Option 2: Planyway export (visual + structured reporting)
Planyway is a visual planning and tracking tool that plugs into Jira directly and syncs with all your data in real time, in both directions. It lets you structure your data inside Jira through timelines, calendars, workload planning, and dedicated reporting tools, then export exactly the view or report you need. Beyond that, it includes dedicated reports for time tracking, planned vs. tracked effort, and workload analysis.
Planyway's interface is designed to be clear enough for board meetings and health checks, which often means you don't need to export anything or build a separate presentation at all. And when you do need a file — once your data is filtered and organized, you can export it to Excel (XLSX), CSV, or PDF.
How it works
Here's how the export process works in practice. You start by filtering and organizing the view and then export what you actually need. It takes seven steps.
Step 1: Open Planyway inside Jira.
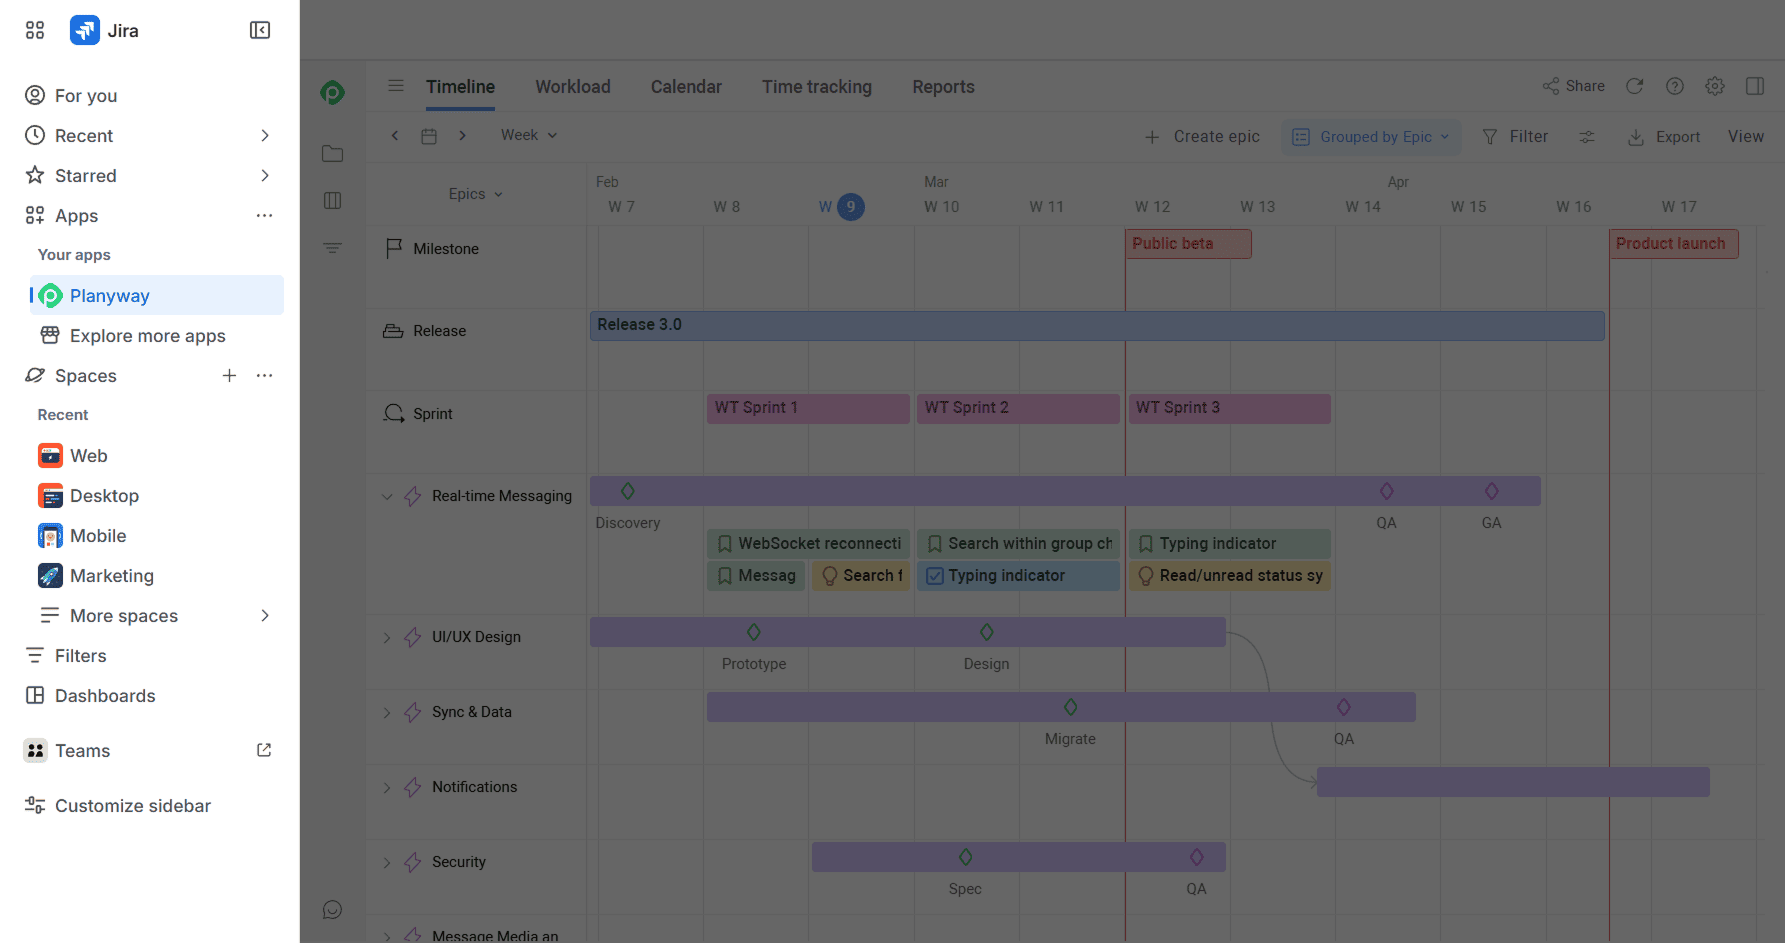
Step 2: Connect specific Spaces, Board or Filters that you want to extract data from.
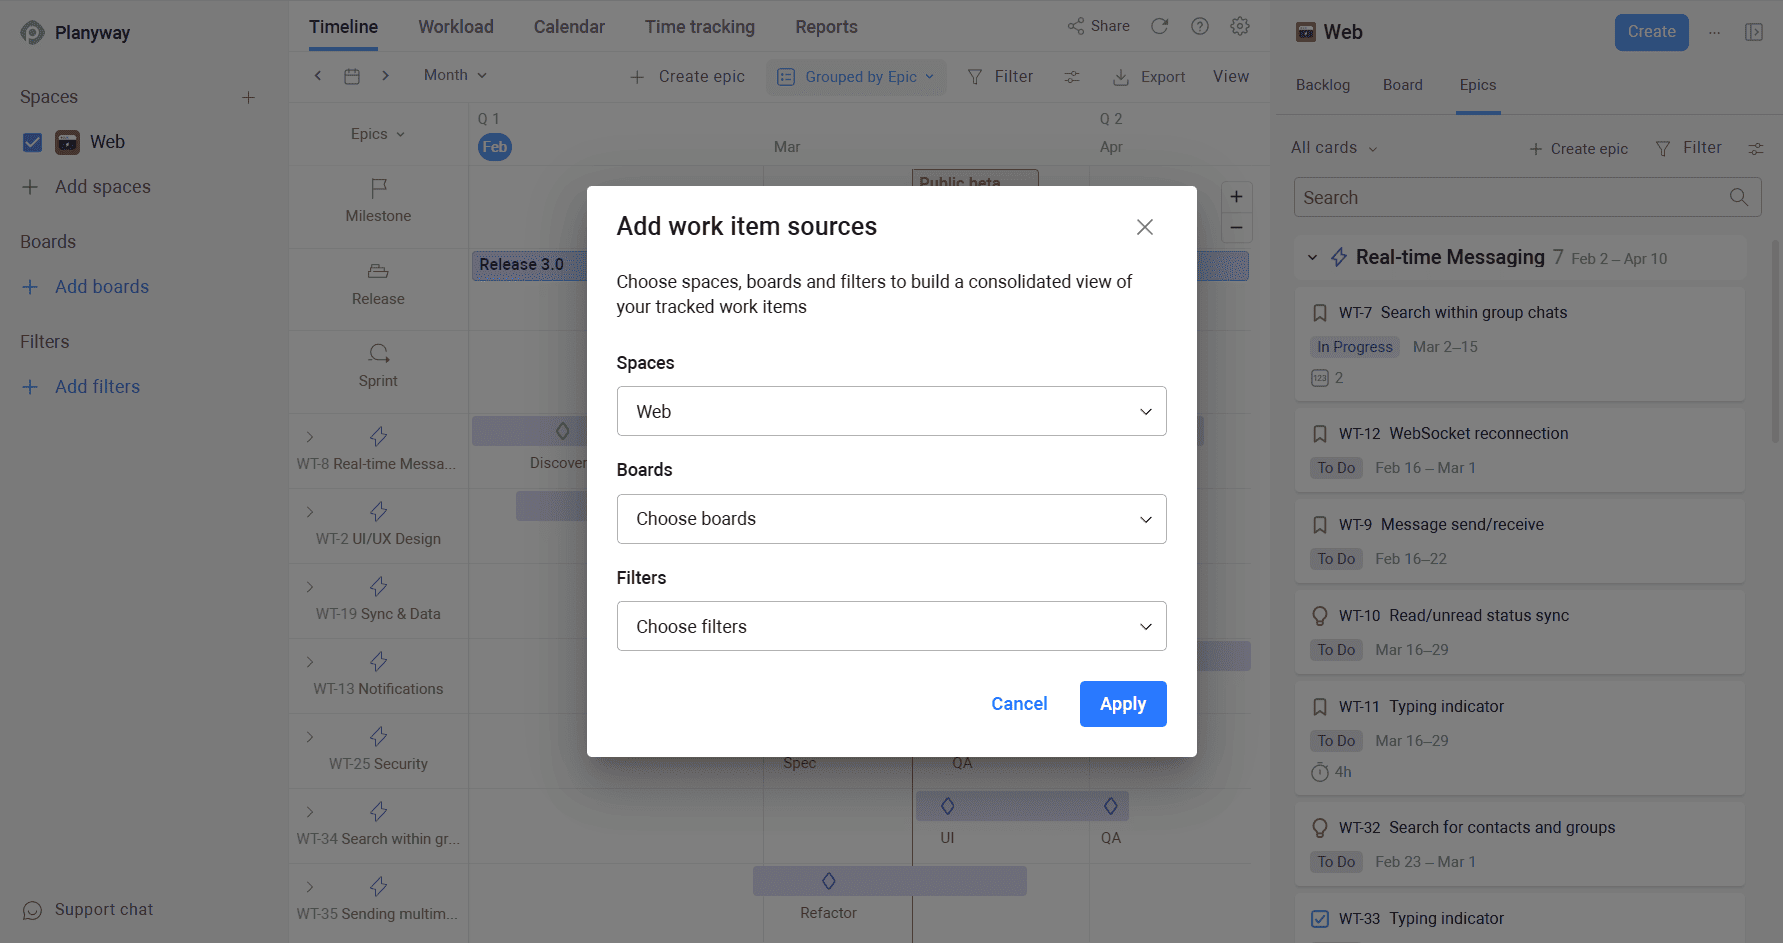
Step 3: Open the view or report that contains the data you want to export.
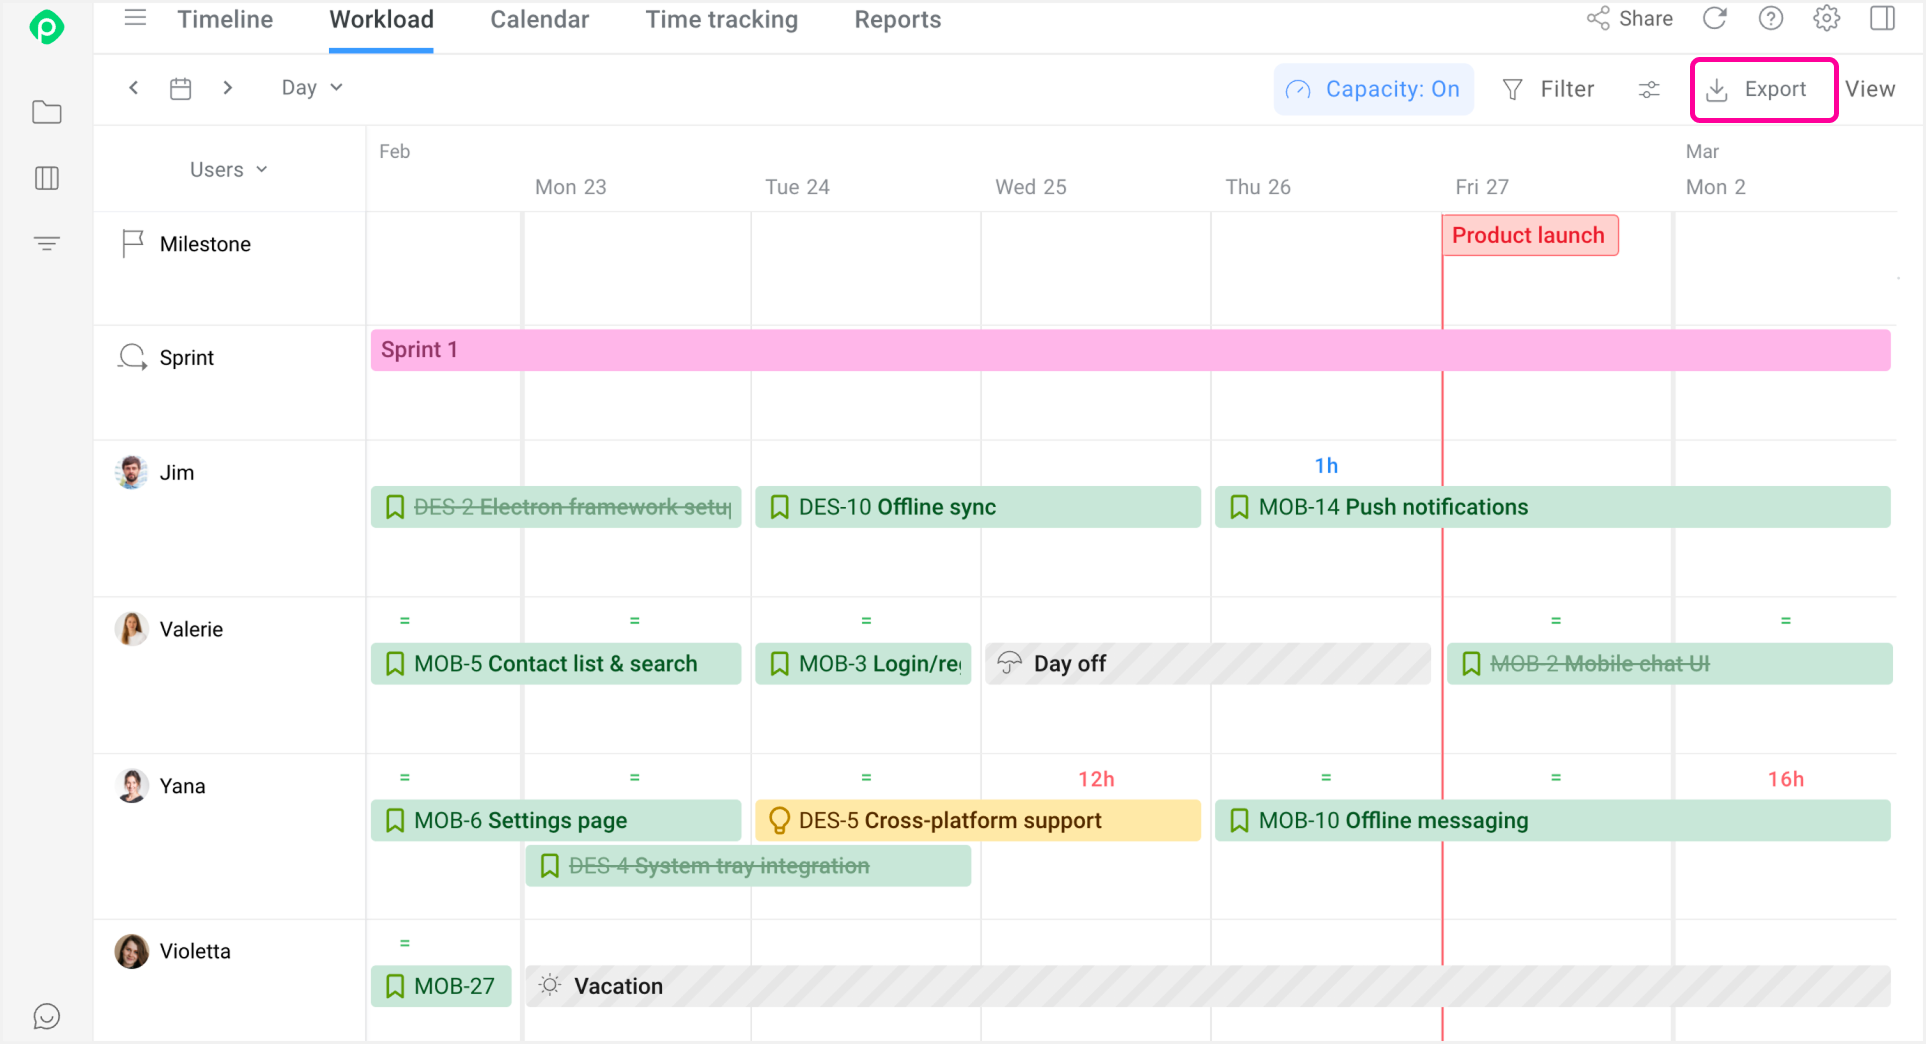
This can be a table, timeline, workload view, calendar, time logs, or a dedicated report depending on what you’re trying to analyze. For example, in the timeline view, you can export start/end dates, assignees, and epics.
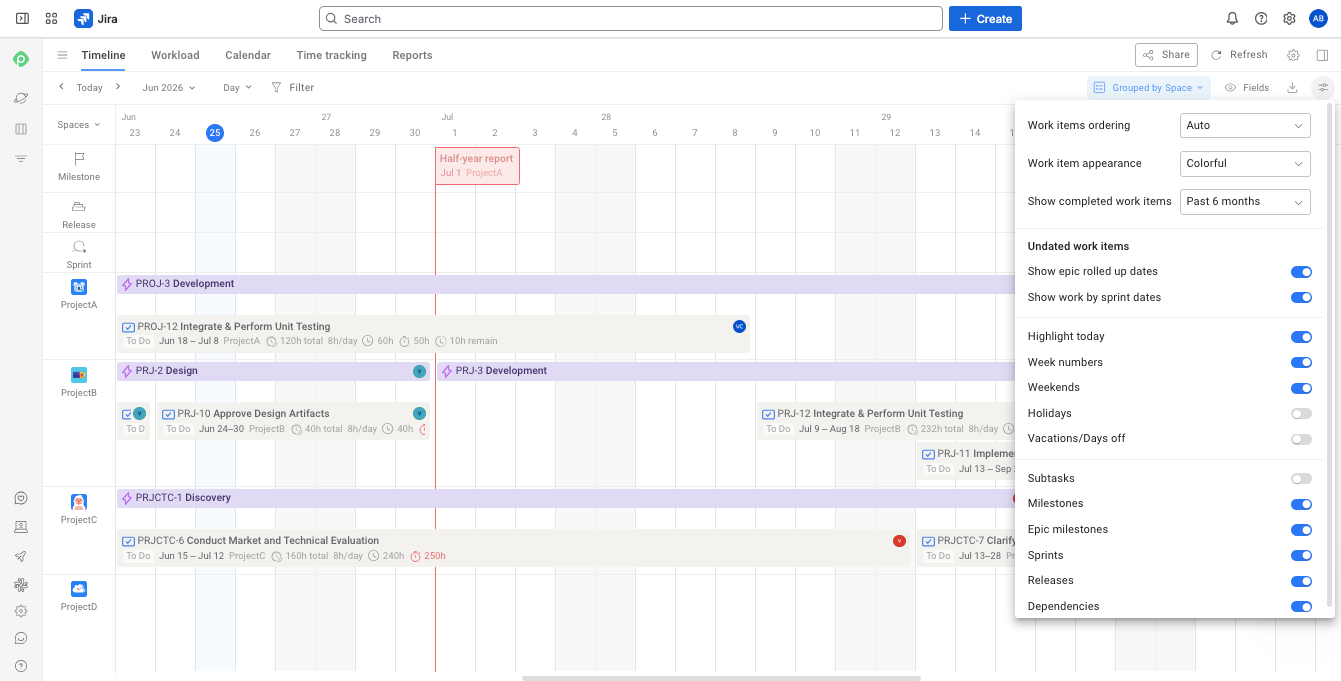
Step 4: Adjust view settings as needed.
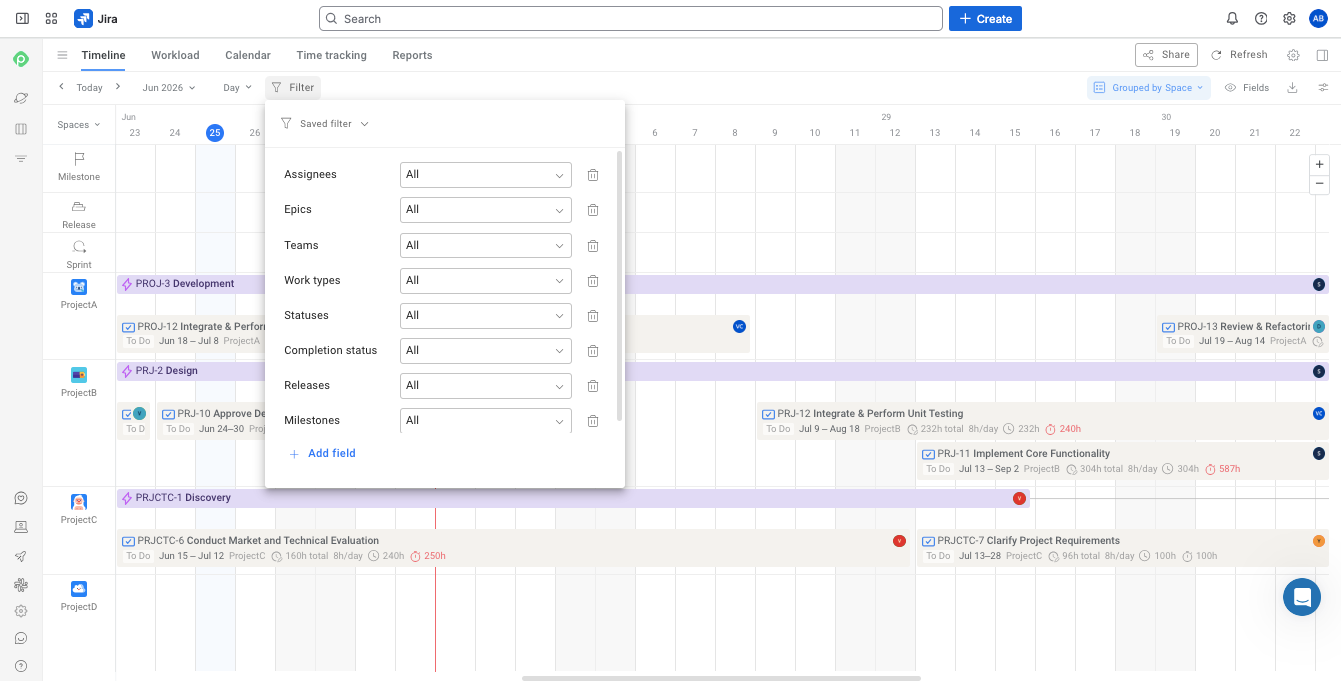
Step 5: Apply filters by assignee, issue type, status, epic, label, sprint, project, or date range.
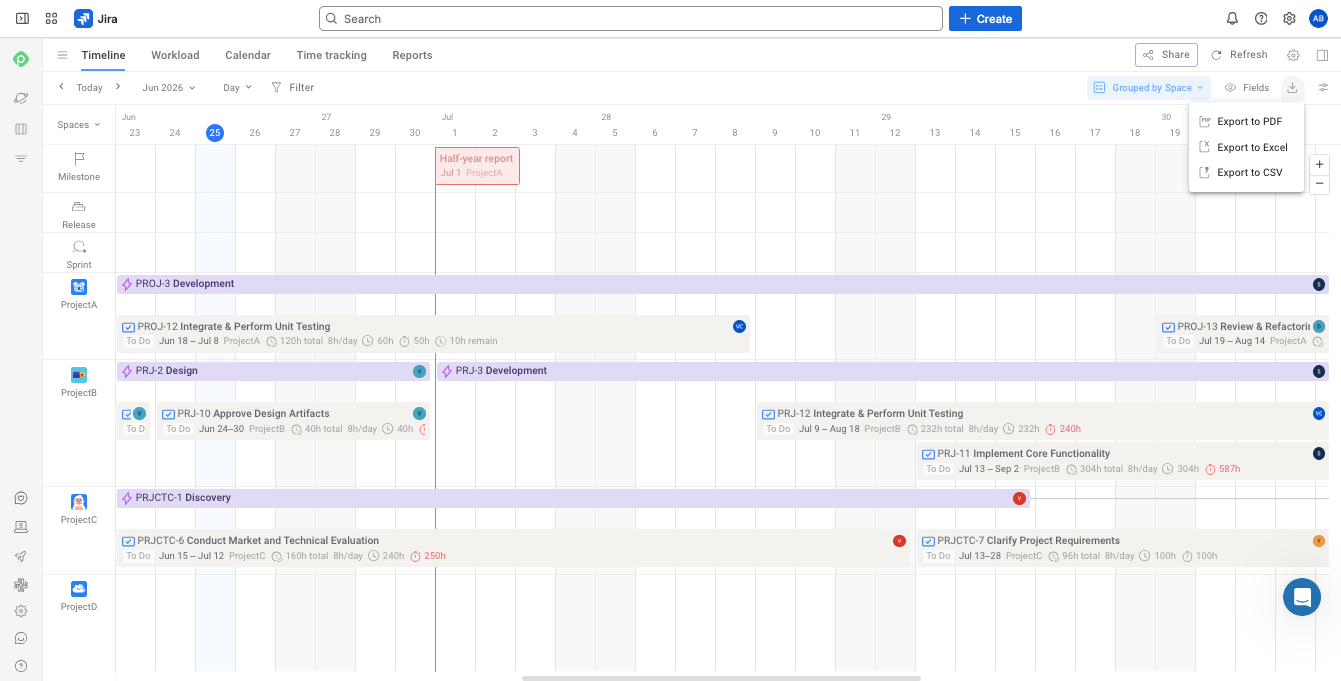
Step 6: Hit Export and choose Excel.
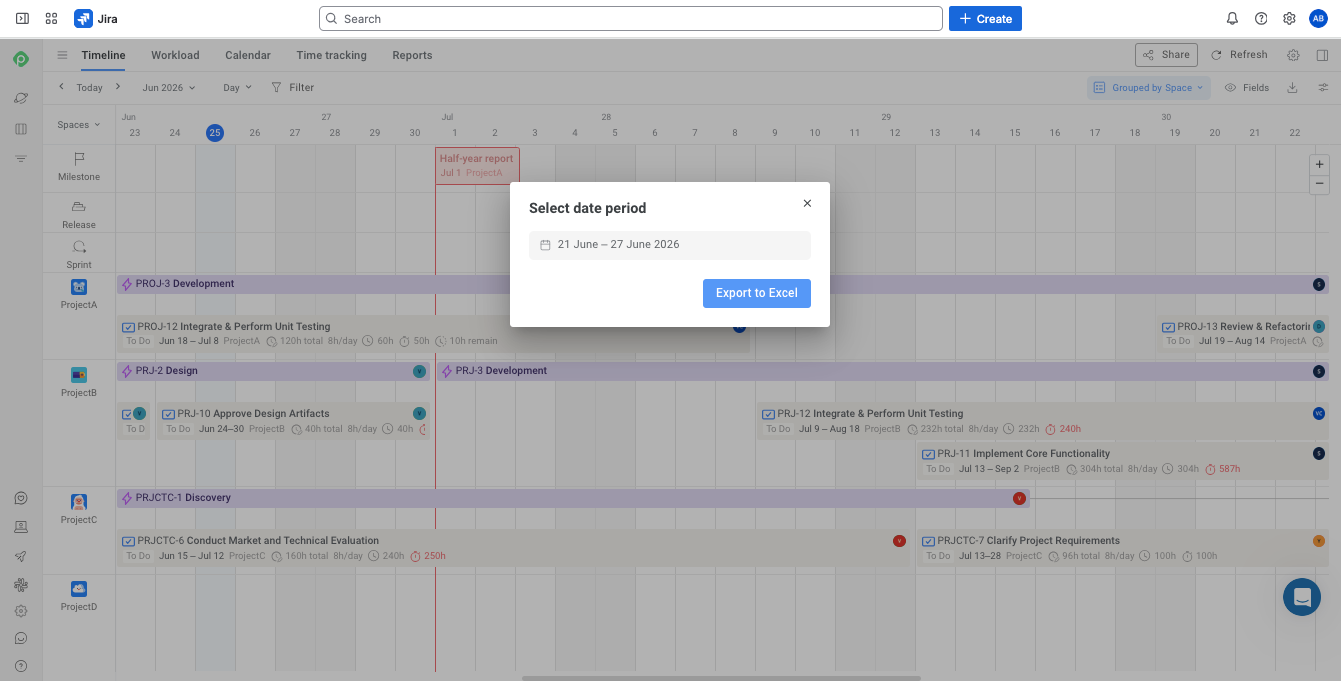
Step 7: Create the Excel file by selecting the date period of your report.
What data is included when you export with Planyway
Depending on the selected view or report, exports can include:
- Standard Jira issue fields (key, description, status, assignee, dates, etc.)
- Subtasks (optional — toggle in View Settings)
- Milestones and releases (optional)
- Time tracking data: worklogs, planned time, tracked time — including entries created directly in Planyway
- Workload context (who was assigned, across which projects)
- Data across multiple projects in a single export
Option 3: Integrating Jira Cloud with MS Excel add-in
Atlassian offers an official Jira Cloud for Excel add-in, available through the Microsoft Store. Unlike the CSV export, this creates a live connection between Excel and your Jira instance — so you can refresh data directly inside the Excel spreadsheet rather than downloading new files every time.
How it works
- Open a blank spreadsheet in Excel.
- Go to Home > Add-ins and search for “Jira Cloud for Excel” in the search bar.
- Install the add-in and click Get Started.
- A browser tab opens asking for a six-digit verification code — copy it from Excel and paste it in.
- Select the Jira Cloud URL you want to connect to and click Accept.
- Back in Excel, use the add-in panel to run JQL queries and pull Jira issues directly into your spreadsheet.
Once set up, you can use the =JIRA.JQL() function to populate cells with live issue data, and hit Refresh whenever you need to pull the current Jira data without re-exporting anything.
What data you can export with the MS Excel add-in
Standard issue fields that match your JQL query: issue key, summary, status, assignee, priority, dates, and most standard fields. The add-in supports custom fields as well, though the support varies depending on field type.
Key limitations to keep in mind
- The add-in doesn't work with Jira Data Center or Jira Server.
- You can pull data from Jira into Excel, but any edits you make in Excel won't push back to Jira.
- A number of users report authentication failures, broken JIRA.JQL() formulas that revert to _xldudf_JIRA_JQL, and connection drops after Office 365 updates. This usually requires reconnecting the add-in or clearing the add-in cache.
- Like the CSV export, you get a flat list — no timeline, no workload data, no sprint context built in.
- Worklogs and time entries aren't accessible through the add-in.
The add-in works well for teams that need a regularly refreshable snapshot of Jira issues in a shared Excel file. It's less useful when you need time data, workload context, or multi-project exports.
Option 4: Jira API (with or without automation tools )
If you’re feeling fancy and tech-savvy, you can use an API call for data exporting (but that’s usually overkill). This option requires you to write a JavaScript or Python script to vacuum data directly from Jira. Alternatively, you can use a no-code platform.
Such a powerful tool makes sense for teams that need to automate complex exports, build custom integrations, or extract data that the built-in export simply leaves out (like full comment threads or all worklog details going back months). That said, you do need either technical skills or a no-code tool to make it work.
How it works (with code)
Write a Python or JavaScript script that:
- Authenticates with your Jira instance using an API token.
- Sends a GET request to the /rest/api/3/search/jql endpoint with a JQL query.
- Paginates through results using the nextPageToken returned in each response.
- Processes the JSON response and writes it to an Excel file using a library like openpyxl or xlsxwriter.
How it works (without code)
No-code platforms like Zapier, n8n, or Make (Integromat) have pre-built Jira connectors that let you query the API visually and route the data to Excel, Google Sheets, or other destinations — no scripting required.
You can create a workflow that can automatically:
- Export Jira issues to Excel or Google Sheets.
- Sync Jira data on a schedule.
- Update spreadsheets when issues change status.
- Build recurring reports without manual exports.
What data is included when exporting via API
Virtually anything Jira stores: all issue fields, comments, attachments, worklog entries, change history, linked issues, subtask hierarchies, and more. The API gives you full access to the raw Jira data model and suits teams that need to customize exports or have recurring exports on autopilot. The tradeoff is that you have to structure and format it yourself — there's no "clean Excel" button at the end.
Why export Jira data to Excel? (what people actually do it for)
People usually export issues to Excel for one of two practical reasons: they need to share project data with someone who doesn't live in Jira, or they need to analyse and reshape it in ways Jira simply can't.
Not everyone you report to has a Jira login
Clients, finance, leadership, external partners — most of the people who need to see project data don't have a Jira license and wouldn't know where to look even if they did. Excel is the common ground: other users outside your organization can open and read a spreadsheet.
Tracking work and presenting it are two different jobs
Jira is built to manage work across large teams, and it stores a lot of information that reflects history rather than the current state. To surface that data in a form where a stakeholder can glance at it and immediately get the answers they need — is a separate job. Stakeholders want a snapshot, not a changelog, and Jira isn't really cut out for it.
The math behind reports usually lives outside Jira
Planned vs. actual time, delivery velocity, billing summaries, stakeholder snapshots — Jira stores the raw data for all of this but can't produce these outputs out of the box. That gap is almost always filled by Excel. The catch is that the data has to be clean enough to work with before you can do anything useful with it.
Which Jira-to-Excel export method is right for you?
As is often the case when choosing the right tool, different use cases call for different solutions. The best way to find yours is to look at how you actually need to analyze data and match that against what each export process offers. Most teams end up mixing approaches over time, and that's completely fine.
For a quick, one-off export with under 1,000 issues, the built-in CSV export is the simplest, most obvious path. If you're on Jira Cloud and want a refreshable spreadsheet connected to live data while time tracking or workload context is not that important, try the MS Excel add-in.
If structured, visual data is what you're after, a marketplace app (or add-on) like Planyway lets you make sense of everything before you export anything. In many cases, you'll find you need less cleanup in Excel, or no export at all.
For complete data extraction (comments, attachments, or backlogs beyond 1,000 issues) the REST API is the only option that covers everything, though it requires technical skills or a no-code platform to set up. And when the goal is scheduled, automatic data syncs to spreadsheets, a third-party automation tool like n8n or Zapier is your best bet.
FAQ
To export all issues to Excel or CSV, go to Issues > Advanced Issue Search (or use the issue navigator), run a filter or JQL query that covers all the issues you want, click Export, and choose Export Excel CSV (all fields). Keep in mind that Jira Cloud caps this at 1,000 issues per export. If you have more, you'll need to split your export into batches using JQL date ranges or project filters.
To export Jira tickets to Excel, go to the issue navigator, filter by the board's project, and export as CSV. You can't export a board view directly, but you can export the issues associated with a board.
The backlog isn't directly exportable as a view. To get your backlog into Excel, go to the issue navigator and filter by your project with a status filter that matches your backlog criteria, then select export Excel CSV.
For fully automated syncs on a schedule, tools like Zapier, n8n, or Make can push Jira data to an Excel file automatically based on a schedule or event. A less hands-off option is the MS Excel add-in, which pulls the latest Jira data into a connected spreadsheet whenever you click Refresh.
Kanban board views can't be exported directly. To export the issues on your Kanban board, use the issue navigator with a JQL filter that matches your board's configuration (usually project = YOURPROJECT AND issuetype in (Story, Bug, Task)).
Jira Cloud's built-in export is capped at 1,000 issues. To work around this, you can split your export into batches using JQL date filters (e.g., created >= "2025-01-01" AND created < "2025-04-01"), run each batch separately, and merge the resulting CSV files in Excel. For a cleaner solution, use the Jira REST API (which supports pagination past 1,000 issues) or a marketplace app that removes the cap.
In the issue navigator, use a JQL filter like sprint = "Sprint 42" AND issuetype = Story to isolate the issues you want, then export as CSV.