Create a Risk Management Plan with Our Risk Register Template
15 min read
Managing risks effectively can make or break a project. Understanding how to handle risks—both positive and negative—is a core skill for project managers, and it’s essential for ensuring your project is delivered on time and within budget. But what exactly is a risk? How do you manage it? And what's the best way to integrate a risk management plan into your project workflow?
In this guide, we’ll walk you through the essentials of project risk management, breaking down key steps and offering practical advice to help you create a strong risk management plan.
What is a Risk?
A risk is any uncertain event, either positive or negative, that could affect your project if it happens. While most people focus on the negative risks (threats), positive risks (opportunities) can also have a significant impact on a project.
Examples of Negative and Positive Risks:
- Negative Risk. Delays in project delivery due to unforeseen technical issues.
- Positive Risk. A highly skilled team member becoming available from another project earlier than expected, creating a potential opportunity for faster progress.
What is Risk Management?
Risk management is the process of identifying, analyzing, and responding to risks throughout the project’s lifecycle. The goal is simple: to maximize the probability and impact of positive risks while minimizing the probability and impact of negative ones.
Risk management planning happens during the project planning phase, ideally when your key project plans (such as the scope baseline, schedule baseline, and cost baseline) are already established. At this point, you will also create other important plans like your quality and procurement plans. 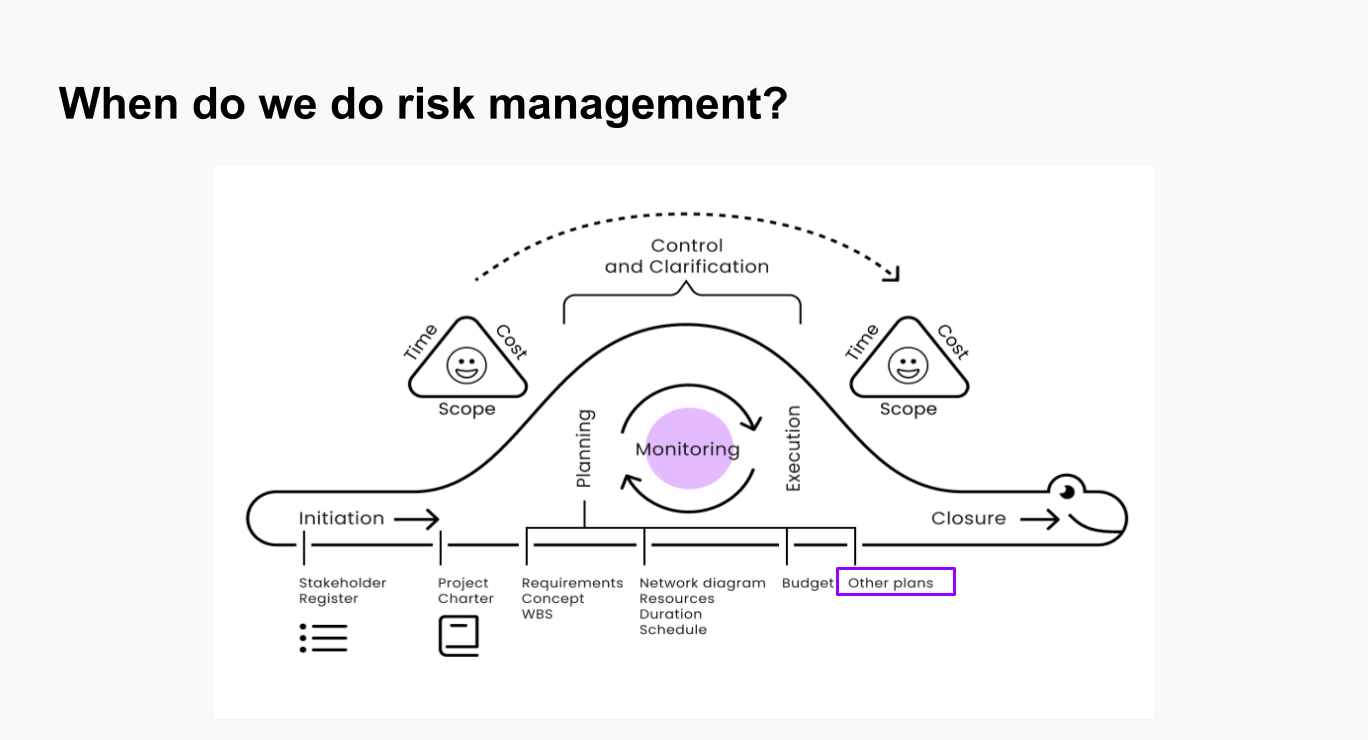
The 90/10 Rule in Risk Management
As a project manager, your goal is to neutralize 90% of the significant threats in your project. The remaining 10% of risks are generally known as "unmanageable" risks—risks that cannot be fully mitigated or anticipated. These could include severe weather events like hurricanes or systemic issues such as outdated equipment, where you have little control but can reduce the overall impact.
For instance, if your project involves construction with old, unreliable machinery, this equipment might break down unexpectedly, delaying the project. Though you can’t replace the equipment, you can create contingency plans to mitigate the impact of such breakdowns.
The Risk Management Plan: Step-by-Step
Project risk management revolves around the Risk Register, a key artifact that captures all risks identified in the project in the table view. The process typically follows these five steps:
- Risk Identification
- Qualitative Risk Analysis
- Quantitative Risk Analysis
- Risk Response Planning
- Risk Monitoring and Control
- Let’s dive deeper into each step:
1. Risk Identification
The first step is identifying potential risks and documenting them in a risk register. This process is often conducted through brainstorming sessions, either with the entire team or select stakeholders, including sponsors and customers. The more risks you identify, the better equipped you are to manage them.
It’s important not to list generic risks like "we might not meet the schedule," "we might exceed the budget," or "we might not meet scope." These are basic project management challenges. Instead, break down the risks into smaller, manageable risks to create a more actionable risk register.
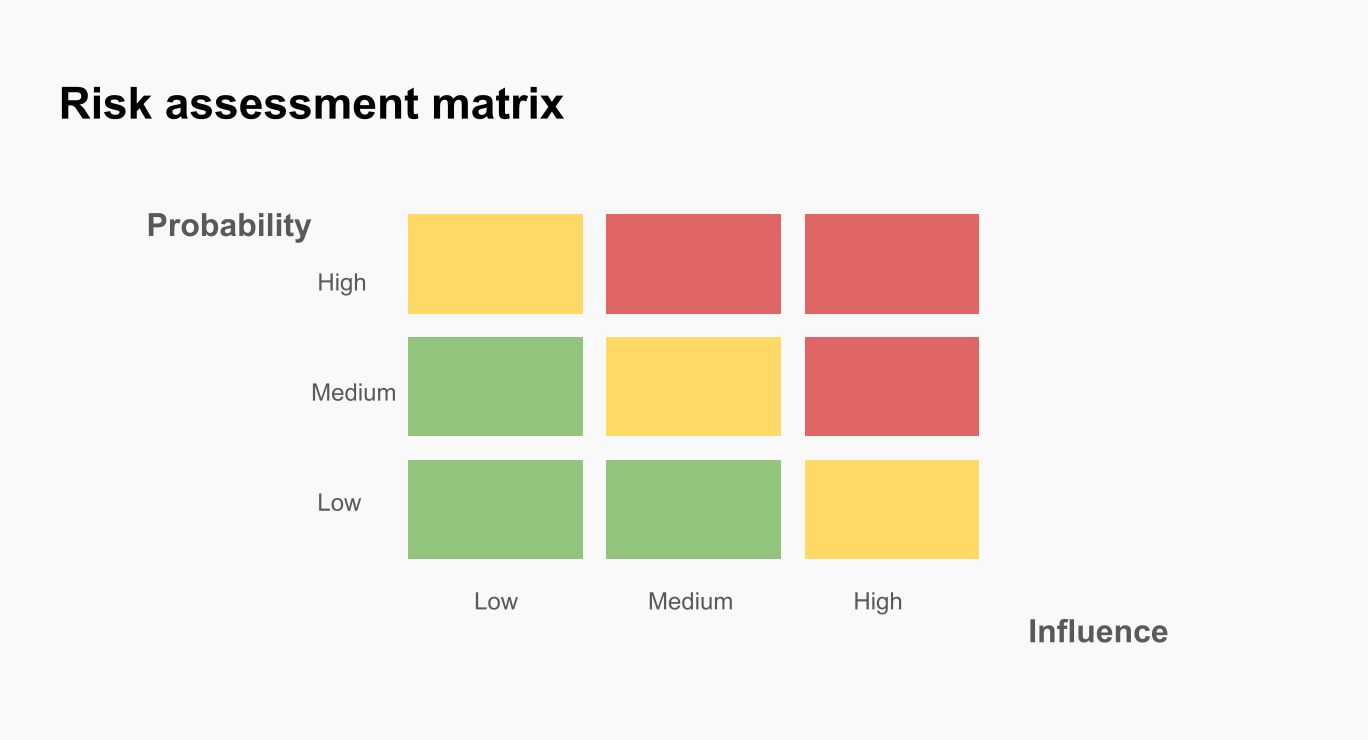
2. Qualitative Risk Analysis
Once you’ve identified risks, the next step is to prioritize them through qualitative analysis in the risk assessment matrix. This involves assessing the probability and impact of each risk, assigning values such as high, medium, or low to both factors. The result is a shortlist of significant risks to focus on, while lower-priority risks can be monitored periodically. Here’s how you can evaluate the importance of a risk:
- Probability. How likely is this risk to occur? High, medium, or low.
- Impact. What will the effect be if the risk occurs? High, medium, or low.
At the end of qualitative analysis, you’ll update the risk register by adding columns for probability, impact, and overall risk significance.
It’s important to handle both positive and negative risks during this process. Some teams choose to manage them separately in different risk registers for clarity.
3. Quantitative Risk Analysis
Quantitative analysis attempts to express risks in numerical terms, often using the Expected Monetary Value (EMV) formula. EMV is calculated by multiplying the probability of the risk by its potential financial impact.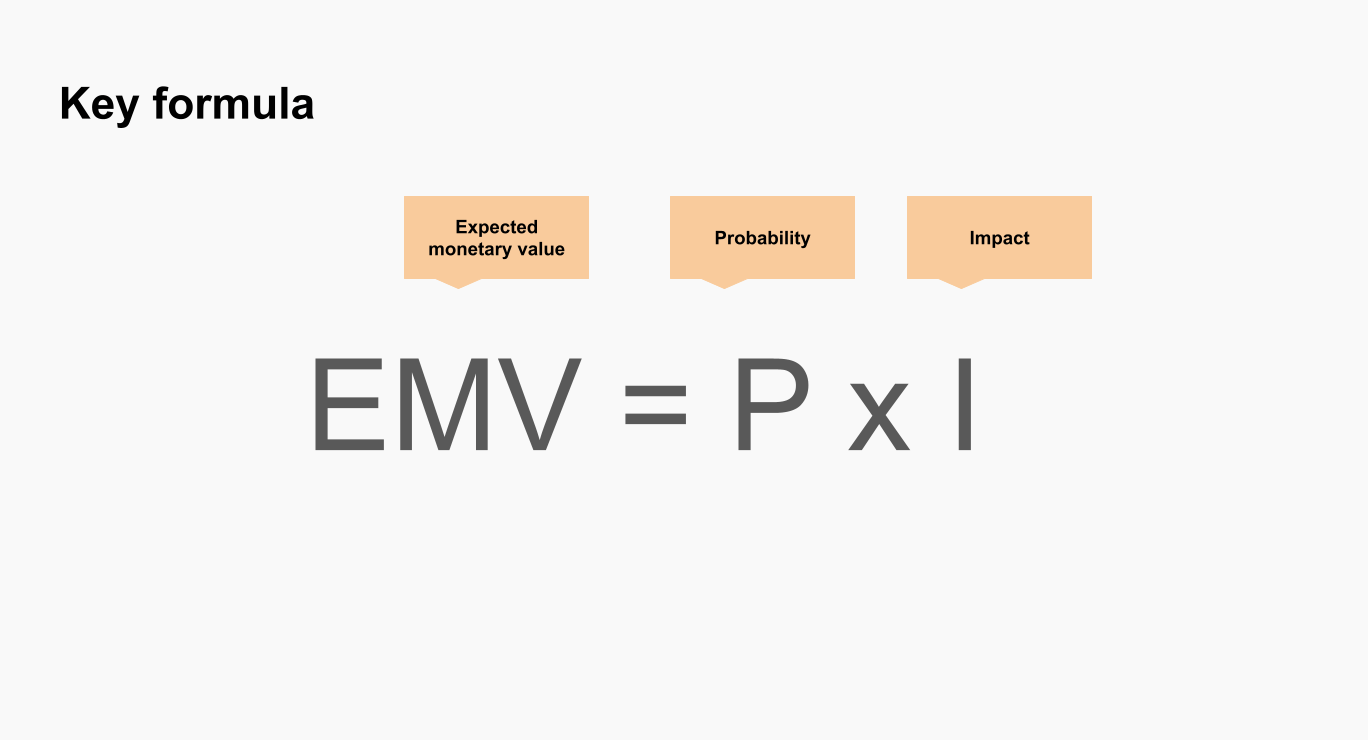
This quantitative analysis can refine the results of the qualitative assessment and help estimate the necessary risk reserves. You might also use this data to shorten your risk list, focusing only on the most significant risks.
For high-priority risks, take the analysis further with quantitative assessment. This step attempts to calculate the potential cost and time impact of each risk, giving you a more precise understanding of the financial implications.
What’s more, this formula helps you establish a risk reserve (budget set aside for dealing with risks that materialize).
Example: If there’s a 50% chance of a risk that will cost you $10,000, then the EMV is 0.5 x $10,000 = $5,000.
4. Risk Response Planning
Now, it’s time to figure out how you’ll respond to each risk. In this phase, you develop Plan A and Plan B for each risk, along with identifying triggers and risk owners.
- Plan A. The actions you take to prevent the risk from happening.
- Plan B. The actions you take if the risk actually occurs.
- Trigger. The event or indicator that tells you the risk is about to happen.
- Owner. The team member responsible for monitoring the risk and implementing the plan.
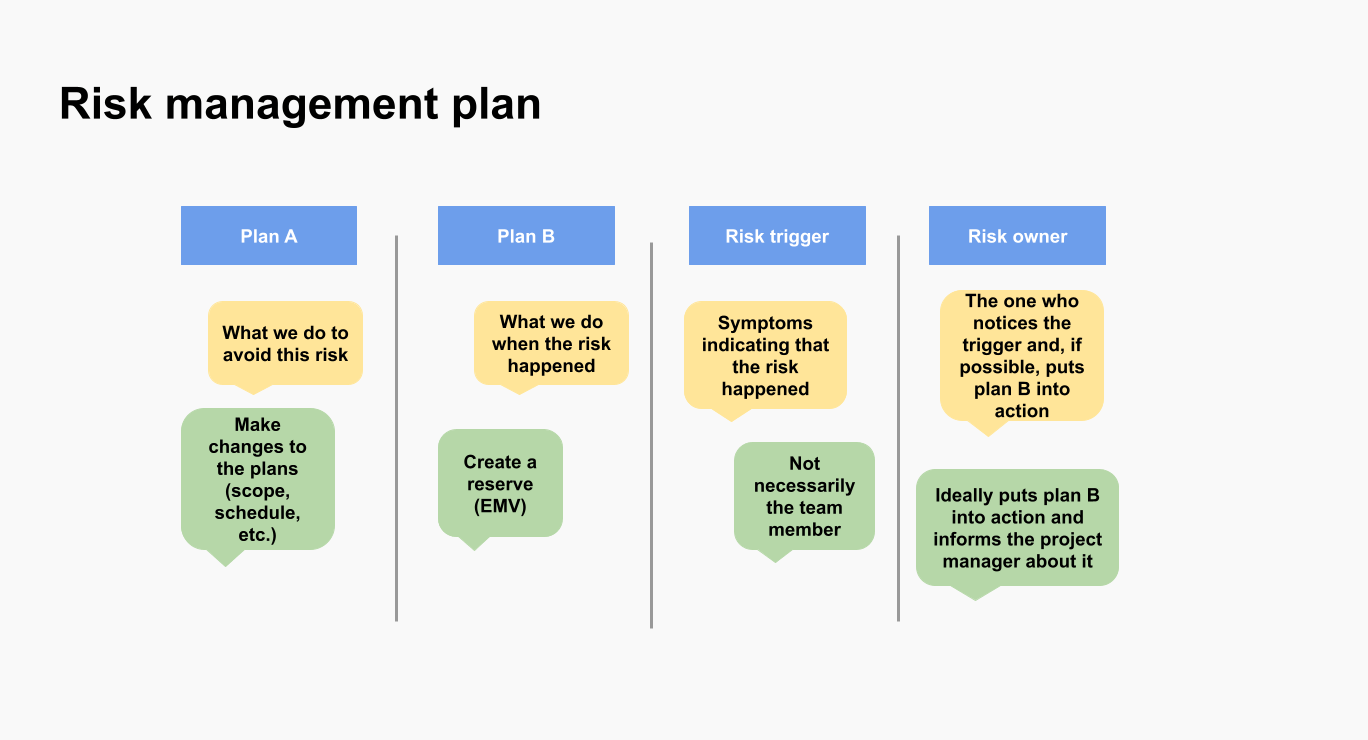
It’s essential to differentiate between the two plans. Actions in Plan A become part of the project plan, regardless of whether the risk materializes. Plan B, however, is a contingency plan that is only activated if the risk occurs.
5. Risk Monitoring and Control
Risk monitoring is a continuous process throughout the project. Risks evolve, new risks emerge, and old ones may change in significance. It’s critical to regularly update the risk register, assess whether risks have materialized, and adjust your reserves accordingly.
If a risk materializes and was not anticipated in the original risk register, a workaround is employed—essentially an improvised response to deal with the unexpected.
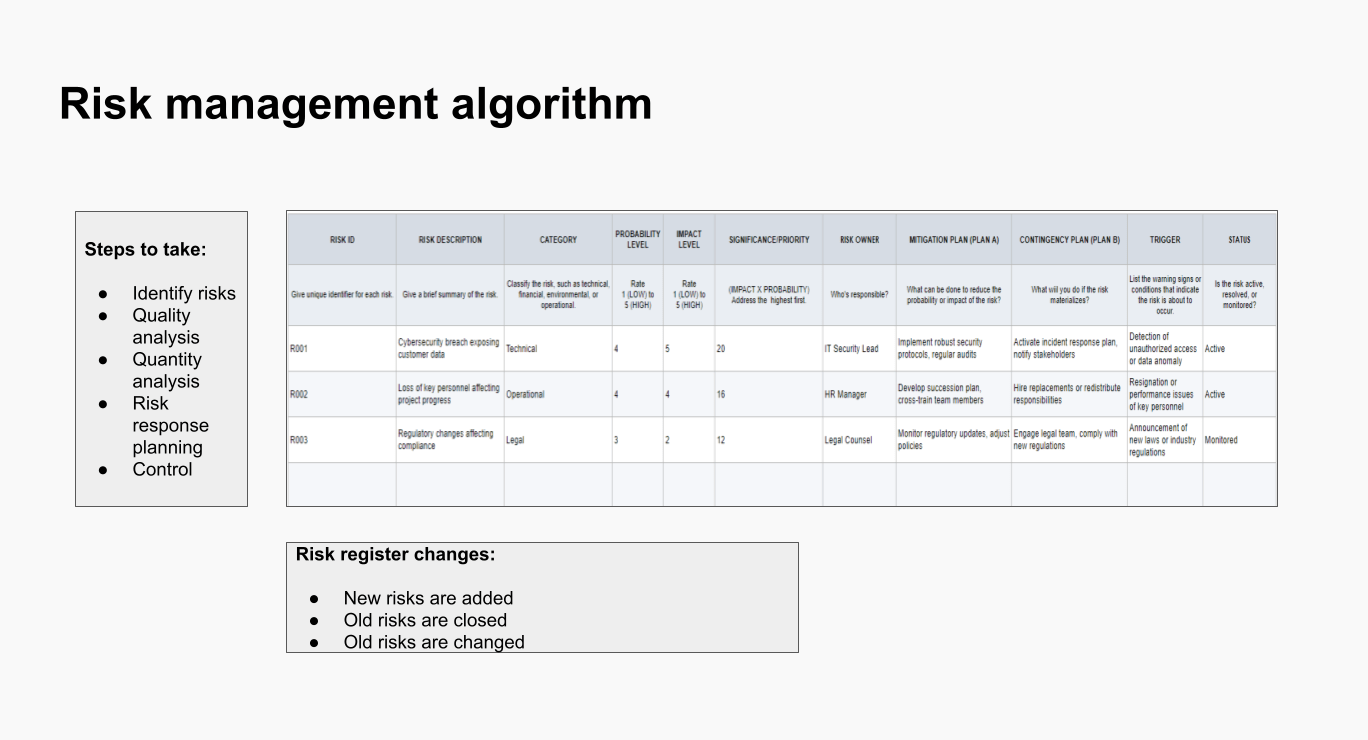
Risk Register Template
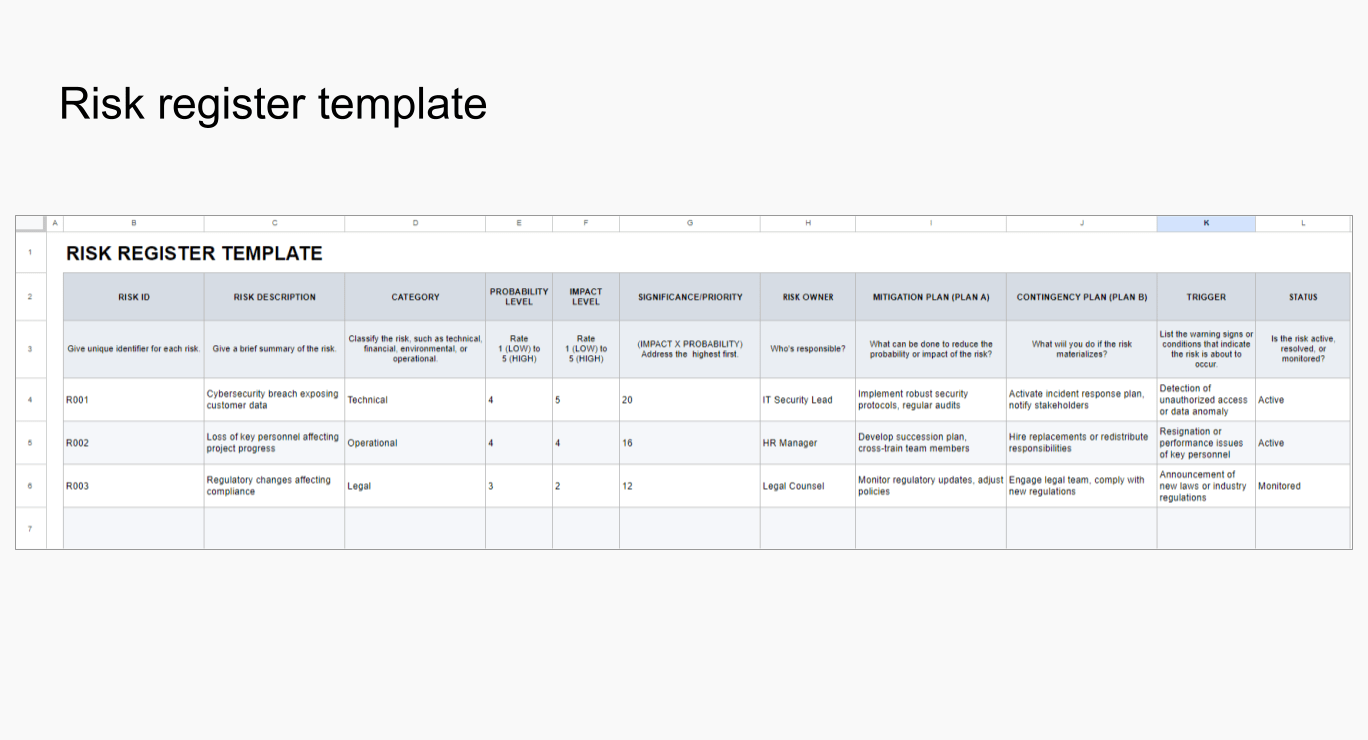
Now, let’s summarize everything mentioned before in a Risk Management Plan Example which is a centralized log for all identified risks. A typical risk register template includes several key fields:
- Risk ID. A unique identifier for each risk.
- Risk Description. A clear explanation of the risk and its potential impact.
- Category. Classification of the risk, such as technical, financial, environmental, or operational.
- Probability. The probability of the risk occurring, often rated as high, medium, or low.
- Impact. The severity of the risk’s potential effect on the project, also rated on a high-to-low scale.
- Significance/Priority. This field combines the probability and impact to give an overall risk score or priority level. Risks with high significance should be addressed with urgency, while low-significance risks may require minimal attention.
- Risk Owner. The individual responsible for monitoring the risk and implementing response plans.
- Mitigation Plan (Plan A). Actions to reduce the probability or impact of the risk.
- Contingency Plan (Plan B). Reactive steps to take if the risk materializes.
- Trigger. Warning signs or conditions that indicate the risk is about to occur.
- Status. The current status of the risk—whether it is active, resolved, or monitored.
By regularly updating this register and reviewing it during meetings, the team ensures they remain proactive in managing both positive and negative risks. This document also allows for better communication and accountability, as all stakeholders can easily access and understand the risks and planned responses.
Conclusion
A well-managed project risks fewer disruptions and has a greater chance of success. By identifying, analyzing, and controlling risks, you can create a stable foundation for your project, ensuring it stays on course even in the face of uncertainty.
At Planyway, we believe that strong risk management starts with the right tools. With our project management and timeline software, you can keep your risks in check, track them with ease, and make sure your team is always prepared for the unexpected.
About the Author
Violetta Chernobuk is a skilled content strategist and writer at Planyway, specializing in crafting insightful and engaging articles on productivity and project management. With her keen eye for detail and a deep understanding of user needs, Violetta ensures that every piece of content is both informative and inspiring, helping readers optimize their workflows and stay ahead in their projects.