
Jira Capacity Planning: Best Way to Plan Teamwork Effectively
March 22, 2023 · 12 min read
Each project manager knows that understanding team capacity is truly challenging. Whenever a new piece of work comes in, you’re always faced with the same question: Do we have enough hands to accomplish it?
In this article, we’ll explore real-world challenges project managers face when implementing capacity planning in Jira, share expert insights, and provide comparisons of capacity planning tools tailored to different use cases.
Best Jira Capacity Planning Tools in 2025
- Planyway for cross-project team management
- Activity Timeline for event scheduling
- Capacity Tracker for single-project teams
What is capacity?
Work capacity refers to the ability of an individual, team, or organization to perform a certain amount of work within a given period. It’s influenced by skills, resources, work processes, and worker engagement. Understanding capacity is crucial for businesses to optimize workflows and ensure that resources are utilized efficiently.
How to do capacity planning in Jira?
If you’re wondering how to plan team capacity within Jira — explore the possibilities of Jira marketplace, set up and test out some of Jira plugins for resource management.
Such capacity planning tools are software applications that help organizations manage their resources effectively by forecasting demand and planning capacity accordingly. Here are some alternative best tools for Jira capacity planningcapacity planning tools for Jira workload management worth mentioning.
Tools for Capacity Planning in Jira
1. Planyway
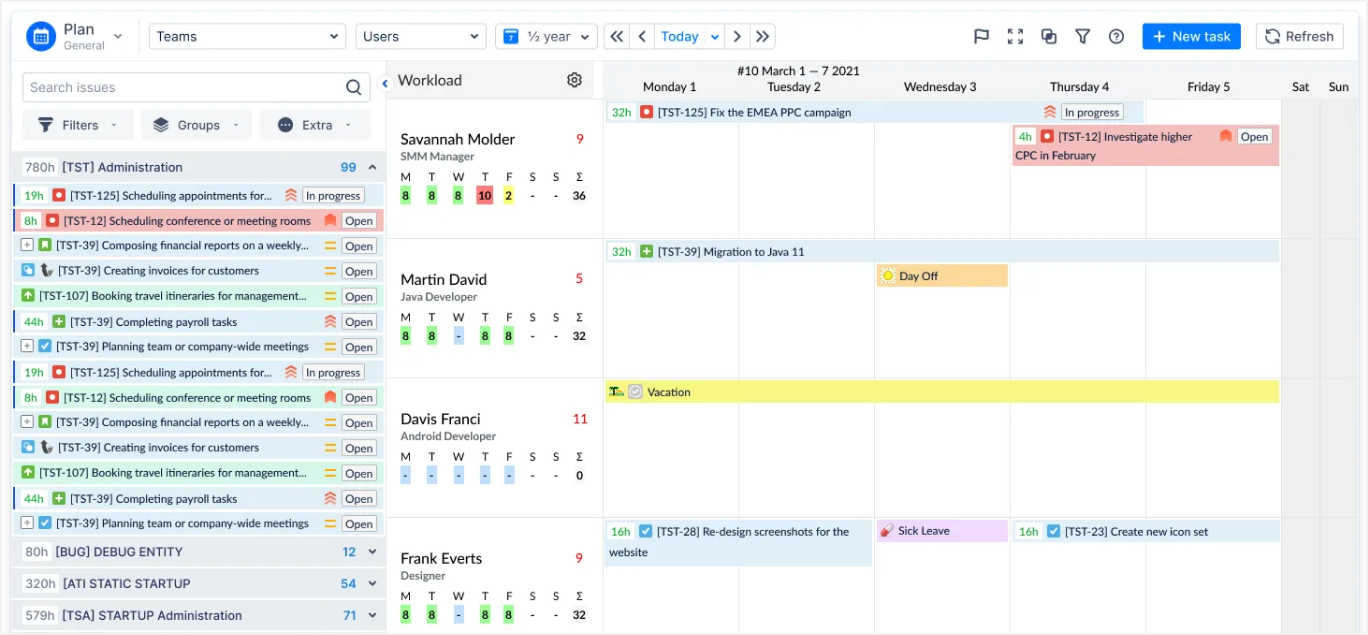
Planyway for Jira is an ideal tool for Jira capacity planning for teams that brings more visibility into your Jira workflow: roadmap, multiple-project portfolio, calendar, time tracking, and of course workload view.
Start Jira resource capacity planning with Planyway just in 4 steps:
1. Visualize teamwork
Choose the Timeline tab, and group it by user. Drag and drop existing Jira issues from the board to the timeline onto the appropriate dates and right lanes to assign issues as well.
2. Manage teams across projects
In case your team works across projects, just connect all required projects in the main menu and see all issues assigned to your team members together on a single timeline.
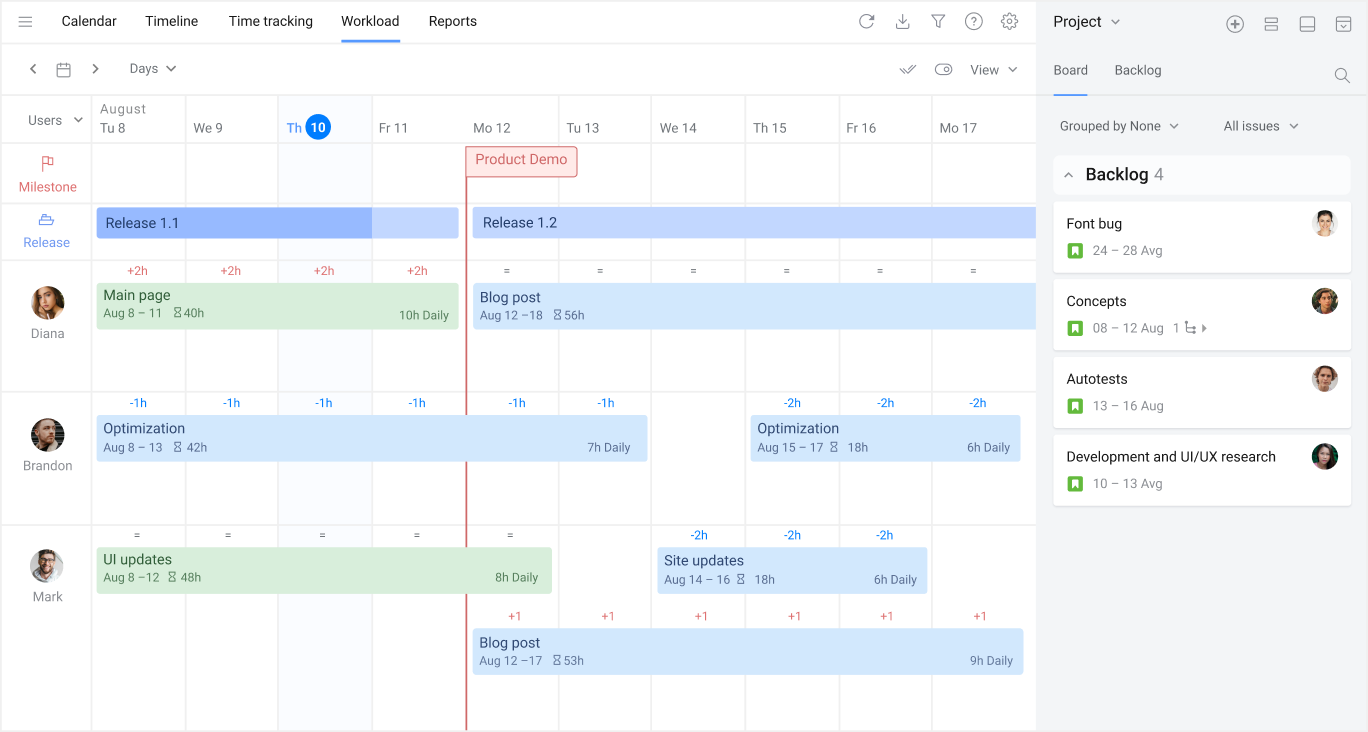
3. Manage workload
Simply by stretching the card to the right or left on the Jira roadmap, find the optimal Jira workload for everyone. Hours are recalculated based on the daily maximum capacity and estimation added earlier.
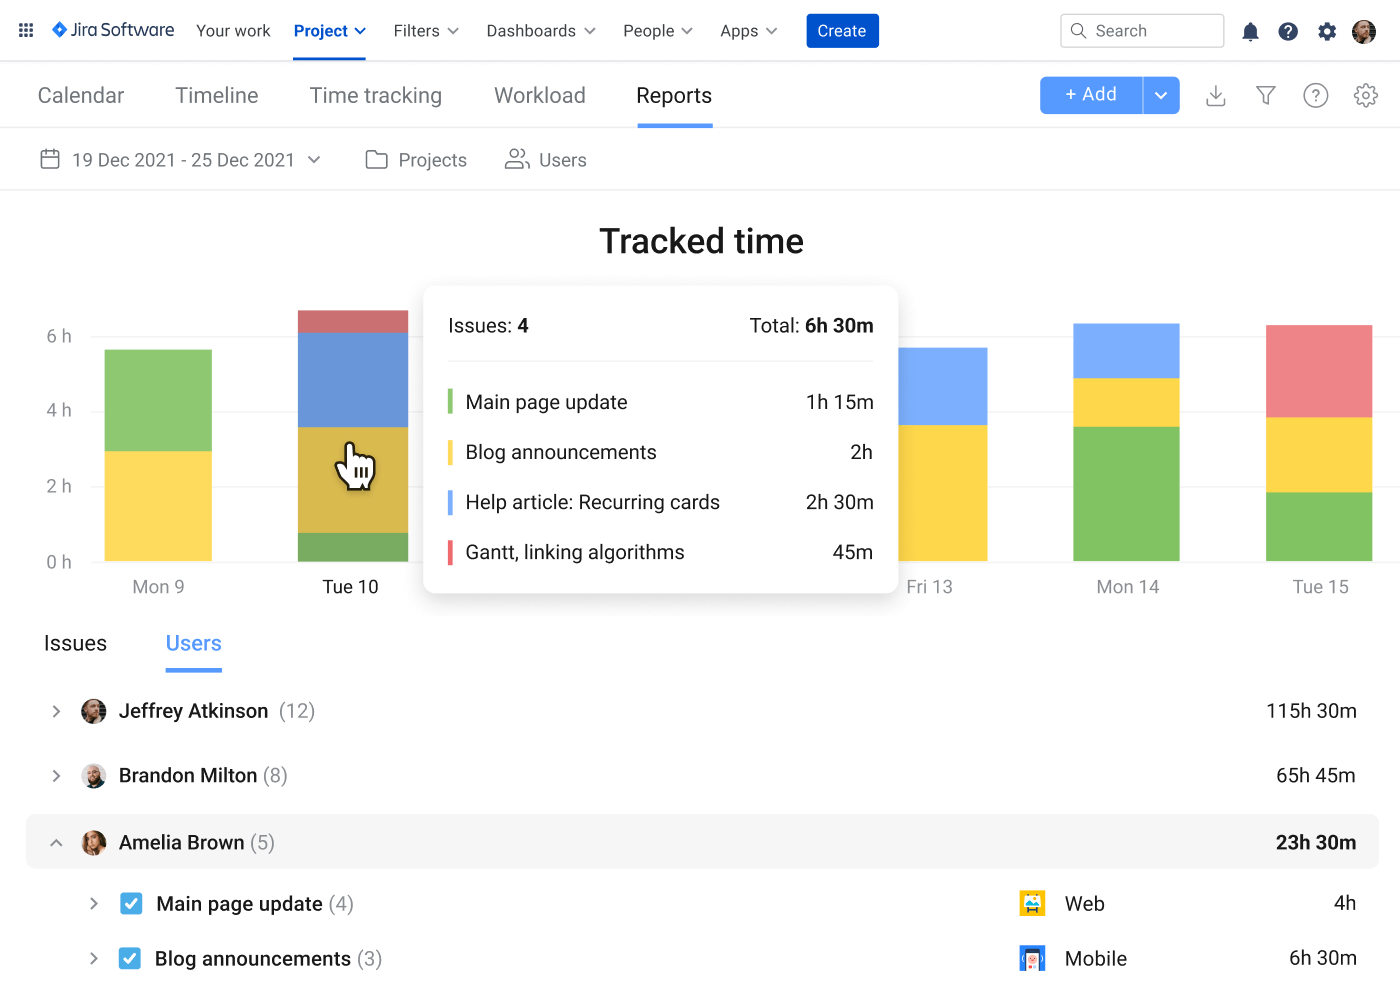
4. Build reports
If you need to get the representation of what exactly your teammates were working on, you can visualize this data in Reports and, if needed, export it to the Excel file.
Case Study: Acme Software Solutions
Acme Software implemented Planyway to manage its growing project portfolio. By visualizing team workloads and tracking effort estimates, the company reduced project delays by 25% and improved team satisfaction scores by 18%.
2. Activity Timeline: Capacity Planning and Time Tracking for Jira
An activity timeline tool is an application that allows you to create a visual representation of a series of events or activities in Jira over a specific period of time. It can be used for project management, event planning, scheduling, or personal tracking.
Activity timeline tools typically allow you to input data such as dates, names, descriptions, and images for each activity or event. The tool then creates a timeline that displays the events in chronological order, with labels, markers, and other visual cues to help you identify important milestones or changes over time.
3. Capacity Tracker by Inprowiser Engineering
With this capacity tracker, you can easily distribute and allocate work among teams. Identify and adjust work allocation based on the availability of the team members. The app is good enough (generally), except one missing feature – planning, tracking, and reporting across multiple projects. Therefore, if you need to work on several projects while reporting to one manager, this tool isn't for you.
Capacity tracker has a public API, that allows developers to access and interact with a company's software or platform in a standardized way, and can be used to create new applications or integrate existing applications with the platform's data or functionality.
What is a capacity planner?
A capacity planner is a professional tool that helps organizations optimize resource utilization to meet current and future demands. It analyzes data, forecasts resource needs, and evaluates the impact of infrastructure or business changes, assisting IT, operations, engineering, and business teams in managing resources effectively.
Capacity planning tools gather, visualize, and analyze data to predict future needs, identify bottlenecks, and ensure smooth operations, playing a vital role in aligning resources with organizational goals.
What’s capacity planning?
Capacity planning is the process of determining and optimizing the resources an organization needs to meet demand, ensuring work is distributed effectively across teams and projects to maintain balanced workloads and timely delivery. It is crucial for businesses facing growth, seasonal fluctuations, or new initiatives, helping to prevent overinvestment or underinvestment in resources.
The process involves two key stages: assessing team capacity to understand workload limits and planning to prioritize and schedule tasks, ensuring deadlines are met while avoiding team burnout or underutilization.
Best Practices for Effective Capacity Planning in Jira
We’ve created a checklist to simplify capacity planning software adoption in Jira.
Preparation
Define clear goals for adopting capacity planning in Jira (e.g., workload optimization, project timeline accuracy, reducing burnout).
Identify your team's specific needs (e.g., cross-project visibility, time tracking, dependency management).
Choose the right capacity planning tool for Jira (e.g., Planyway, Activity Timeline, or Capacity Tracker).
Gather data on current workloads, team availability, and resource utilization.
Tool Setup
Install the chosen capacity planning plugin from the Jira Marketplace.
Configure permissions and access levels for your team members.
Sync projects, boards, and tasks with the plugin for centralized planning.
Define the daily working hours and workload limits for each team member.
Training and Onboarding
Provide an overview of capacity planning concepts to your team.
Conduct a training session on using the selected tool, covering features like timelines, workload views, and reports.
Set up timelines or roadmaps for visualizing team capacity and task distribution.
Input effort estimates (e.g., hours or story points) for all tasks in Jira.
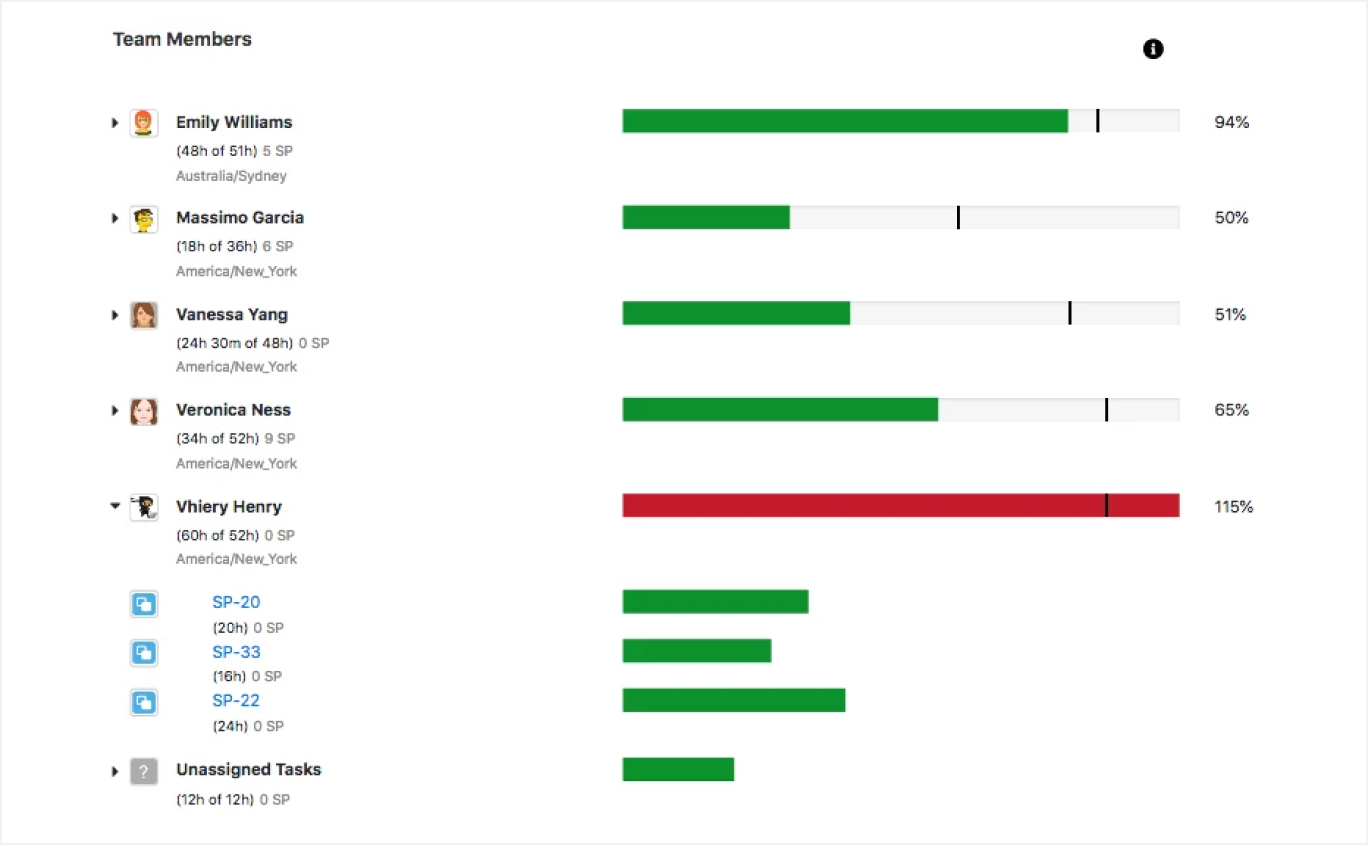
Identify bottlenecks or over/under-utilized resources using workload indicators.
Adjust task assignments to balance workloads effectively.
Monitoring and Optimization
Regularly review team workloads and timelines to ensure alignment with project goals.
Use reports to track team performance and identify areas for improvement.
Incorporate tracked time and previous estimates into future planning for better accuracy.
Schedule regular retrospectives to gather feedback on the tool’s effectiveness.
Continuous Improvement
Stay updated on new features or integrations offered by your chosen capacity planning tool.
Periodically reassess your team's needs and adjust tool configurations accordingly.
Benefits of Jira Capacity Planning
Resource capacity planning in Jira might not seem easy when you start, especially if you’re used to enthusiastically saying “yes” to each new request. But, if you get into this habit, it can bring you numerous benefits:
1. Prevent team burnout
When there is a lack of visibility into how much work a team can accomplish, the chances of overburdening are high. Taking steps to get a clear idea of your actual Jira team capacity means that you can prevent this risk.
2. Set realistic deadlines
Underestimating efforts is a common problem, but having details about team availability can help you manage deadline expectations more accurately and closer to reality.
3. Detect skill shortage
Capacity planning doesn’t just relate to time, it also relates to skills. It will help you find an easier spot if projects require skills that your team doesn’t have.
Planning in Jira for free
With new projects coming up, it’s easy to fall into the trap of taking a task on board first and then realize that your team can not make it happen within the set timeframe. With capacity planning, you can work backwards: starting with a clear view of how much your team can accomplish, and then planning all the work from there.
Avoid the guess game about the team's bandwidth, set realistic deadlines, and prevent team’s burnout with best tools for Jira capacity planning like the Planyway addon.
Expert Insights
John Doe, a certified Agile coach, states:
“Capacity planning in tools like Jira is not just about managing resources but also about building a predictable delivery model. When teams see their workload and capacity visualized, it’s easier to set realistic expectations and avoid overcommitting.”
Try Planyway for free for 14 days — with all premium features. Make the right choice for you and your team, or stay on the free version as long as you need.
Quick Overview FAQ: Jira Capacity Planning
What is Jira capacity planning?
- Jira capacity planning is the process of managing and allocating resources within Jira to ensure that teams can meet their project deadlines and handle their workload effectively. It involves tracking team availability, workload distribution, and setting realistic timelines.
Why is Jira capacity planning important?
- Effective capacity planning ensures that teams are not overloaded, helping prevent burnout and missed deadlines. It allows managers to allocate tasks efficiently, balance workloads, and optimize team productivity.
How do I set up Jira for capacity planning?
- Setting up Jira for capacity planning involves configuring your team’s workflows, defining work allocation rules, and integrating tools like Planyway for visualizing team capacity. You can also customize issue types and labels to track the effort required for each task.
What are the best tools for Jira capacity planning?
- Someof the top tools for Jira capacity planning include Planyway, BigPicture, and Tempo Planner. These tools help with visualizing team capacity, managing resources, and aligning tasks with team availability.
How can I track team capacity in Jira?
- You can track team capacity in Jira by setting up custom fields for effort estimates, using Jira's workload management features, and visualizing capacity through integration tools like Planyway. Additionally, setting up clear goals and sprint planning can help manage workload distribution.
Can Jira capacity planning help with resource allocation?
- Yes, Jira capacity planning is an effective way to allocate resources. By tracking your team’s availability and workload in real-time, you can ensure that tasks are assigned based on team members' strengths and availability, leading to more efficient resource usage.
How can I handle resource overload in Jira?
- To manage resource overload, you can use Jira’s workload management tools to monitor team availability. If someone is overloaded, you can reassign tasks, adjust priorities, or add additional resources to ensure deadlines are met without compromising quality.
Can I integrate Jira with other tools for better capacity planning?
- Yes, Jira can be integrated with several tools such as Planyway, BigPicture, and Tempo to enhance your capacity planning. These integrations provide features like resource visualization, automated task assignments, and capacity forecasting.
What is the difference between Jira capacity planning and sprint planning?
- Sprint planning in Jira focuses on managing and allocating tasks within a set sprint (typically 1-2 weeks), while capacity planning takes a broader view of overall team resources, availability, and workload beyond just one sprint.
How can I optimize capacity planning in Jira for agile teams?
- For agile teams, capacity planning in Jira can be optimized by breaking down tasks into manageable user stories, setting realistic estimates, and regularly reviewing team velocity to ensure that workloads are balanced and achievable.
